background image


-5- 

• Disassembly of handle (A).(B) set 

• Removal of the base ass'y 

[74]{71} 

[42]{39} 

[77]{74}


[38]{35}


[48]{45}


[47]{44}


[46]{43}


[51]{46}


[54]{51}


{48}


[56]{53}


[55]{52}


[53]{50}


[52]{49}


[38]{35}


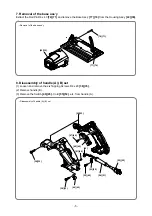
7. Removal of the base ass’y 

Extract the Roll Pin D6 x 40 

[74]{71}

 and remove the Base Ass’y 

[77]{74}

 from the Housing Ass’y 

[42]{39}


8. Disassembly of handle (A).(B) set 

(1) Loosen and remove the six Tapping Screws D4 x 20 

[38]{35}

.  

(2) Remove handle (B).


(3) Remove the Switch 

[48]{45}

, Cord 

[55]{52}

, etc. from handle (A). 

Summary of Contents for C 7BUR

Page 1: ...tightening torque 8 Checking after reassembly 9 Wiring diagram 10 STANDARD REPAIR TIME UNIT SCHEDULES 12 CONTENTS Page C 7UR Overseas Sales Division PRODUCT NAME Hitachi 184 mm 7 1 4 Circular Saw Models C 7UR C 7BUR For the USA and Canada only Hitachi 185 mm 7 1 4 Circular Saw Model C 7UR Except for the USA and Canada CONFIDENTIAL Dec 2017 ...

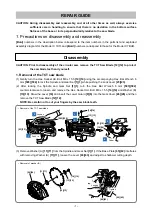
Page 2: ...aw Blade 12 12 to protect the saw blade teeth and yourself 1 Removal of the TCT saw blade 1 Gently turn the Hex Socket Hd Bolt M8 x 15 5 14 14 using the accompanying Hex Bar Wrench 6 mm 503 502 to lock the Spindle and Gear Set 1 1 while pushing the Lock Lever 23 23 2 After locking the Spindle and Gear Set 1 1 turn the Hex Bar Wrench 6 mm 503 502 counterclockwise to loosen and remove the Hex Socket...

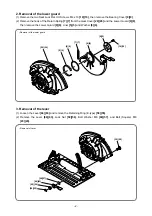
Page 3: ...9 9 2 Remove the hook of the Return Spring 7 7 from the Gear Cover 26 26 and the Lower Guard 8 8 then remove the Lower Guard 8 8 Liner 5 5 and Washer 6 6 3 Removal of the lever 1 Loosen the Lever 66 63 and remove the Retaining Ring E type 58 55 2 Remove the Lever 66 63 Lock Nut 59 56 Bolt Washer M8 60 57 and Bolt Square M8 29 29 7 7 8 8 9 9 10 10 58 55 59 56 66 63 60 57 29 29 ...

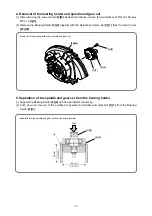
Page 4: ...s described above loosen the two Seal Lock Flat Hd Screws M5 x 14 3 3 2 Remove the Bearing Holder 2 2 together with the Spindle and Gear Set 1 1 from the Gear Cover 26 26 5 Separation of the spindle and gear set from the bearing holder 1 Support the Bearing Holder 2 2 with an appropriate tubular jig 2 Push down on the end of the spindle to separate the Spindle and Gear Set 1 1 from the Bearing Hol...

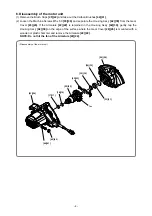
Page 5: ...n Brushes 44 41 2 Loosen the Machine Screws M5 x 50 39 36 and separate the Housing Ass y 42 39 from the Gear Cover 26 26 If the Armature 22 22 is remained in the Housing Ass y 42 39 gently tap the Housing Ass y 42 39 on the edge of the surface where the Gear Cover 26 26 is mounted with a wooden or plastic hammer and remove the Armature 22 22 NOTE Do not hit the fan of the Armature 22 22 ...

Page 6: ... 56 53 55 52 53 50 52 49 38 35 7 Removal of the base ass y Extract the Roll Pin D6 x 40 74 71 and remove the Base Ass y 77 74 from the Housing Ass y 42 39 8 Disassembly of handle A B set 1 Loosen and remove the six Tapping Screws D4 x 20 38 35 2 Remove handle B 3 Remove the Switch 48 45 Cord 55 52 etc from handle A ...

Page 7: ...lowing figure 2 Mounting the stator ass y Press fit the Stator Ass y 20 20 into the Housing Ass y 42 39 so that the internal wire of the Stator Ass y 20 20 is positioned to the opposite side of the name plate on the Housing Ass y 42 39 Refer to the wiring diagrams on pages 10 and 11 After press fitting hook the Brush Terminal 19 19 on the Brush Holder 43 40 3 Mounting the lock lever 1 Mount the O ...

Page 8: ... protrusion on either left or right side Protrusion Position of the protrusion 4 Mounting the bearing holder 1 Mount the Bearing Holder 2 2 to the Gear Cover 26 26 positioning the protrusion on either left or right side of the Bearing Holder 2 2 downward NG NG OK OK ...

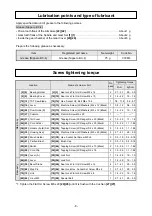
Page 9: ...Cover 38 35 Tapping Screw W Flange D4 x 20 Black 2 1 5 2 5 1 1 1 8 46 43 Cord Holder 38 35 Tapping Screw W Flange D4 x 20 Black 1 1 5 2 5 1 1 1 84 56 53 Handle A B Set 38 35 Tapping Screw W Flange D4 x 20 Black 5 1 5 2 5 1 1 1 84 42 39 Housing Ass y 39 36 Machine Screw W Washers M5 x 50 Black 3 2 7 4 1 2 0 3 0 43 40 Brush Holder 41 38 Hex Socket Set Screw M5 x 8 2 0 5 1 0 0 4 0 74 44 41 Carbon Bru...

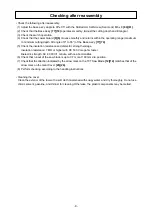
Page 10: ...ric strength voltage Insulation resistance 7 MΩ or higher with DC 500 V megohm tester Dielectric strength AC 4 000 V 1 minute with no abnormalities 6 Check that runout of the saw blade is up to 0 7 mm at 160 mm dia position 7 Check that the direction indicated by the arrow mark on the TCT Saw Blade 12 12 matches that of the arrow mark on the Gear Cover 26 26 8 Perform checking according to the han...

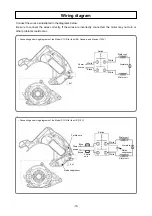
Page 11: ...oil Switch White Brown Power source Armature Noise suppressor Ferrite core White White Stator coil Stator coil Switch White Black Power source Armature 5 1 5 1 Connect the wires as illustrated in the diagrams below Be sure to connect the wires correctly If the wires are incorrectly connected the motor may not turn or other problems could occur Wiring diagram Noise suppressor Ferrite core ...

Page 12: ...V Noise suppressor Blue Blue Stator coil Stator coil Switch Blue Brown Power source Armature Connecting and wiring diagrams of the Model C 7BUR for the USA Canada and Mexico 120 V Black Yellow Brake coil Stator coil Switch Brake Blue White Power source Armature Black Connector Stator 5 1 5 1 Noise suppressor Connector ...

Page 13: ...rd Cord Armor Armature Ball Bearing 6202VV Ball Bearing 6000VV Bearing Bushing Spindle and Gear Set Bearing Holder Ball Bearing 6003VV Gear Cover Housing Ass y Stator Ass y Work Flow Handle A B Set Lower Guard Return Spring Base Ass y Bevel Plate STANDARD REPAIR TIME UNIT SCHEDULES ...

Page 14: ...3 1 2 3 4 6 7 8 16 15 9 10 11 12 13 14 17 18 20 21 22 23 32 15 33 34 24 26 31 25 28 38 45 44 43 40 41 37 47 48 53 49 54 55 56 57 51 19 35 46 29 77 76 58 59 60 66 58 60 59 63 62 73 504 501 502 503 29 505 38 27 39 42 38 50 67 69 68 70 29 74 65 61 76 75 64 71 65 75 36 30 ...

Page 15: ... 19 937623 BRUSH TERMINAL 2 20 340983C STATOR ASS Y 120V 1 INCLUD 19 36 20 340983B STATOR ASS Y 110V W NOISE SUPPRESSOR 1 INCLUD 19 35 36 20 340983F STATOR ASS Y 230 240V W NOISE SUPPRESSOR 1 INCLUD 19 35 36 21 372743 FAN GUIDE 1 22 361074U ARMATURE ASS Y 110V 120V 1 INCLUD 17 18 32 33 22 361074F ARMATURE 230V 240V 1 23 320959 LOCK LEVER 1 24 372768 FLOW GUIDE B 1 25 372767 FLOW GUIDE A 1 26 37276...

Page 16: ... 8 FOR GBR 230V 55 500463Z CORD 1 CORD ARMOR D8 8 FOR GBR 110V 55 500247Z CORD 1 CORD ARMOR D8 8 FOR EUROPE 56 373027 HANDLE A B SET 1 57 372773 LEVER A 1 58 670514 RETAINING RING E TYPE FOR D10 SHAFT 2 59 372772 LOCK NUT 2 60 949433 BOLT WASHER M8 10 PCS 2 61 372764 BEVEL STAND 1 62 372770 BEVEL PLATE 1 63 992013 SEAL LOCK FLAT HD SCREW M5 X 14 4 64 308109 SLOTTED HD SET SCREW SEAL LOCK M6 X 8 1 ...

Page 17: ... CAN 502 302691 GUIDE 1 EXCEPT FOR USA CAN 503 872422 HEX BAR WRENCH 6MM 1 504 371108 TOOL BAG 1 FOR USA CAN 505 LEVER 1 EXCEPT FOR USA CAN SUPPLIED WITH ITEM NO 31 4 Printed in Japan 10 17 171023N ALTERNATIVE PARTS STANDARD ACCESSORIES NO USED CODE NO ITEM NO ...

Page 18: ... 69 1 2 3 4 6 7 8 16 15 9 10 11 12 13 14 17 18 20 21 22 23 30 15 31 32 24 26 25 28 35 42 41 40 37 38 34 44 45 50 49 51 52 53 54 501 46 19 33 43 29 74 73 502 55 56 57 63 55 57 56 60 59 70 29 35 27 36 39 35 47 48 64 66 65 67 29 71 62 58 72 61 68 62 72 73 64 70 ...

Page 19: ...30 31 23 320959 LOCK LEVER 1 24 372768 FLOW GUIDE B 1 25 372767 FLOW GUIDE A 1 26 372763 GEAR COVER 1 27 337080 CUSHION 1 28 949794 FLAT HD SCREW M6 X 20 10 PCS 1 29 372774 BOLT SQUARE M8 2 30 980700 DUST WASHER B 1 31 6202VV BALL BEARING 6202VVCMPS2L 1 32 372783 O RING I D 34 5 1 33 930804 TERMINAL M4 0 10 PCS 2 34 NAME PLATE 1 35 301653 TAPPING SCREW W FLANGE D4 X 20 BLACK 8 36 997841 MACHINE SC...

Page 20: ...2 372769 BASE PLATE 1 63 372745 LEVER 1 64 319541 SEAL LOCK HEX SOCKET SET SCREW M5 X 6 1 65 372778 SPRING B 1 66 308387 U NUT M5 1 67 372776 STOPPER LEVER 1 68 372777 SPECIAL BOLT 1 69 372775 STEP PIN 1 70 372779 SEAL LOCK HEX SOCKET SET SCREW M5 X 8 1 71 949686 ROLL PIN D6X40 10 PCS 1 72 372771 LINK 1 73 328604 SEAL LOCK FLAT HD SCREW M4 X 8 3 74 372785 BASE ASS Y 1 INCLUD 29 54 62 64 70 72 73 D...

Reviews: