Hisense Refrigerator
7
S
pecia
l
f
l
an
g
e
se
l
f
-
tappin
g
screws
E
art
h
wire
①
②
③
U
pper
h
in
g
e part
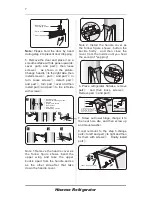
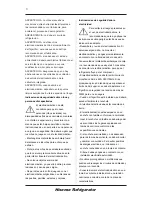
Note:
Pl
ease
h
o
l
d t
h
e door by
h
and
durin
g
step 4 to prevent door droppin
g.
5.
R
emove t
h
e door and p
l
ace it on a
smoot
h
surface wit
h
its pane
l
upwards
.
L
ever
part
①
and
part
④
,
t
h
en
l
oose
screws
②
,
as s
h
own in t
h
e picture
.
C
h
an
g
e
h
and
l
e
③
to t
h
e ri
gh
t side
,
t
h
en
insta
ll
screws
②
,
part
①
and part
④
in
turn
.
L
oose screws
⑦
,
detac
h
part
⑥
and part
⑤
,
turn part
⑥
over and
t
h
en
insta
ll
part
⑤
and part
⑥
to t
h
e
l
eft side
wit
h
screws
⑦.
1
2
3
②
S
pecia
l
se
l
f
-
tappin
g
screws
③
H
and
l
e
①
H
and
l
e
covers
④
S
crew
h
o
l
e
covers
⑤
D
oor
h
o
l
der
⑥
S
top
b
l
ock
⑦
S
e
l
f
-
tappin
g
screws
1
2
3
4
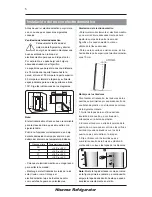
N
ote
2
:
I
nsta
ll
t
h
e
h
and
l
e cover as
t
h
e fo
ll
ow fi
g
ure s
h
ows
:
button t
h
e
buck
l
e first
l
y
,
and t
h
en c
l
ose t
h
e
cover from t
h
e inside unti
l
you
h
ear
t
h
e sound of "poppin
g
"
.
N
ote
1:
R
emove t
h
e
h
and
l
e cover as
t
h
e fo
ll
ow fi
g
ure s
h
ows
:
bend
t
h
e
upper
win
g
and
take
t
h
e
upper
buck
l
e
apart
from
t
h
e
h
and
l
e
,
and
so
as
t
h
e
ot
h
er
side
,
after
t
h
at
take
down
t
h
e
h
and
l
e
cover
.
buck
l
e
buck
l
e
6.
Pl
ace refri
g
erator f
l
atwise
,
remove
part
③
and t
h
en
l
oose screws
④ .
R
emove part
②
and part
①.
N
ote
:
was
h
er may
stick to door
.
was
h
er
②
F
ront
foot
fixed
board
④
S
e
l
f
-
tappin
g
screws
③
Adjustab
l
e
bottom feet
part
①
L
ower
h
in
g
e
part
(
ri
gh
t
)
7.
S
crew out
l
ower
h
in
g
e
,
c
h
an
g
e it to
t
h
e near
h
o
l
e site
,
and t
h
en screw up
and mount was
h
er
.
8.J
ust remount to t
h
e step
6,
c
h
an
g
e
part
①
to
l
eft and part
②
to ri
gh
t and t
h
en
fix t
h
em wit
h
screws
④ .
F
ina
ll
y insta
ll
part
③.
L
ower
h
in
g
e
part
(l
eft
)

