Before usin
g
t
h
e app
l
iance for t
h
e first
time
,
you s
h
ou
l
d be informed of t
h
e
fo
ll
owin
g
tips
.
Ventilation
of
appliance
I
n order to improve efficiency
of t
h
e coo
l
in
g
system and
save ener
g
y
,
it is necessary to
maintain
g
ood venti
l
ation around t
h
e
app
l
iance for t
h
e dissipation of
h
eat
.
F
or t
h
is reason
,
sufficient c
l
ear space
s
h
ou
l
d be avai
l
ab
l
e around t
h
e
refri
g
erator
.
Suggest:
I
t is advisab
l
e for t
h
ere to be
at
l
east
75
mm of space from t
h
e back
to t
h
e wa
ll,
at
l
east
100
mm from its top
,
at
l
east
50
mm from its side to t
h
e wa
ll
and a c
l
ear space in front to a
ll
ow t
h
e
doors to open
135
°
.
As s
h
own in fo
ll
ow
dia
g
rams
.
Note:
Th
is app
l
iance performs we
ll
wit
h
in t
h
e c
l
imate c
l
ass s
h
owed in
t
h
e tab
l
e be
l
ow
.
I
t may not work proper
l
y if bein
g
l
eft at a temperature above or be
l
ow
t
h
e indicated ran
g
e for a
l
on
g
period
.
C
l
imate c
l
ass
Ambient temperature
SN
N
ST
T
+10
°C to
+32
°C
+16
°C to
+32
°C
+16
°C to
+38
°C
+16
°C to
+
4
3
°C
●
●
S
tand your app
l
iance in a dry p
l
ace
to avoid
h
i
gh
moisture
.
K
eep t
h
e app
l
iance out of direct
sun
l
i
gh
t
,
rain or frost
.
S
tand t
h
e
app
l
iance away from
h
eat sources suc
h
as stoves
,
fires or
h
eaters
.
●
●
Leveling of appliance
F
or sufficient
l
eve
l
in
g
and air
circu
l
atin
g
in t
h
e
l
ower rear section of
t
h
e app
l
iance
,
t
h
e bottom feet may
need to be adjusted
.
Y
ou can adjust
t
h
em manua
ll
y by
h
and or by usin
g
a
suitab
l
e spanner
.
T
o a
ll
ow t
h
e doors to se
l
f
-
c
l
ose
,
ti
l
t
t
h
e top backwards by about
10
mm
.
●
●
≤
10
mm
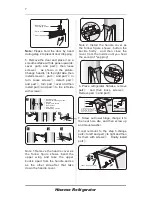
Installing the door handles
F
or t
h
e convenience of transportation
,
t
h
e door
h
and
l
es are separate
l
y
provided in a p
l
astic ba
g,
you can
insta
ll
t
h
e door
h
and
l
es as fo
ll
ows
.
1.
L
ever screw covers on t
h
e
l
eft side
of t
h
e door
,
and t
h
en put t
h
em back to
t
h
e p
l
astic ba
g.
2.
M
atc
h
t
h
e
h
and
l
e on t
h
e
l
eft side of
t
h
e door
,
keepin
g
axes of screw
h
o
l
es
in t
h
e
h
and
l
e and t
h
e door in a
l
ine
,
as
t
h
e picture s
h
ows
.
3.
F
ix t
h
e
h
and
l
e wit
h
t
h
e specia
l
screws provided in t
h
e p
l
astic ba
g.
And
t
h
en insta
ll
t
h
e
h
and
l
e covers
.
1
2
Hisense Refrigerator
Installing
your
new
appliance
5
Note
:
I
nsta
ll
t
h
e
h
and
l
e cover as t
h
e
fo
ll
ow fi
g
ure s
h
ows
:
button t
h
e
buck
l
e first
l
y
,
and t
h
en c
l
ose t
h
e
cover from t
h
e inside unti
l
you
h
ear
t
h
e sound of "poppin
g
"
.
≥
100
mm
1855
mm
≥ 75
mm
≥
50
mm
≥
50
mm
712
mm
1220
mm
1025mm

