background image

16

2.4  Loading/Saving Data

HIOKI

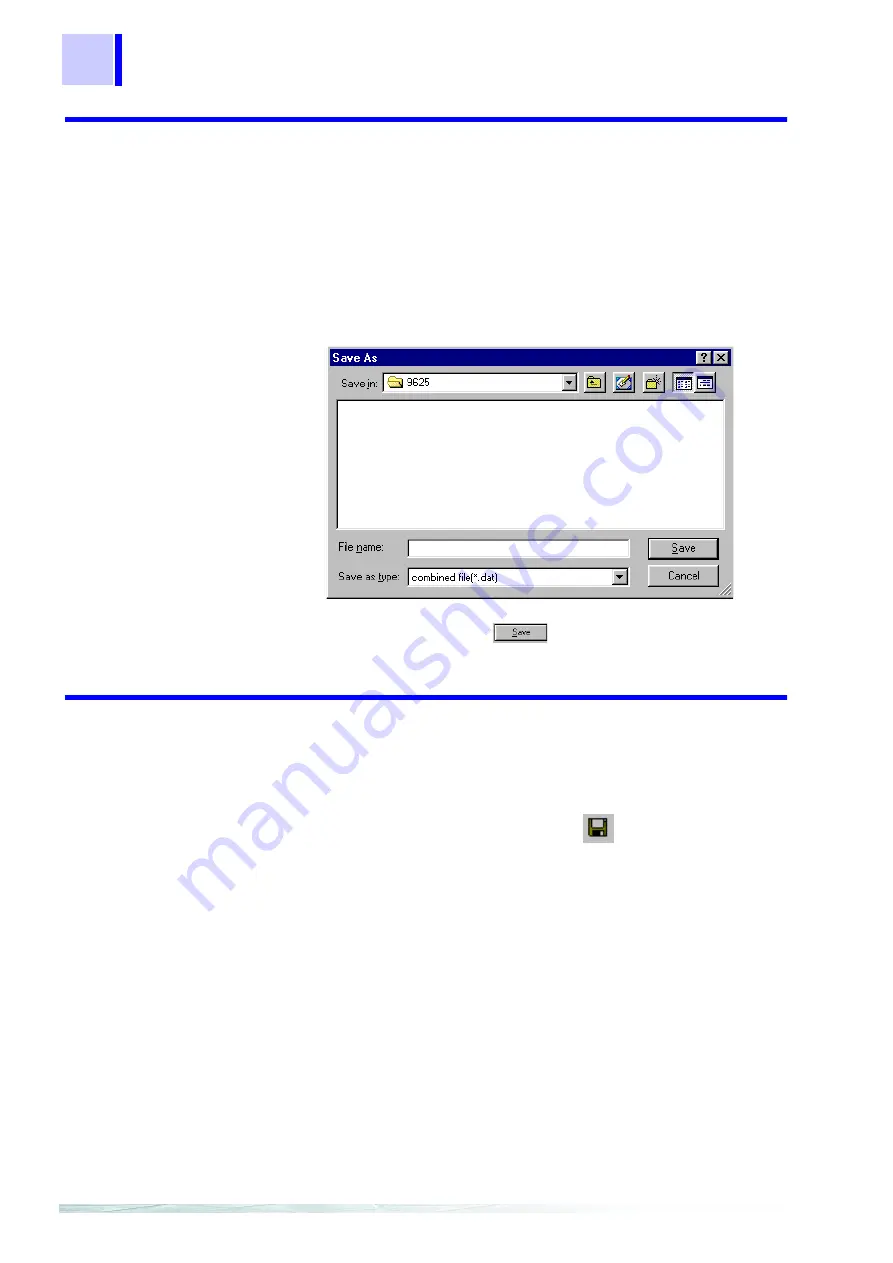
2.4.3 Saving in a Combined File Under a New File 

Name

Combine loaded data files into one file, and save the file as a new
combined file.

1.

Select 

File - Save the combined file as

 on the menu bar.

2.

The Save As dialog will appear.

3.

Enter a filename, and click 

.

2.4.4 Saving a Combined File

Save changes in the loaded combined file.

1.

Click the Save to combined file button 

, or select 

File - Save

combined file

 on the menu bar.

Summary of Contents for 9625

Page 1: ...POWER MEASUREMENT INSTRUCTION MANUAL 9625 SUPPORT SOFTWARE...

Page 2: ......

Page 3: ...equirements 9 2 2 Installing and Uninstalling the Software 10 2 3 Launching and Exiting the 9625 11 2 4 Loading Saving Data 12 2 4 1 Loading a Measurement data File 12 2 4 2 Loading a Combined File 15...

Page 4: ..._43 7 1 Basic Operation 44 7 2 Advanced Operation 46 Chapter 8 Displaying a Harmonic Graph ________47 8 1 Basic Operation 48 8 2 Advanced Operation 51 Chapter 9 Displaying a Waveform of Harmonic Measu...

Page 5: ...system 2 Explanation of other rights and restrictions 1 Restrictions on reverse engineering decompiling and disassembling You may not reverse engineer decompile or disassemble the software 2 Separati...

Page 6: ...vised software 2 If the software does not operate in accordance with the supplied Instruction Manual or the software media or Instruction Manual are damaged in any way you have one year from the date...

Page 7: ...sentative Instruction manual CD Symbols The following symbols in this manual indicate the relative importance of cautions and warnings Notation Unless otherwise specified Windows represents Windows 20...

Page 8: ...n Do not use a ball point pen or hard tipped pen because there is a danger of scratching the surface and corrupting the data Do not use adhesive labels Do not expose the disc directly to the sun s ray...

Page 9: ...ne on top of another 2 Summary Display Displays a list of measurement data 3 Daily Weekly and Monthly Report Display Displays a daily weekly or monthly report of demand measurements 4 Harmonic Analysi...

Page 10: ...ntaneous value and integrated value Demand measurement data file CSV format with extension DEM Instantaneous value maximum value minimum value and demand value Harmonic measurement data file CSV forma...

Page 11: ...lection Line graph bar graph 2 axis graph and 3 dimensional graph Line style color setting Line style and line color are selectable separately for each piece of data Marker display is available Stacke...

Page 12: ...ay Prints the data shown by the time series graphic display and dis plays the preview Summary display Prints the data shown by the summary display and displays the pre view Harmonic display Prints the...

Page 13: ...day for a daily report seven days for a weekly report and one month for a monthly report The facility capacity is set in the Load data file dialog Click File on the menu bar and then select Load file...

Page 14: ...8 1 3 Calculation Formulas HIOKI...

Page 15: ...MB or more recomended Hard Disk Free disk space of 128 MB or more Display XGA 1024 x 768 or higher Disk System CD ROM drive Used only for installation Printer Required for report printing on the compu...

Page 16: ...ws Start menu select Settings and Control Panel 2 Click the Add Remove Programs icon to display the Add Remove Programs Properties dialog 3 In the Install Uninstall tab of the dialog click on 9625 POW...

Page 17: ...POWER MEASUREMENT SUPPORT SOFTWARE 2 The main screen entitled HIOKI 9625 POWER MEASUREMENT SUPPORT SOFTWARE appears Exiting _______________________________________________________ 1 Select File Exit f...

Page 18: ...ension BIN 1 Click the Load data file button or select File Load file on the menu bar 2 The Load data file dialog will appear 2 4 Loading Saving Data If a waveform data file or a short term interval d...

Page 19: ...the calculation of the demand factor for a daily weekly or monthly report The default setting is 0 kW Change the setting as necessary 1 Select a data file for which the setting can be changed 2 Click...

Page 20: ...he waveform data file 69WAVEXX WUI When multiple data files are loaded the measurement periods of all files must not exceed one year When a data file is large in size an extended period may be require...

Page 21: ...ed 9625 combined file Extension DAT 1 Click the Open combined file button or select File Open Combined file on the menu bar 2 The Open dialog will appear 3 Select a combined file to be loaded and clic...

Page 22: ...ile and save the file as a new combined file 1 Select File Save the combined file as on the menu bar 2 The Save As dialog will appear 3 Enter a filename and click 2 4 4 Saving a Combined File Save cha...

Page 23: ...ow Load the file that was worked on last this becomes effective after the next startup Return to the default settings this is effective at the next startup only Select Settings Options Others on the m...

Page 24: ...18 2 4 Loading Saving Data HIOKI...

Page 25: ...6 Displaying the Daily Weekly or Monthly Report page 37 4 Harmonic List Screen Displays a list of harmonic measurement data Chapter 7 Displaying a Harmonic List page 43 5 Harmonic Graphic Screen Displ...

Page 26: ...IOKI When data has been loaded the time series graph will be shown 3 2 Screen Configuration Menu bar Tool bar Status bar Displays the time during cursor measurement explanations of the menu bar or too...

Page 27: ...pened Com bined File Display a list of the combined files worked on last Exit Exit the 9625 Edit Copy Copy the currently displayed screen to the clipboard View Toolbars Show or hide the toolbar Change...

Page 28: ...combined file 4 Save as CSV file 5 Copy 6 Print preview 7 Print The currently displayed screen can be pasted to the clipboard and worked on using another program such as a word processing pro gram Cl...

Page 29: ...Vertical axis Vertical axis Cursor Cursor Vertical axis Vertical axis Cursor Graph type selection Cursor indicated time Data interval setting Display period Display range selection Display data item s...

Page 30: ...raph Check the box of each item to be displayed Select Display Item Left click on the parameter of an item and a list of selectable parame ters will appear Select an item to display from the list Sele...

Page 31: ...the data name of an item and a list of selectable data names will appear Select the name of the data to be displayed Change Graph Format Left click on the graph of an item and the Change graph format...

Page 32: ...Set Display Name Set the name of each display item to be used in printout Left click on the display name of an item and the Display name dialog will appear Check the Create setting manually box to set...

Page 33: ...diately before the displayed time of each interval will be dis played as made at the actual time 5 Move Display Range The display period may be changed by moving the scroll bar 6 Set Display Period Th...

Page 34: ...lly set automatically but can be changed manually The upper limit and lower limit of the vertical axis are also changed using the sliders Set Grid Show or hide the grid line Set the color and line sty...

Page 35: ...using the setting for the measurement data regard less of this setting 3 Change Background Color The background color of the graph display area can be changed Select Settings Options Others on the me...

Page 36: ...time scale of a millisecond will not be shown when short term interval all wave data is displayed at the data interval of all wave 6 Display 3D Graph Time series graphs may be displayed in three dime...

Page 37: ...ted data Click the summary tab to display Displaying Summary Chapter 5 Screen Data interval Display period Display range setting scrolling setting scrolling Detail item selection Display start stop ti...

Page 38: ...um will appear Select a data type from the list Select Circuit No Left click on the circuit of an item and a list of selectable circuit num bers will appear Select the circuit No of the data to be dis...

Page 39: ...er than the interval of the loaded data cannot be set When multiple pieces of data have been loaded a larger interval will be used If the data interval is set to other than an integral multiple of the...

Page 40: ...5 Set Display Period The display period may be changed by moving the scroll bar NOTE Any changes in settings 2 to 5 above will be reflected in the settings for the time series graph screen 6 Scroll Sc...

Page 41: ...in the vertical axis set tings of graph When the Display CSV format data by the number of digits in default setting box is checked numerical data in the CSV for mat will be shown with the number of de...

Page 42: ...lect Settings Options Others on the menu bar Set if necessary Changes in this setting will be reflected in the time scale for the time series graphic display and daily weekly monthly report display NO...

Page 43: ...the sum of measurements taken at intervals of one day for a week The monthly report shows numerically the sum of measurements taken at intervals of one day for a month Click the Report Daily Weekly Mo...

Page 44: ...ct an item to display from the list Select Circuit No Left click on the circuit of an item and a list of selectable circuit num bers will appear Select the circuit No of the data to be displayed Selec...

Page 45: ...mand Period Select a demand period for the data to be displayed at either 30 minutes or 1 hour NOTE An interval smaller than the measurement interval of the loaded data cannot be set 3 Set Display Tim...

Page 46: ...of decimals When the Display CSV format data by the number of digits in default setting box is checked cursor measurement values will be displayed using the setting for the measurement data regard le...

Page 47: ...mmary display 4 Sum Up Data The total and average of demand values active power maximum demand time of maximum demand load factor and demand factor will appear at the bottom of the data list When mult...

Page 48: ...check the Display the integrated power in each time division box 6 Display with CO2 Conversion Integrated active power kWh values can be converted for display as CO2 carbon dioxide exhaust values Sel...

Page 49: ...monic content and phase angle are also displayed A harmonic list cannot be displayed when the loaded data does not contain harmonic data Click the Harmonic List tab to display Displaying a Harmonic Li...

Page 50: ...he value of an item and a list of selectable data types instantaneous average maximum and minimum will appear Select a data type from the list Select Circuit No Left click on the circuit of an item an...

Page 51: ...item and the Display name dialog will appear Check the Create setting manually box to set the display name of each item separately To use a common display format choose symbols in the list to enter th...

Page 52: ...display unit for the vertical axis and measurement value and the num ber of decimals When the Display CSV format data by the number of digits in default setting box is checked cursor measurement valu...

Page 53: ...onic power phase angle A harmonic graph cannot be displayed when the loaded data does not contain harmonic data Click the Harmonic Graph tab to display Displaying a Harmonic GraphChapter 8 Linear axis...

Page 54: ...the value of an item and a list of selectable data types instantaneous average maximum and minimum will appear Select a data type from the list Select Circuit No Left click on the circuit of an item a...

Page 55: ...d in printout Left click on the display name of an item and the Display name dialog will appear Check the Create setting manually box to set the display name of each item separately To use a common di...

Page 56: ...evel or harmonic content is displayed the linear axis or logarithmic axis can be chosen as the vertical axis 5 Measure with Cursor Left click in the graph display area and the cursor will appear The m...

Page 57: ...ertical axis setting dialog Set Vertical Axis The vertical axis is normally set automatically but can be changed manually in the case of a linear axis Set Grid Show or hide the grid line Set the color...

Page 58: ...s and measurement value and the num ber of decimals When the Display CSV format data by the number of digits in default setting box is checked cursor measurement values will be displayed using the set...

Page 59: ...isplayed if the loaded data does not contain waveform data Click the Weveform tab to display Displaying a Waveform of Chapter 9 Harmonic Measurement Data Legend of line Display data selection Waveform...

Page 60: ...ck in the waveform display area and the cursor will appear The measurement of the point at which the cursor is located will be dis played To move the cursor left click at the point to which the cursor...

Page 61: ...dis play the Vertical axis setting dialog Set Vertical Axis The vertical axis is normally set automatically but can be changed manually Set Grid Show or hide the grid line Set the color and line styl...

Page 62: ...bar Set the display unit for the vertical axis and measurement value and the num ber of decimals When the Display CSV format data by the number of digits in default setting box is checked cursor measu...

Page 63: ...57 HIOKI Display the settings of measurement data Click the Setting tab to display Displaying Settings Chapter 10 Measurement data selection Tab...

Page 64: ...yed from the loaded data files 2 Set Column Width Place the cursor on the right edge of the column to be adjusted the cursor will change to a cross Double click to adjust the column width automaticall...

Page 65: ...o create reports using commonly avail able computer spreadsheet programs 1 Select Screen Display the screen from which to save data in CSV format 2 Save in CSV format Click the Save as CSV file button...

Page 66: ...60 HIOKI...

Page 67: ...rmonic list graph waveform screen and set ting screen on the printer connected to the PC 1 Select Screen Display the screen to be printed 2 Enter Printing Header You can add a logo title comments to t...

Page 68: ...he menu bar The Printer Settings dialog will appear Either color or monochrome printing can be selected To print in mono chrome check the B W PRINT box 4 Display Print Preview Click the Print preview...

Page 69: ...ck the Print button or select File Print on the menu bar The Print dialog will appear After confirming printer settings click to start printing NOTE Some colors selected on the screen might not be pri...

Page 70: ...64 HIOKI...

Page 71: ...81 268 28 0568 E mail os com hioki co jp URL http www hioki co jp Printed in Japan 9625A981 01 All reasonable care has been taken in the production of this manual but if you find any points which are...

Page 72: ...2 Japan TEL 81 268 28 0562 FAX 81 268 28 0568 E mail os com hioki co jp URL http www hioki co jp HIOKI USA CORPORATION 6 Corporate Drive Cranbury NJ 08512 USA TEL 1 609 409 9109 FAX 1 609 409 9108 962...

Reviews: