130
7.2 Repair and Servicing
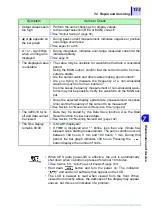
• Display does not
return to zero
• Occurs after switching to peak measurement or changing range?
Always press
button to clear data after switching to peak
measurement or changing range.
❖
See "Starting Measurement" (page 65)
• Is the DC or AC+DC mode selected?
Perform auto zero adjustment with 0 A measurement signal.
• Is the auto zero adjustment range exceeded?
Range is about ± 450 dgt. in L range, and ± 45 dgt. in H range.If
the range is exceeded, the clamp-on sensor may need to be
repaired.
❖
See Section 5.1 "Auto Zero Adjustment Function" (page 89)
• Is the display update rate set to SLOW?
If so, the display may not return to zero immediately.
❖
See Section 5.2 "Display Update Rate" (page 90)
• Displayed values
seem too low
Current Measurement
• Are the tips of the clamp-on sensor in good condition?
• Does the clamp-on sensor close tightly?
If not, measurements will be too low.
• Is the intended measurement mode selected?
❖
See Section 1.5 "Measurement Modes" (page 20)
• Has auto zero adjustment been performed correctly in DC and
AC+DC modes?
If the displayed value is negative, measurement values will be
low.
❖
See Section 5.1 "Auto Zero Adjustment Function" (page 89)
• Is the frequency of the measured current 10 Hz or lower?
To measure at 10 Hz or lower, select the AC+DC mode and set
the display update rate to SLOW.
• Is the measured current (such as starting current) continuous?
If it is not continuous, the measured value will decrease.
❖
See Section 5.3 "Measurement Response Time" (page 92)
• Is SLOW selected with AUTO ranging?
Has the range changed?
❖
See Section 5.2 "Display Update Rate" (page 90)
• Is the filter function enabled?
If a waveform component at 60 Hz or higher is present, the mea-
sured value is low.
❖
See Section 5.4 "Filter Function" (page 95)
• Is the
indicator (low-battery warning) displayed?
❖
See Section 5.13 "Battery-Low Warning" (page 105)
Symptom
Items to Check
Summary of Contents for 3290-10
Page 1: ...CLAMP ON AC DC HiTESTER INSTRUCTION MANUAL 3290 10...
Page 2: ......
Page 6: ...iv Contents...
Page 14: ...8 Usage Notes...
Page 42: ...36 2 5 Turning Power On and Off...
Page 54: ...48 3 6 Measuring Duty by Timer...
Page 149: ...4 5 6 7 8 9 10 11...
Page 150: ......


