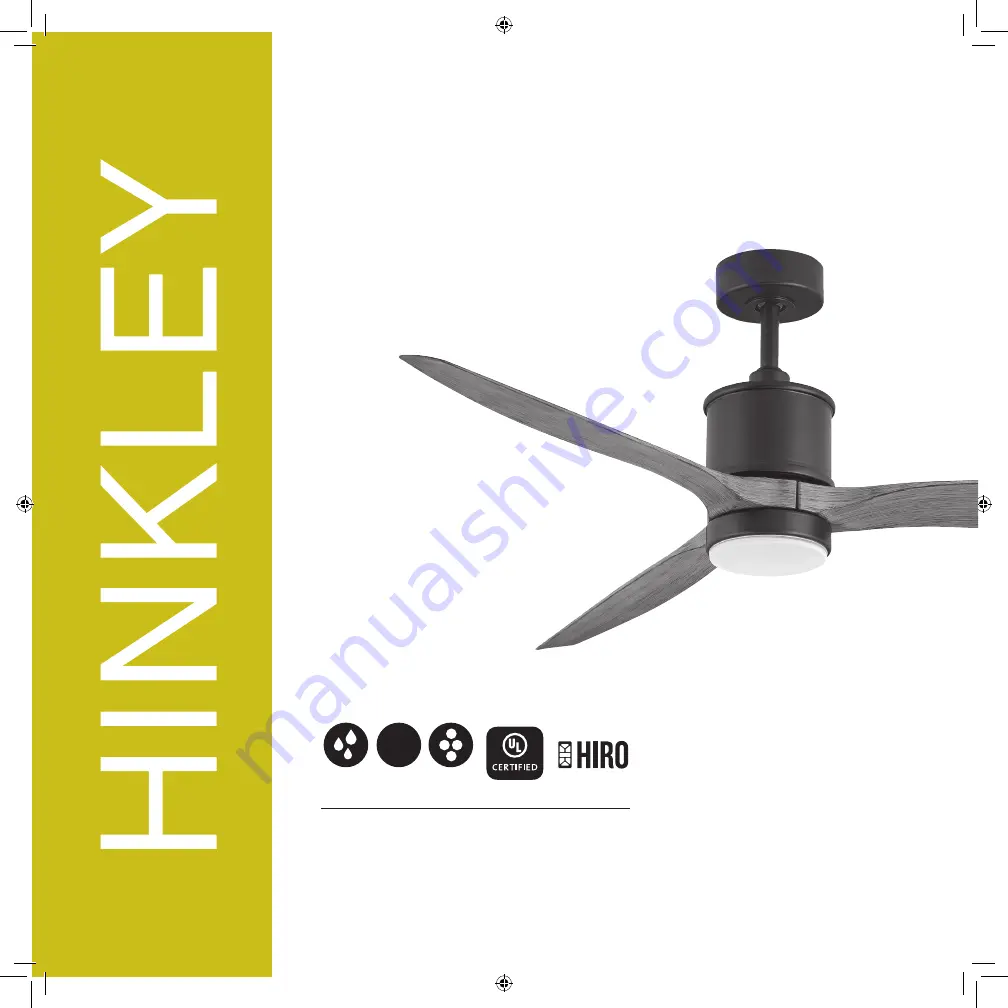
60" HOVER
™
CEILING FAN INSTRUCTION MANUAL
INDOOR / OUTDOOR LED FAN
WET
DC
DC MOTOR
LED
Page 1: ...60 HOVER CEILING FAN INSTRUCTION MANUAL INDOOR OUTDOOR LED FAN WET DC DC MOTOR LED ...
Page 2: ...nstal lation and oper ation of this fan It has been designed to mak e the instal lation process as easy as possible If you are unfamiliar or uncomf ortable with wiring please con tact a qual ified electrician If you need add itional assistance or have an y questions please reach out to us For warran ty information visit hinkley com SERVICE HINKLEY COM 800 HINKLEY LET S SEE THAT HINKLEY STYLE HINKL...
Page 3: ...NS 03 IMPORTANT SAFETY PRECAUTIONS 03 TOOLS MATERIALS REQUIRED 04 UNPACKING YOUR FAN 05 PREPARATION 05 INSTALLING THE HANGING BRACKET 06 HANGING THE FAN 08 ELECTRICAL CONNECTIONS 09 FINISHING THE INSTALLATION 10 BLADE ATTACHMENT 11 INSTALLING THE LIGHT KIT AND GLASS SHADE 12 INSTALLING THE WALL CONTROL 14 OPERATION 16 CARE AND CLEANING 16 TROUBLESHOOTING 17 ENERGY GUIDE 17 18 SPECIFICATIONS SMART ...
Page 4: ...he carton until ready to be installed to protect its finish If you are installing more than one ceiling fan make sure that you do not mix fan blade sets as each blade is part of a weighted set After making electrical connections spliced conductors should be turned upward and pushed carefully up into outlet box The wires should be spread apart with the common conductor and the grounding conductor on...
Page 5: ...support of lighting fixtures are not acceptable f or fan support and may need to be replaced Consult a qualified electrician if in doubt Do not use an incandescent light dimmer Do not use this fan with any transformer type fan speed control device To reduce the risk of personal injury do not bend the blade arms when installing them balancing the blades or cleaning the fan Do not insert any object s ...
Page 6: ... shown above may look slightly different for your specific model of fan 7 4 Downrod Asm Yoke Cover Adapter Plate 16W LED Assembly Glass Shade Receiver Incl 5 Wire Nuts Hardware Bag Ball Moisture Cover Fan Housing with Motor Remove rubber shipping supports around motor if applicable Save the screws Bracket Mounting Hardware wood screws screws lock washers star washers flat washers wire nuts Blade to M...
Page 7: ...ck be sure electricity is turned off at the main power box before wiring All wiring must be in accordance with National and Local Electrical Codes and the ceiling fan must be grounded as a precaution against possible electric shock Locate ceiling joist where fan is to be mounted being sure location agrees with the requirements in the minimum clearance section of this guide Wood joists must be sound...
Page 8: ...res come out facing upward Loosen the two security set screws and remove the downrod pin and retaining clip from the coupling on top of the motor assembly Fig 2 Carefully feed the electrical lead wires and safety cable from the fan through the downrod Thread downrod into coupler until holes align Insert downrod pin through holes in mounting collar and downrod clip cotter pin through small hole in ...
Page 9: ...ig 3 Lift ball downrod fan into hanger bracket opening NOTE The tab opposite hanger bracket opening should fit in slot on ball Fig 4 6 7 8 9 NOTE 6 feet of lead wire is supplied on the fan for use with longer downrods Trim Ring Safety Cable Fig 4 Attach the wood screw and the flat washer to the ceiling joist as shown do not fully tighten Slide the cable clamp onto the safety cable from the fan Loop ...
Page 10: ...5 wires on the receiver Fig 2 Connect the YELLOW fan wire to the YELLOW receiver wire Connect the GRAY fan wire to the GRAY receiver wire Connect the RED fan neutral wire to the RED receiver neutral wire Connect the WHITE fan neutral wire to the WHITE receiver neutral wire Connect the BLUE fan neutral wire to the BLUE receiver neutral wire 3 Connect the wiring from the ceiling to the receiver unit...
Page 11: ...section of the key holes Align the circular hole on canopy with the remaining hole on the mounting bracket secure by tightening the two set screws NOTE Adjust the canopy screws as necessary until the canopy and trim ring are snug Canopy Screws Trim Ring Ceiling Fan Outlet Box Hanger Bracket Groove WARNING Make sure the hook on the hanging bracket properly sits in the groove in the hanger ball befo...
Page 12: ... during operation Cordless power screwdrivers are NOT recommended as they usually strip the heads of the screws and usually will not fully compress the lock washers on the motor screws Use a large flat blade screwdriver for final tightening to fully compress the washers This will help ensure proper alignment of the blades and noise free wobble free running 10 hinkle y com Screws Lock Washers Blade...
Page 13: ...ated on the fan motor Loosen the other 2 screws Do not remove Fig 2 Fig 1 Fig 2 While holding the LED Assembly under your fan make the polarized plug connections Fig 2 Red to white Black to black Tuck connections neatly into adapter plate Place the key holes on the LED Assembly over the 2 screws previously loosened turn the LED Assembly until it locks in place at the narrow section of the key hole...
Page 14: ...te transmitter will be held in place with built in magnets Remove the existing wall plate and the old switch from the wall outlet box Seat the cradle A into the wall plate Fig 2 Connect the black lead wires from the switch in the cradle A to the black wires in the switch box Hot input wire to one of the cradle A switch leads Power lead to the fan is connected to the remaining switch lead Connect t...
Page 15: ...ch lead Fig 4 Attach the cradle A to the wall switch box using the supplied hardware Attach the multi gang faceplate to the switch set in the wall outlet box Cradle A of Hinkley switch will fit in any standard decora face plate Remote transmitter will be held in place with built in magnets 1 2 3 4 5 Option 3 Multi Gang Wall Switch Box Installation 2019 Hinkley Lighting Inc hinkley com 13 Fig 4 Out...
Page 16: ... enters the body it can cause severe internal burns and can lead to death in as little as 2 hours Always completely secure the battery compartment If the battery compartment does not close securely stop using the product remove the batteries and keep it away from children IF you think batteries might have been swallowed or placed inside any part of the body seek immediate medical attention The bat...
Page 17: ...reates a cooling effect as shown in Figure 3 This allows you to set your air conditioner on a warmer setting without affecting your comfort Winter Mode Reverse An UPWARDairflow moves warmer air off the ceiling area as shown in Figure 4 This allows you to set your heating unit on a coole r setting without affecting your comfort 2019 Hinkley Lighting Inc hinkley com 15 ...
Page 18: ...nd all electrical connections 3 Assure there are no more than 2 fans operating on a circuit through the wall control Assure that there are no more than 12 fans operating on a circuit through an on off wall switch or a breaker not through a wall control 4 Assure that the fan in within range of the WiFi 150 ft or wall control 30 ft 1 Allow a 24 hour breaking in period Most noise associated with a new...
Page 19: ...ost depends on rates Energy Use 18 Watts and use 3 34 Cost Range of Similar Models 19 84 5 Estimated Yearly Energy Cost All estimates based on typical use excluding lights Airflow Shown Is a Weighted Average of High and Low Cubic Feet per Minute Based on Downrod PERFORMANCE SPECIFICATIONS STANDARD HIGH SPEE D LOW SPEE D Airflow CFM 7118 1989 Energy Use Watts 28 5 2 1 Airflow Efficiency CFM W 249 961 E...
Page 20: ...set Method a Turn mains power OFF to the fan b Turn mains power back ON on the fan c Hold down the Power button on the transmitter for 5 seconds until the fan light flashes 3 times d Repeat steps a c above 4 more times e The fan s memory is now totally overwritten and it has forgotten all other remotes Brute Force Method https bond home io app HINKLEY SMART FAN OPTIONS In add ition to the included ...
Page 21: ...UCTS THAT ENHANCE YOUR SPACE WITH COMFORT PURPOSE AND STYLE AS A FAMILY COMPANY WE ARE COMMITTED TO DESIGN PERFORMANCE AND QUALITY AND WHAT S IMPORTANT TO YOU IS PARAMOUNT TO US FOR A COMPLETE ASSORTMENT OF OUR PRODUCTS AND SOURCE BOOKS VISIT HINKLEY COM ...
Page 22: ...GLOBAL HEADQUARTERS 33000 Pin Oak Parkway Avon Lak e Ohio 44012 T 440 653 5500 F 440 653 5555 hinkley com ...
Page 23: ...60 HOVER CEILING FAN INSTRUCTION MANUAL INDOOR OUTDOOR LED FAN WET DC DC MOTOR LED ...
Page 24: ...ado Si necesita asistencia adicional o tiene alguna pregunta comuníquese con nosotros Para obtener información sobre la garantía visite hinkley com SERVICE HINKLEY COM 800 HINKLEY VAMOS A ESE ESTILO HINKLEY HINKLEY HINKLEYSTYLE QUEREMOS QUE AMES A TU NUEVO VENTILADOR ASÍ QUE ESTAMOS AQUÍ SI TIENE UNA PREGUNTA NECESITA AYUDA O QUIERE HABLAR SOBRE NUESTROS PRODUCTOS ENVÍE SUGERENCIAS NUESTRO CAMINO ...
Page 25: ...NS 03 IMPORTANT SAFETY PRECAUTIONS 03 TOOLS MATERIALS REQUIRED 04 UNPACKING YOUR FAN 05 PREPARATION 05 INSTALLING THE HANGING BRACKET 06 HANGING THE FAN 08 ELECTRICAL CONNECTIONS 09 FINISHING THE INSTALLATION 10 BLADE ATTACHMENT 11 INSTALLING THE LIGHT KIT AND GLASS SHADE 12 INSTALLING THE WALL CONTROL 14 OPERATION 16 CARE AND CLEANING 16 TROUBLESHOOTING 17 ENERGY GUIDE 17 18 SPECIFICATIONS SMART ...
Page 26: ...hasta que esté lista para ser instalada para proteger su acabado Si está instalando más de un ventilador de techo asegúrese de no mezclar conjuntos de aspas de ventilador ya que cada aspa es parte de un conjunto ponderado Después de realizar las conexiones eléctricas los conductores empalmados deben girarse hacia arriba y empujarse con cuidado hacia el interior de la caja de distribución Los cable...
Page 27: ...lizadas para el soporte de accesorios de iluminación no son aceptables para el soporte del ventilador y pueden necesitar ser reemplazadas Consulte a un electricista calificado si tiene dudas No utilice un atenuador de luz incandescente No utilice este ventilador con ningún dispositivo de control de velocidad del ventilador de tipo transformador To reduce the risk of personal injury do not bend the...
Page 28: ...specífico de ventilador DESEMBALAJE TU VENTILADOR DESEMBALA TU VENTILADOR Y COMPRUEBA EL CONTENIDO No deseche la caja de cartón Si alguna vez es necesario reemplazar o reparar la garantía el ventilador debe devolverse en su embalaje original Retire todas las piezas y hardware No coloque la carcasa del motor sobre un costado o la carcasa decorativa puede moverse doblarse o dañarse Examinar todas la...
Page 29: ...tricas Espada Cubierta del yugo Vara Kit de luces LED Pabellón Carcasa del motor PREPARACIÓN INSTALANDO EL SOPORTE COLGANTE Arandela plana Tornillo de caja de salida Soporte de suspensión Caja de salida del ventilador de techo Ubique la viga del techo donde se va a montar el ventilador asegurándose de que la ubicación esté de acuerdo con los requisitos en la sección de espacio libre mínimo de esta...
Page 30: ...ente con cuidado los cables conductores eléctricos desde el ventilador a través de la varilla Enrosque la varilla en el acoplador hasta que se alineen los agujeros Inserte el pasador de la varilla hacia abajo a través de los agujeros en el collar de montaje y la varilla enganche el pasador de chaveta a través del pequeño orificio en el extremo del pasador de la varilla para sostener la varilla en ...
Page 31: ... ventilador en la abertura del soporte de suspensión NOTA La lengüeta opuesta a la abertura del soporte del colgador debe encajar en la ranura de la bola Fig 4 Cubierta del yugo Bola de suspensión Parte superior del cuerpo del ventilador Anillo de ajuste Pabellón Tornillo de ajuste Cable a tierra Fig 4 INSTALACIÓN DE SOPORTE DE CABLE DE SEGURIDAD Fije el tornillo para madera y la arandela plana a ...
Page 32: ...onecte el cable neutral del ventilador AZUL al cable neutral del receptor AZUL Conecte el cable de suministro de construcción NEGRO al cable del receptor NEGRO Conecte el cable neutro del receptor BLANCO al cable neutro del edificio BLANCO Conecte el cable de tierra del edificio de COBRE al cable de tierra del ventilador AMARILLO VERDE También conecte los dos cables VERDES del ventilador al cable ...
Page 33: ...a llave Alinee el orificio circular en la cubierta con el orificio restante en el soporte de montaje asegure apretando los dos tornillos de fijación NOTA Ajuste los tornillos del dosel según sea necesario hasta que el dosel y el anillo de ajuste estén ajustados Pabellón Tornillo Anillo de ajuste Ranura ADVERTENCIA Asegúrese de que el gancho en el soporte para colgar se asiente correctamente en la ...
Page 34: ...chillas INSTALANDO LAS CUCHILLAS NOTA NO se recomiendan los destornilladores eléctricos ya que generalmente pelan las cabezas de los tornillos y generalmente no comprimen completamente las arandelas de seguridad de los tornillos del motor Use un destornillador plano de hoja grande para apretar por completo y comprimir completamente las arandelas Esto ayudará a garantizar una alineación adecuada de...
Page 35: ...tor del ventilador Afloje los otros 2 tornillos No quitar Fig 2 Fig 1 Fig 2 Mientras sostiene el ensamblaje del LED debajo de su ventilador realice las conexiones del enchufe polarizado Fig 2 Cables de luz Placa de montaje Cubo de montaje parte inferior del motor Empulgueras Pantalla de vidrio Tornillo Placa de montaje Conectores de cable Meta las conexiones cuidadosamente en la placa de montaje C...
Page 36: ... mag incorporado Retire la placa de pared existente y el interruptor antiguo de la caja de salida de la pared Asiente la base A en la placa de pared Figura 2 Conecte los cables conductores negros del interruptor en la base A a los cables negros en la caja del interruptor Cable de entrada caliente a uno de los cables del interruptor de la base A El cable de alimentación del ventilador está conectad...
Page 37: ... 4 Fije la base A a la caja de interruptores de pared utilizando los accesorios suministrados Conecte la placa frontal de varios grupos al interruptor en la caja de salida de la pared La base A del interruptor Hinkley encajará en cualquier placa frontal decora estándar El transmisor remoto se mantendrá en su lugar con imanes incorporados 1 2 3 4 5 Opción 3 Instalación de la caja de interruptores d...
Page 38: ... quemaduras internas graves y puede provocar la muerte en tan solo 2 horas Asegure siempre completamente el compartimiento de la batería Si el compartimento de las pilas no se cierra de forma segura deje de usar el producto retire las pilas y manténgalo alejado de los niños SI cree que las baterías pueden haber sido ingeridas o colocadas dentro de cualquier parte del cuerpo busque atención médica ...
Page 39: ...3 Esto le permite configurar su aire acondicionado en un ambiente más cálido sin afectar su comodidad Modo de invierno reverso Un fl ujo de aire HACIA ARRIBA mueve el aire más cálido del área del techo como se muestra en la Figura 4 Esto le permite configurar su unidad de calefacción en un lugar más frío sin afectar su comodidad MODO VERANO DIRECCIÓN CONTRA EL RELOJ MODO INVIERNO SENTIDO DE LAS AGU...
Page 40: ...se escuche un clic o un zumbido durante el funcionamiento Esto es especialmente cierto en climas con amplios rangos de temperatura y humedad Cuando desempolve las cuchillas debe sostener la cuchilla para evitar que se doble no se debe aplicar presión a las cuchillas Si experimenta algún defecto en el funcionamiento de su ventilador verifique los siguientes puntos SOLUCIÓN DE PROBLEMAS PRECAUCIÓN A...
Page 41: ...od Flujo de aire Pies cúbicos por minuto Cuanto mayor sea el flujo de aire más aire se moverá el ventilador Eficiencia del flujo de aire 267 pies cúbicos por minuto por vatio Rango de costos de modelos similares 19 84 Su costo depende de las tarifas y el uso Uso de energía 18 vatios Todas las estimaciones se basan en el uso típico excluyendo la luz Flujo de aire CFM Energía usada vations Eficienci...
Page 42: ...er el ventilador c Mantenga presionado el botón de encendido en el transmisor durante 5 segundos hasta que la luz del ventilador parpadee 3 veces d Repita los pasos a c anteriores 4 veces más e La memoria del ventilador ahora está totalmente sobrescrita y se ha olvidado de todos los demás controles remotos Método de fuerza bruta https bond home io app OPCIONES DE VENTILADOR INTELIGENTE DE HINKLEY ...
Page 43: ...QUE MEJORAN SU ESPACIO CON COMODIDAD PROPÓSITO Y ESTILO COMO EMPRESA FAMILIAR ESTAMOS COMPROMETIDOS CON EL DISEÑO EL RENDIMIENTO Y LA CALIDAD Y LO QUE ES IMPORTANTE PARA USTED ES PARAMOUNT PARA NOSOTROS PARA UN SURTIDO COMPLETO DE NUESTROS PRODUCTOS Y FUENTES DE LIBROS VISITA HINKLEY COM ...
Page 44: ...GLOBAL HEADQUARTERS 33000 Pin Oak Parkway Avon Lak e Ohio 44012 T 440 653 5500 F 440 653 5555 hinkley com ...
Page 45: ...60 HOVER VENTILATEUR LED INTÉRIEUR EXTÉRIEUR WET DC DC MOTOR LED MANUEL D INSTRUCTIONS POUR VENTILATEUR DE PLAFOND EN FRANÇAIS ...
Page 46: ... Si vous avez besoin d aide supplémentaire ou avez des questions n hésitez pas à nous contacter Pour des informations sur la garantie visitez hinkley com SERVICE HINKLEY COM 800 HINKLEY LET S SEE THAT HINKLEY STYLE HINKLEY HINKLEYSTYLE NOUS VOULONS VOUS AIMER VOTRE NOUVEAU FAN NOUS SOMMES ICI SI VOUS AVEZ UNE QUESTION BESOIN D UNE AIDE OU VOULEZ CHAT SUR NOS PRODUITS ENVOYER DES SUGGESTIONS NOTRE ...
Page 47: ...LATION ET D UTILISATION PRÉCAUTIONS DE SÉCURITÉ IMPORTANTES OUTILS ET MATÉRIAUX NÉCESSAIRES DÉBALLAGE DE VOTRE VENTILATEUR PRÉPARATION INSTALLATION DU SUPPORT DE SUSPENSION SUSPENSION DU VENTILATEUR CONNECTIONS ELECTRIQUES FIN DE L INSTALLATION OPERATION 11 12 14 16 16 17 17 18 INSTALLATION DU KIT LUMIÈRE ET VERRE INSTALLATION DE LA COMMANDE MURALE OPÉRATION ENTRETIEN ET NETTOYAGE DÉPANNAGE GUIDE ...
Page 48: ...jusqu à ce qu il soit prêt à installer pour protéger sa finition Si vous installez plus d un ventilateur de plafond assurez vous de ne pas mélanger les pales du ventilateurchaque lame fait partie d un ensemble lesté Après avoir effectué les connexions électriques les conducteurs épissés doivent être tournés vers le haut et poussés avec précaution dans la boîte de sortie Les fils doivent être écarté...
Page 49: ...port du ventilateur et peuvent devoir être remplacés Consulter un électricien qualifié en cas de doute N utilisez pas de gradateur de lumière incandescente N utilisez pas ce ventilateur avec un dispositif de contrôle de vitesse de ventilateur de type transformateur Pour réduire le risque de blessures corporelles ne pliez pas les bras des pales lors de leur installation de l équilibrage des pales o...
Page 50: ... rondelles plates serre fils Vis de la lame au moteur et Rondelles de blocage et rondelles plates Trousse d équilibre Matériel de câble de sécurité vis à bois rondelle plate CA900752Fxx In Hardware Bag DR94016Fxx YC900752Fxx E900752LED X X GL900752OPET CNW900760 MH900752Fxx XX FINITION DU VENTILATEUR Commande murale avec batterie 2032 socle A plaque murale plaque frontale 2 vis de montage Berceau ...
Page 51: ...contre un éventuel choc électrique Boîte de sortie pour ventilateur de plafond Support de suspension Rondelle plate Rondelle à ressort Vis de boîte de sortie Tige de suspension Housse de joug Logement de moteur Kit d éclairage LED Localisez la solive de plafond où le ventilateur doit être monté en étant sûr que l emplacement est conforme aux exigences de la section de dégagement minimum de ce guid...
Page 52: ...ement les fils électriques du ventilateur à travers la tige de suspension Vissez la tige de suspension dans le coupleur jusqu à ce que les trous s alignent Insérez la goupille de la tige de suspension dans les trous du collier de montage et de la tige de suspension cliper la goupille fendue dans le petit trou à l extrémité de la goupille de la tige pour maintenir la tige en place Serrez les vis de...
Page 53: ...MARQUE la languette opposée à l ouverture du support de suspension doit s insérer dans la fente de la boule Fig 4 6 7 8 9 REMARQUE 6 pieds de fil conducteur sont fournis sur le ventilateur pour une utilisation avec des tiges de suspension plus longues Haut du corps du ventilateur Housse de joug Canopée Anneau de garniture Vis de réglage Fil de terre Casquette Ball Moister Goupille Fig 4 INSTALLATI...
Page 54: ...ion Utilisez le faisceau de 2 fils sur le récepteur Fixez avec le fil fourni Connectez le fil d alimentation du bâtiment NOIR au fil du récepteur NOIR Connectez le fil neutre du récepteur BLANC au fil neutre du bâtiment BLANC Connectez le fil de terre du bâtiment COPPER au fil de terre du ventilateur JAUNE VERT Connectez également les deux fils VERT du ventilateur au fil de terre du bâtiment N OUB...
Page 55: ...ulaire sur l auvent avec le trou restant sur le support de montage fixez en serrant les deux vis de réglage REMARQUE Ajustez les vis de la verrière au besoin jusqu à ce que la verrière et l anneau de garniture soient bien ajustés Canopée Des vis Anneau de garniture Rainure AVERTISSEMENT Assurez vous que le crochet du support de suspension repose correctement dans la rainure de la boule de suspensi...
Page 56: ...QUE Les tournevis électriques sans fil ne sont PAS recommandés car ils dénudent généralement la tête des vis et ne compressent généralement pas complètement les rondelles de blocage sur les vis du moteur Utilisez un grand tournevis à lame plate pour un serrage final afin de comprimer complètement les rondelles Cela aidera à assurer un alignement correct des lames et un fonctionnement sans bruit et...
Page 57: ...is Ne pas retirer Fig 2 Fig 1 Fig 2 Tout en maintenant l ensemble LED sous votre ventilateur effectuez les connexions à fiches polarisées Fig 2 Rouge à blanc Noir à noir Rentrez soigneusement les connexions dans la plaque de montage Placez les trous de serrure sur l ensemble LED sur les 2 vis précédemment desserrées tournez l ensemble LED jusqu à ce qu il se verrouille en place au niveau de la sec...
Page 58: ...oirs du commutateur dans le berceau A aux fils noirs dans le boîtier de commutation Fil d entrée chaud vers l un des fils du commutateur du berceau A Le fil d alimentation du ventilateur est connecté au fil de l interrupteur restant Connectez l ensemble plaque murale berceau A à la boîte de sortie murale à l aide du matériel fourni Enclenchez le couvercle de la plaque frontale sur le support mural...
Page 59: ...u A au boîtier d interrupteur mural à l aide du matériel fourni Fixez la plaque frontale multi gang à l interrupteur situé dans la boîte de prise murale Le berceau A de l interrupteur Hinkley s adaptera à n importe quelle plaque frontale decora standard L émetteur à distance sera maintenu en place avec des aimants intégrés 1 2 3 4 5 Option 3 Installation d un boîtier d interrupteur mural multi gro...
Page 60: ...lle peut provoquer de graves brûlures internes et entraîner la mort en aussi peu que 2 heures Sécurisez toujours complètement le compartiment à piles Si le compartiment des piles ne se ferme pas correctement arrêtez d utiliser le produit retirez les piles et tenez le hors de portée des enfants SI vous pensez que des piles ont pu être avalées ou placées à l intérieur de n importe quelle partie du c...
Page 61: ... vous permet de régler votre climatiseur sur un réglage plus chaud sans a ecter votre confort Mode hiver marche arrière Un flux d air VERS LE HAUT déplace l air plus chaud de la zone du plafond comme illustré à la figure 4 Cela vous permet de régler votre unité de chauffage sur un réglage plus frais sans a ecter votre confort MODE ÉTÉ DIRECTION CONTRE HORAIRE MODE HIVER DANS LE SENS DES AIGUILLES ...
Page 62: ...age et le boîtier de sortie ENTRETIEN ET NETTOYAGE DÉPANNAGE PROBLÈME LE VENTILATEUR NE DÉMARRE PAS FAN SONS BRUIT VENTILATEURS WOBBLES 1 Vérifiez que toutes les vis de lame et de bras de lame sont bien fixées 2 Si l oscillation de la lame est toujours perceptible l échange de deux lames adjacentes côte à côte peut redistribuer le poids et éventuellement entraîner un fonctionnement plus fluide 3 V...
Page 63: ... affiché est une moyenne pondérée des pieds cubes hauts et bas par minute basée sur la tige de descente Plus le débit d air est élevé plus le ventilateur bougera Efficacité du flux d air 267 pieds cubes par minute par watt Gamme de coûts des modèles similaires 19 84 Basé sur 12 cents par kWh et 6 4 heures d utilisation par jour Votre coût dépend des tarifs Consommation d énergie 18 watts SPÉCIFICA...
Page 64: ...ntilateur c Maintenez enfoncé le bouton d alimentation de l émetteur pendant 5 secondes jusqu à ce que le voyant du ventilateur clignote 3 fois d Répétez les étapes a à c ci dessus 4 fois de plus e La mémoire du ventilateur est maintenant totalement écrasée et il a oublié toutes les autres télécommandes Méthode de la force brute https bond home io app OPTIONS DE VENTILATEUR INTELLIGENT HINKLEY En ...
Page 65: ...OTRE ESPACE AVEC CONFORT FONCTIONNEMENT ET STYLE EN TANT QU ENTREPRISE FAMILIALE NOUS NOUS ENGAGEONS À LA CONCEPTION À LA PERFORMANCE ET À LA QUALITÉ ET CE QUI EST IMPORTANT POUR VOUS EST PRIMORDIAL POUR NOUS POUR UN ASSORTIMENT COMPLET DE NOS PRODUITS ET LIVRES SOURCES VISITEZ HINKLEY COM ...
Page 66: ...GLOBAL HEADQUARTERS 33000 Pin Oak Parkway Avon Lak e Ohio 44012 T 440 653 5500 F 440 653 5555 hinkley com ...