MACHINE SAFETY
To ensure that work is carried out in the best safety conditions, proceed as follows:
1. Make sure the solution tank is empty. If this is not the case, empty it (read "
").
2. Make sure the recovery tank is empty. If this is not the case, empty it (read "
").
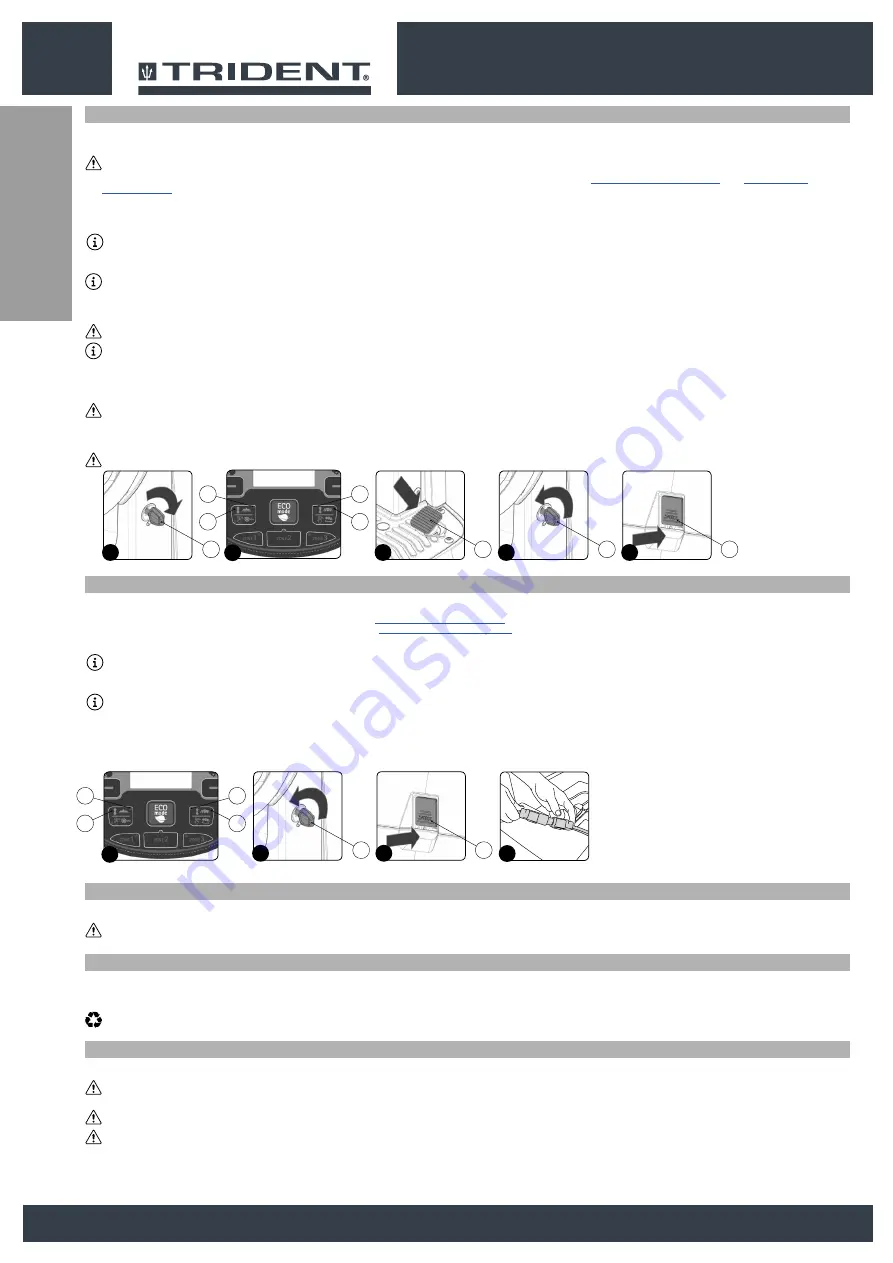
3. Lift the brush head body, press the “BRUSH HEAD COMMAND” button (1) on the control panel (
Fig.2
).
N.B.
:
As soon as the button (1) on the control panel is pressed, the green LED (2) (“BRUSH HEAD BODY WORK POSITION”) will switch off (
Fig.2
).
4. Lift the squeegee body and press the “SQUEEGEE CONTROL” button (3) on the control panel (
Fig.2
).
N.B.
:
as soon as the button (3) on the control panel is pressed, the green LED (4) (“SQUEEGEE BODY WORK POSITION”) will switch off (
Fig.2
).
5. Set the main switch to the “0” position by turning the key (5) to the left (
Fig.2
). Remove the key from the instrument panel.
6.
Get off the machine.
7. Press the recovery tank release lever (6) and turn the recovery tank into the maintenance position (
Fig. 3
).
8. Disconnect the battery connector from the machine's main system connector (
Fig.4
).
9. Rotate the recovery tank into the work position. Make sure that the recovery tank retainer system is correctly engaged.
1
4
2
3
1
4
3
2
5
6
INSERTING THE BATTERIES IN THE MACHINE
To fit the batteries inside the machine, contact a HILLYARD assistance centre technician
.
WARNING
: HILLYARD declines all responsibility for any damage to property or injury persons in the event that the batteries are replaced by an unauthorized technician.
BATTERY MAINTENANCE AND DISPOSAL
For battery maintenance and recharging, respect the instructions provided by the battery manufacturer.
When the batteries reach the end of their service life, they must be disconnected by a HILLYARD assistance centre technician or by a specialised and properly trained worker, and must be subsequently removed
from the battery compartment using suitable lifting devices.
N.B.
: dead batteries are classified as dangerous waste and as such must be delivered to an authorised body for disposal.
RECHARGING THE BATTERIES
The batteries must be charged prior to first use, and whenever they no longer provide sufficient power to perform the desired work.
CAUTION
: The control board and the battery charger, if present on board, are set for lead-acid batteries; contact the nearest HILLYARD assistance centre to modify the setting if you want to use gel
batteries.
CAUTION
: to avoid any permanent damage to the batteries, it is essential to avoid their complete discharge; begin recharging them within a few minutes of noting the "discharged batteries" signal.
CAUTION
: Never leave the batteries completely discharged, even if the machine is not being used.
1. Bring the machine to the battery recharging area.
HOW TO MOVE THE MACHINE
To transport the machine safely, proceed as follows:
DANGER
: before starting any task, make sure the current regulations concerning the safe transport of dangerous substances are scrupulously observed.
1. Check to make sure that the solution tank and the recovery tank are empty. If this is not the case, empty them (see the sections titled “
2. Sit on the driver’s seat.
3. Insert the key (1) into the main switch on the control panel. Set the main switch to "I" (
Fig.1
).
4. Lift the brush head body and press the “BRUSH HEAD CONTROL” button (2) on the control panel (
Fig.2
).
NB
:
as soon as the button (2) on the control panel is pressed, the green LED (3) (“BRUSH HEAD BODY WORK POSITION”) will switch off (
Fig.2
).
5. Lift the squeegee body and press the “SQUEEGEE CONTROL” button (4) on the control panel (
Fig.2
).
N.B.
:
as soon as the button (4) on the control panel is pressed, the green LED (5) (“SQUEEGEE BODY WORK POSITION”) will switch off (
Fig.2
).
6. Press the drive pedal (6) (
Fig.3
) to begin moving the machine.
7. Use a ramp to move the machine up onto the transport vehicle.
CAUTION
:
during this operation, check there are no people or objects near the machine.
NB
: the ramp gradient must not be such as to cause damage to the machine as it goes up.
8. Once the machine is on the means of transport, set the main switch to “0” by turning the key (1) to the left (
Fig. 4
). Remove the key from the instrument panel.
9.
Get off the machine.
10. Press the recovery tank release lever (7) and turn the recovery tank into the maintenance position (
Fig. 5
).
CAUTION
: the following operations must be carried out by qualified personnel. An incorrect connection of the connector may cause problems with machine functioning.
11. Disconnect the electrical connector from the machine's general system.
12. Rotate the recovery tank into the work position. Make sure that the recovery tank retainer system is correctly engaged.
WARNING
: secure the device according to the directives in force in the country of use, so that it cannot slide or tip over.
5
3
4
1
1
1
7
6
2
5
3
4
2
12
Summary of Contents for TRIDENT R26SC PRO
Page 2: ......
Page 3: ...ENGLISH 4 ESPA OLA 30 FRAN AIS 56 3 ESPA OLA FRAN AIS ENGLISH...
Page 82: ...ESPA OLA FRAN AIS ENGLISH 82...
Page 83: ......


