Self Watering
Garden Bed 120
Product Manual
1207 – PH1467b_MATILDA - Self Watering Garden Bed_120_Product Manual.indd 1
29/01/13 10:11 AM
Page 1: ...Self Watering Garden Bed 120 Product Manual 1207 PH1467b_MATILDA Self Watering Garden Bed_120_Product Manual indd 1 29 01 13 10 11 AM ...
Page 2: ...les within the potting mix or soil Do not add fertilsers and or chemicals directly to the self watering system via the Funnel Your Self Watering Garden Bed is made from a number of different types of plastic materials Some fertilisers and or chemicals may not be suitable for use in your Self Watering Garden Bed and you should check their compatibility before use Follow all fertiliser and or chemic...
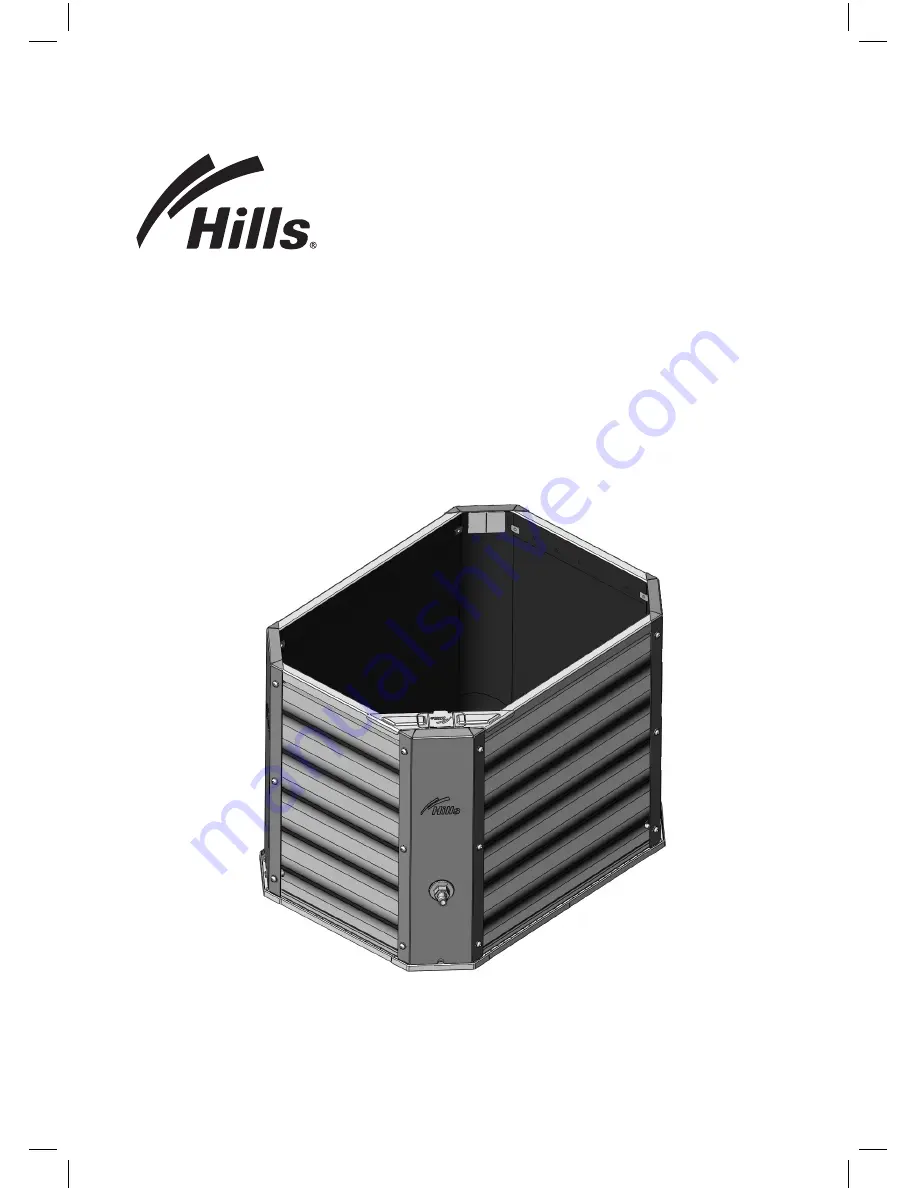
Page 3: ...1 Part Name Qty Internal Washer 1 External Washer 1 Liner Clip 8 Soil Moisture reader 1 Multi Spanner 1 Hex Key 1 M6 x 22mm Screw 16 M6 x 10mm Screw 8 M6 Washer 24 M6 Hex Nut 8 M6 T Nut 16 Overflow Plug 1 Absorption tube assembly Liner End Capping Base Overflow Corner Funnel Side Sheet Side Capping Corner Overflow Nut End Sheet Carton Contents 1207 PH1467b_MATILDA Self Watering Garden Bed_120_Prod...
Page 4: ...ns If you wish to have the Funnel and overflow outlet positioned Front Left or Back Right follow the assembly instructions If you wish to have the Funnel and overflow outlet positioned Front Right or Back Left you will need to substitute the Side Sheets shown in the assembly instructions with End Sheets refer to Fig 1 Note Do not attempt to move your Self Watering Garden Bed when full of sand and ...
Page 5: ...g the big end of the Multi spanner Fig 2 Fig 3 Step 4 Note The Overflow Corner is the corner part with a hole and the Hills logo Place an M6 x 10mm Screw with Washer through the centre holes of the Overflow Corner and Side Sheet painted side facing outward Attach an M6 Nut and tighten using the Hex Key and Multi spanner provided Fig 2 Hint Hold the M6 Nut using the small end of the Multi spanner F...
Page 6: ...eps 4 5 Fig 6 Note Do not fit Screws Washers and T Nuts to the top holes yet Fig 6 Step 6 Assemble an End Sheet painted side facing outward to the other side of the Overflow Corner using Screws Washers Nuts and T Nuts in the centre and lower holes as described in Steps 4 5 Fig 5 1207 PH1467b_MATILDA Self Watering Garden Bed_120_Product Manual indd 6 29 01 13 10 11 AM ...
Page 7: ...w Hole in the Liner with the Overflow Corner and place the Liner inside the garden bed Fig 7 Note Ensure that the short ends of the Liner face the End Sheets Turn the Liner inside out if the Overflow Hole does not align with the Overflow Corner Fig 8 Fig 8 1207 PH1467b_MATILDA Self Watering Garden Bed_120_Product Manual indd 7 29 01 13 10 11 AM ...
Page 8: ...f the Side Sheet Fig 8 9 Align the Top Holes of the Liner with the corresponding Top Holes of the Side Sheet Step 11 Place a Liner Clip over the Liner and Side Sheet close to the Top Holes Fig 9 10 Note Ensure that the flat side of the Liner Clip is placed on the inside of the garden bed Fig 10 1207 PH1467b_MATILDA Self Watering Garden Bed_120_Product Manual indd 8 29 01 13 10 11 AM ...
Page 9: ...r the remaining Side Sheet and End Sheets Fig 11 Step 14 Pull the Side Sheet inward again and place a Side Capping on top of the Liner and Side Sheet Fig 12 Fig 11 Fig 12 1207 PH1467b_MATILDA Self Watering Garden Bed_120_Product Manual indd 9 29 01 13 10 11 AM ...
Page 10: ...ush a T Nut through the Side Capping and Liner and hold in place Insert a M6 x 22mm Screw with Washer through the corresponding top holes of the Corner and Side Sheet Tighten using the tools provided until 1 to 2mm of the screw end protrudes past the end of the T Nut Fig 13 Hint Hold the T Nut horizontal using the big end of the Multi spanner Fig 13 Fig 13 1207 PH1467b_MATILDA Self Watering Garden...
Page 11: ...align and place the Base parts to interlock them Fig 15 Note Ensure that the Base part number and recycling code is facing upward The part number is located in the centre of the part Fig 16 Hint Use the assembled Base parts as a guide for the final position of the garden bed Fig 16 Fig 16 Fig 15 1207 PH1467b_MATILDA Self Watering Garden Bed_120_Product Manual indd 11 29 01 13 10 11 AM ...
Page 12: ...ee so that it s facing away from the centre of the Absorption Tube coil Fig 18 Note Ensure that the Feeder Elbow is pushed into the Absorption Tube and that the Feeder Tubes are pushed onto the fittings fully Step 22 Push the soft and flexible Internal Washer over the thread of the Overflow Tee Fig 19 Note Ensure that the Arrow on the Overflow Tee is pointing downward The Arrow is coloured grey in...
Page 13: ...de the garden bed turn the Absorption Tube Assembly upside down and re orient the Feeder Tube to the upward position as described in Step 20 This will position the Overflow Tee on the opposite side of the End Sheet Fig 21 Note Ensure that the Feeder Elbow is pushed into the Absorption Tube and that the Feeder Tubes are pushed onto the fittings fully Fig 20 Fig 21 1207 PH1467b_MATILDA Self Watering...
Page 14: ...ner and the Funnel wings rest on top of the Capping Refer to cut out view Fig 22 b Pull the Feeder Tube out from the Overflow Corner until the Funnel end is able to make contact with it Fig 22 c Push the Funnel end inside the Feeder Tube while rotating the Funnel to rest flat on top of the Capping Fig 22 Fig 22 Fig 22 Step 25 Push the threaded Overflow Tee end through the Overflow Corner hole Fig ...
Page 15: ...the Overflow Outlet during watering When the self watering system is full excess water will flow from the Overflow Outlet Alternatively connect 13mm poly tube to the barbed end of the Overflow Nut to divert any excess water Place the overflow plug back on the overflow outlet to ensure no dripping once watering is completed Fig 25 Note The overflow plug must be removed when watering Do not fill the...
Page 16: ...ou know when to water Allows you to monitor PH levels in soil To check moisture content push switch to the left insert probe deeply into soil reaching root level Keep probe close to plant To check PH level push switch to the right insert probe deeply into soil Remove from the soil and wipe clean after each use No batteries required Indoor or outdoor use Accessories available Plant ID Tags Hills Gr...
Page 17: ... reference Product Number printed on carton FH Date of purchase Name and location of store Made in China Designed and tested under a Quality System that meets Hills demanding quality specifications 1207 PH1467b_MATILDA Self Watering Garden Bed_120_Product Manual indd 17 29 01 13 10 11 AM ...
Page 18: ...ts 3 Hills warrants that for the duration of the Warranty Period all Products will be free of faults arising from defects in Workmanship or Materials on the terms and conditions set out in this warranty 4 Hills undertakes that if during the Warranty Period any Product or any part of a Product has failed to operate correctly due to faulty Workmanship or defective Material it will repair or replace ...
Page 19: ...ucts The Products are designed to perform specific tasks under established test loads and unauthorised attachments may produce stresses for which the design is not appropriate 9 The following applies to consumers who purchased a relevant Product in Australia Our goods come with guarantees that cannot be excluded under the Australian Consumer Law You are entitled to a replacement or refund for a ma...
Page 20: ...Hills Holdings Limited A B N 35 007 573 417 Issue December 2012 PH1467b MSD 1207 1207 PH1467b_MATILDA Self Watering Garden Bed_120_Product Manual indd 20 29 01 13 10 11 AM ...