


DS-PR1-60 User Manual
UM DS-PR1-60 090920NA
45
6.3
One-Point Calibration
Before You Start
•
You need to disarm the radar before the operation.
•
You need to add the camera in the radar list before calibration, and set the speed dome initial position.
•
The installation height of the linked speed dome should to be more than 9 ft 10 in (3 m).
1.
Click
on the Calibration List
2.
Select a linked IPC.
3.
Select
One-Point Calibration
as the calibration mode.
4.
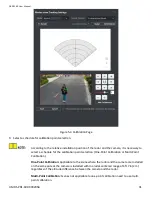
Select the track of calibration staff: Ask the calibration staff to move into the radar detection area.
Compare the moving object in the live view window of the camera and the track in the radar field diagram,
the operation staff needs to select the track of the calibration staff and click it. The color of the selected
track will change from red to yellow.
Figure 6-1 Select the Track
5.
Ask the calibration staff to move to the calibration point within 20 to 40 m directly in front of the radar, and
then stand at the calibration point.
6.
Adjust the PTZ buttons in the live view window to get the PTZ position: Adjust the altitude of the
calibration staff to two-thirds of the altitude of the window, and click the direction buttons to align the
central sign
+
with the calibration staff (For precise alignment, click
and click on the center of the object
and the screen will adjust automatically).
7.
Click
Get Calibration
to add a calibration point, the PTZ position and the radar position of the calibration
staff will be shown on the right list.
Summary of Contents for DS-PR1-60
Page 1: ...DS PR1 60 Security Radar User Manual...
Page 42: ...DS PR1 60 User Manual UM DS PR1 60 090920NA 42...
Page 69: ...DS PR1 60 User Manual UM DS PR1 60 090920NA 69...
Page 70: ...DS PR1 60 User Manual UM DS PR1 60 090920NA 70...
Page 71: ...DS PR1 60 User Manual UM DS PR1 60 090920NA 71 UD13649B...