background image

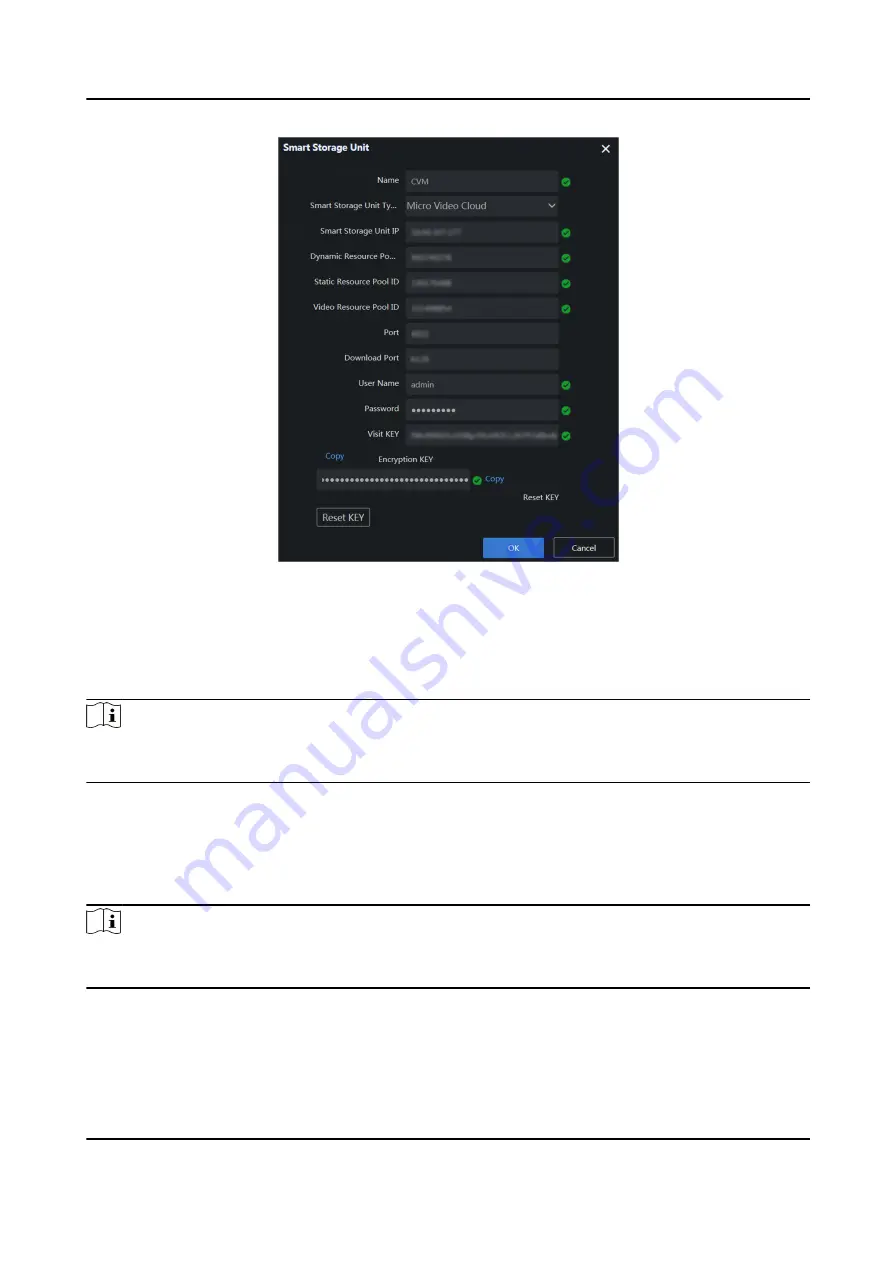
Figure 2-18 Add Smart Storage Unit

4. After setting parameters, click OK.

2.3 Create Cluster

Note

The nodes that create micro video cloud cluster should be same with that of creating analysis

cluster. Otherwise, exception may occur.

2.3.1 Add Nodes

Before You Start

The node is online and on the same subnet with the server.

Note

The specific parameter values filled in the relevant interfaces below are for reference only. You

need to configure relevant parameter values according to actual needs.

Steps

1. Go to System Management → Cluster Management → Node Management

2. Click Add.

Intelligent Fusion Server Installation Guide

15

Summary of Contents for DS-IX2001-A3U/X

Page 1: ...Intelligent Fusion Server Installation Guide...

Page 2: ...MAXIMUM EXTENT PERMITTED BY APPLICABLE LAW THIS MANUAL AND THE PRODUCT DESCRIBED WITH ITS HARDWARE SOFTWARE AND FIRMWARE ARE PROVIDED AS IS AND WITH ALL FAULTS AND ERRORS HIKVISION MAKES NO WARRANTIES...

Page 3: ...LLECTUAL PROPERTY RIGHTS OR DATA PROTECTION AND OTHER PRIVACY RIGHTS YOU SHALL NOT USE THIS PRODUCT FOR ANY PROHIBITED END USES INCLUDING THE DEVELOPMENT OR PRODUCTION OF WEAPONS OF MASS DESTRUCTION T...

Page 4: ...harmful interference 2 This device must accept any interference received including interference that may cause undesired operation EU Conformity Statement This product and if applicable the supplied...

Page 5: ...ndicates a hazardous situation which if not avoided will or could result in death or serious injury Caution Indicates a potentially hazardous situation which if not avoided could result in equipment d...

Page 6: ...1 Format Storage Volume 5 2 2 2 Create Micro Video Cloud Cluster 7 2 2 3 Set Storage Parameter 8 2 2 4 Add Storage Node to Domain 9 2 2 5 Create Static Pool 10 2 2 6 Create Video Pool 11 2 2 7 Create...

Page 7: ...3 A 5 Install OS 23 A 6 Modify Node IP 25 Appendix B Install and Uninstall LIGHTSYSTEM Software 28 B 1 Install LIGHTSYSTEM Software 28 B 2 Uninstall LIGHTSYSTEM Software 28 Appendix C Install and Unin...

Page 8: ...um IV 3 0 GHz or above Memory 1G or larger Resolution 1024 768 or higher Web browser Internet Explorer 8 to 11 1 4 Activation The server is available only after being activated 1 4 1 Activate via SADP...

Page 9: ...ce is activated 3 Modify network parameters of the device 1 Select an activated device and enter information such as IP Address Subnet Mask and Gateway in the Modify Network Parameter 2 Enter your pas...

Page 10: ...e server with web browser Note You shall acknowledge that the use of the product with Internet access might be under network security risks For avoidance of any network attacks and information leakage...

Page 11: ...ible go to Internet Options Advancement check Enable TLS1 1 and Enable TLS1 2 The specific interface depends on the product After admin user logs in the server will jump to the homepage where you can...

Page 12: ...ctures and uploaded videos 2 2 1 Format Storage Volume Steps 1 Enter https 192 168 0 1 5119 in IE browser press Enter and click Continue to view Note Here we take the IP address of the device 192 168...

Page 13: ...erface 4 Go to Device Storage Volume select storage volume and click Format Storage Volume Figure 2 3 Select Storage Volume 5 Keep parameters as default values and click OK Figure 2 4 Format Storage V...

Page 14: ...xception may occur Steps 1 Input https 192 168 0 1 5120 in IE browser and press Enter to enter HikCStor Management System Note Here we take the IP address of the device 192 168 0 1 as an example You s...

Page 15: ...reference only You need to input relevant parameter values according to actual condition 1 Go to 5119 Interface 2 Go to System Storage Configuration 3 Enter the virtual IP of cluster micro video clou...

Page 16: ...rameters to complete 2 2 4 Add Storage Node to Domain Steps 1 Go to 5120 interface 2 Go to Virtualizing Domain Management and click Create Figure 2 11 Create Domain 3 Enter Domain Name and click OK 4...

Page 17: ...urce Pool Management 2 Click Create and set parameters in the popup dialog box as shown below Parameter Name Description Domain ID Select the domain that you created User Name Select admin User Permis...

Page 18: ...Steps 1 Go to Virtualizing Resource Pool Management 2 Click Create and set parameters in the popup dialog box as shown below Parameter Name Description Domain ID Select the domain that you created Use...

Page 19: ...adding smart storage unit 2 2 7 Create Dynamic Pool Dynamic pool is used to storage the human face pictures that are captured by the camera Steps 1 Go to Virtualizing Resource Pool Management 2 Click...

Page 20: ...acity Note It is recommended to set the value as the remaining capacity but you can also set it according to actual needs Click to view available capacity Max Locking up Attempts Enter 10 Figure 2 16...

Page 21: ...nter node IP Dynamic Resource Pool ID Enter dynamic resource pool ID that you created Static Resource Pool ID Enter static resource pool ID that you created Video Resource Pool ID Enter video resource...

Page 22: ...xception may occur 2 3 1 Add Nodes Before You Start The node is online and on the same subnet with the server Note The specific parameter values filled in the relevant interfaces below are for referen...

Page 23: ...nodes to be added please follow the steps above to finish 2 3 2 Create Stand alone Cluster Single node can create standalone cluster After creating cluster the server can analyze data Before You Star...

Page 24: ...ck Create Cluster 2 Select the desired node and click Next Figure 2 22 Select Nodes 3 Click zookeeper kafka MongoDB appServer respectively and check the desired nodes Intelligent Fusion Server Install...

Page 25: ...ace Picture Analysis Path Intelligent analysis of face attributes in pictures Face Video Analysis Path Intelligent analysis of face attributes in videos Structured Picture Analysis Channel Intelligent...

Page 26: ...2 Select the desired nodes and click Next 3 Click zookeeper kafka MongoDB appServer respectively and check the desired nodes 4 Click appServer and enter an unused IP address in Virtual IP 5 Click Sta...

Page 27: ...ctures Structured Video Analysis Channel Intelligent analysis of target human body or vehicle attributes in videos Note If no resource is allocated the server cannot process the analysis task Figure 2...

Page 28: ...ing to actual needs Table A 1 BMC Default Information Parameters Default Value Protocol Type DHCP User Name root Password hik12345 A 2 2 View BMC IP Address View BMC IP address during the process of s...

Page 29: ...admin as password 4 Click Log in 5 Go to BMC Parameters BMC Network Network 6 Select Management Port as LAN Interface 7 Disable DHCP and set IPv4 Address Netmask Gateway according to actual needs 8 Cl...

Page 30: ...sing mirror file as an example Before You Start The mirror file has been obtained and saved Steps 1 Go to Media Virtual Media Wizard CD DVD Figure A 3 Virtual Media Wizard 2 Click Browse to select the...

Page 31: ...art Server 2 The device launches via the mirror file and complete the installation Figure A 6 OS Installation Completed Note Press Enter if the interface stays as below for a long time Figure A 7 Inst...

Page 32: ...ssword of your own choosing Using a minimum of 8 characters including at least three of the following categories upper case letters lower case letters numbers and special characters in order to increa...

Page 33: ...MASK Subnet mask GATEWAY Gateway Figure A 11 Edit Network Parameters 6 Press ESC to exit editing mode enter wq and press Enter to save and exit configuration file 7 Enter service network restart and p...

Page 34: ...Figure A 13 Check Network Parameters 9 Enter reboot and press Enter to restart the server Intelligent Fusion Server Installation Guide 27...

Page 35: ...ss Enter 2 Enter ls and then press Enter Figure B 1 Run Installation File Note If the software is disable to function enter chmod x DC_LIGHTSYSTEM to authorize the software 3 Enter DC_DC_LIGHTSYSTEM_C...

Page 36: ...TEM to authorize the software 3 Enter DC_DC_LIGHTSYSTEM_CN_STD_T4_V1 1 0_ uninstall and then press Enter Figure B 4 Uninstall Software Note It takes a while to complete the installation please wait Th...

Page 37: ...ool such as Xshell Note Here we take Xshell tool login node IP 192 168 0 1 as an example Steps 1 Open Xshell tool enter ssh 192 168 0 1 2343 and press Enter Figure C 1 Set up ssh Connection 2 Enter ro...

Page 38: ...t up ssh Connection 2 Enter root as user name and enter your password 3 Enter cd yunstorage and press Enter Figure C 5 Basic Settings Interface 4 Enter b_iscsi bn_cli resolve_bios storos 2019 bin and...

Page 39: ...UD17661B...

Reviews: