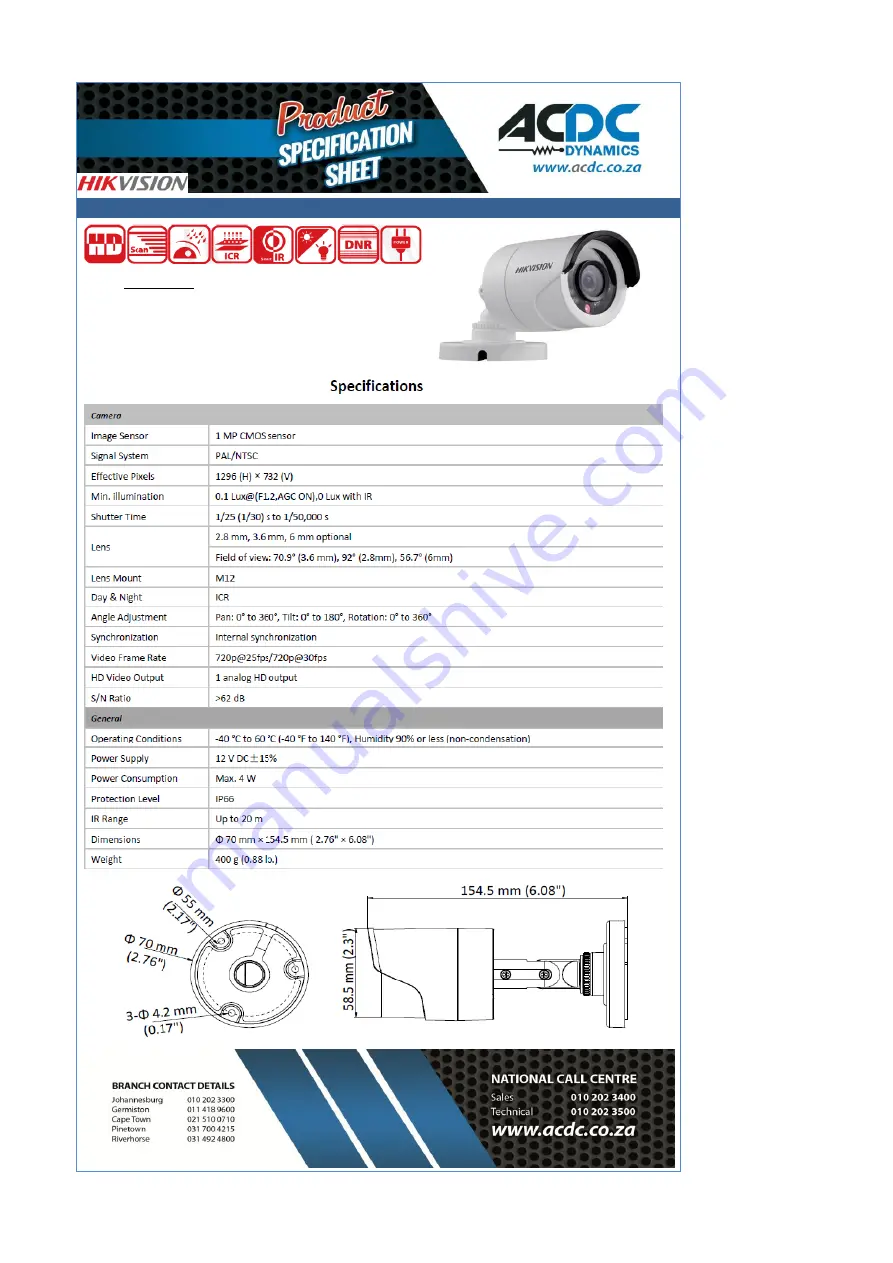
Key Features• 1 Megapixal high performance CMOS• Analogue HD output up to 720p resolution• Day / Night switch• Smart IR, up to 20m distance•
Switchable TV1 / AHD / CV1 / CVBS
• IP66
DS-2CE16COT-IRF
Page 1: ...Key Features 1 Megapixal high performance CMOS Analogue HD output up to 720p resolution Day Night switch Smart IR up to 20m distance Switchable TV1 AHD CV1 CVBS IP66 DS 2CE16COT IRF...
Page 2: ...el Type I DS 2CE16C0T IRF IRPF DS 2CE16D0T IRF IRPF Type II DS 2CE56C0T IRMF DS 2CE56D0T IRMF Type III DS 2CE56C0T IRF IRPF DS 2CE56D0T IRF IRPF This manual may contain several technically incorrect p...
Page 3: ...complies with part 15 of the FCC Rules Operation is subject to the following two conditions 1 This device may not cause harmful interference 2 This device must accept any interference received includi...
Page 4: ...the plug is firmly connected to the power socket When the product is mounted on wall or ceiling the device shall be firmly fixed If smoke odor or noise rise from the device turn off the power at once...
Page 5: ...re Introduction 1 1 Product Features The camera is applicable for both indoor and outdoor conditions and the application scenarios include road warehouse parking lot office campus etc The main feature...
Page 6: ...reparation Before you start Make sure that the device in the package is in good condition and all the assembly parts are included Make sure that all the related equipment is power off during the insta...
Page 7: ...crews Figure 2 2 Secure the camera to the ceiling Note In the supplied screw package both self tapping screws and expansion blots are contained If the wall is cement expansion blots are required to fi...
Page 8: ...ype II camera Steps 1 Use the hex wrench to loosen the screw and remove the mounting base from the camera body shown as the figure 2 4 r e r e Figure 2 4 Disassemble the Camera 2 Attach the drill temp...
Page 9: ...and tighten the screw to secure the camera with the mounting base Clip Plate Side Opening Figure 2 7 Secure the Camera with Mounting Base 7 Connect the corresponding cables such as power cord and vide...
Page 10: ...Template 2 Attach the mounting base to the ceiling and secure them with supplied screws Figure 2 10 Attach the Mounting Base to the Ceiling Note In the supplied screw package both self tapping screws...
Page 11: ...adjust the camera according to the figure below to get an optimum angle 1 Hold the camera body and rotate the enclosure to adjust the pan position 0 to 360 2 Move the camera body up and down to adjus...