HIKVISION 7604NI-K1B Quick Start Manual Download Page 20

Network Video Recorder Quick Start Guide 

19 

3.10 Recording Settings   

Before you start: 

Make sure that the disk has already been installed. If not, please install a disk and initialize it. You 
may refer to the user manual for detailed information. 

Purpose: 

Two kinds of record types are introduced in the following section, including Instant Record and 
All-day Record. And for other record types, you may refer to the user manual for detailed 
information. 


After rebooting all the manual records enabled are canceled. 
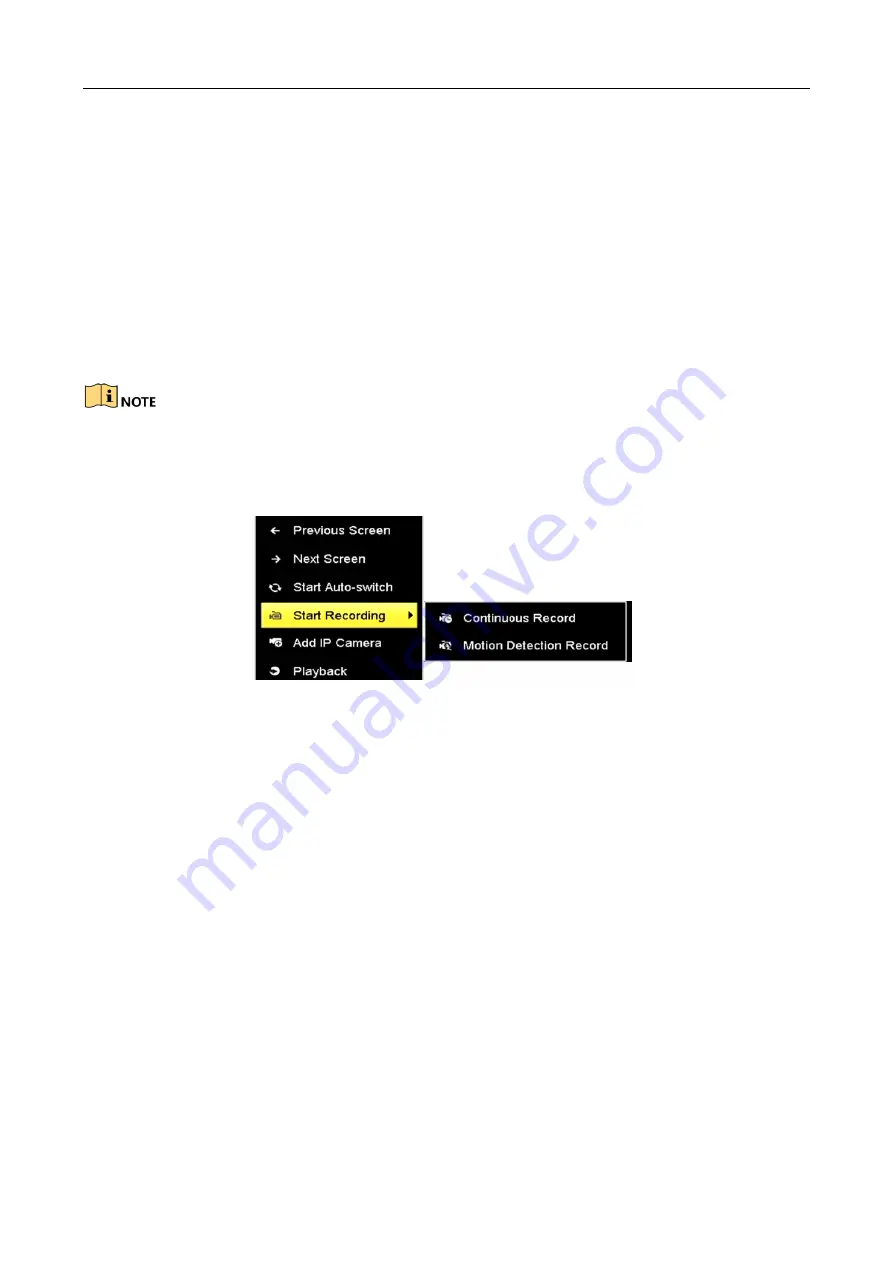
Step 1


On the live view window, right lick the window and move the cursor to the Start Recording 
option, and select Continuous Record or Motion Detection Record on your demand. 


Figure 3-11


Start Recording from Right-click Menu 

Step 2


Click the Yes button in the pop-up Attention message box to confirm the settings. All the 
channels will start to record in the selected mode. 

3.11 Playback 

The recorded video files on the hard disk can be played back in the following modes: instant 
playback, all-day playback for the specified channel, and playback by 
normal/event/smart/tag/sub-periods/external file search.   

Step 1


Enter playback interface. 

Click Menu>Playback or from the right-click menu 

Step 2


Check the checkbox of channel(s) in the channel list and then double-click to select a date on 
the calendar. 

Step 3


You can use the toolbar in the bottom part of Playback interface to control playing progress. 

Summary of Contents for 7604NI-K1B

Page 1: ...Network Video Recorder Quick Start Guide...

Page 2: ...I Q2 P Series 8 Chapter 2 Installation and Connections 9 2 1 NVR Installation 9 2 2 Hard Disk Installation 9 2 3 HDD Storage Calculation Chart 11 Chapter 3 Menu Operation 12 3 1 Menu Structure 12 3 2...

Page 3: ...gos mentioned below are the properties of their respective owners Legal Disclaimer TO THE MAXIMUM EXTENT PERMITTED BY APPLICABLE LAW THE PRODUCT DESCRIBED WITH ITS HARDWARE SOFTWARE AND FIRMWARE IS PR...

Page 4: ...erence 2 This device must accept any interference received including interference that may cause undesired operation EU Conformity Statement This product and if applicable the supplied accessories too...

Page 5: ...4NI K1 B DS 7608NI K1 B DS 7616NI K1 B DS 7600NI K1 P B DS 7604NI K1 4P B DS 7608NI K1 8P B Symbol Conventions The symbols that may be found in this document are defined as follows Symbol Description...

Page 6: ...rts of device do not comply with Limited Power Source the additional equipment connected to POE ports shall have fire enclosure The USB interface of the P devices can be connected with the mouse and U...

Page 7: ...1 Status Indicator Power Power indicator turns green when system is running Status Status indicator blinks red when data is being read from or written to HDD Tx Rx Tx Rx indictor blinks green when net...

Page 8: ...Serial Bus USB port for additional devices such as USB mouse and USB Hard Disk Drive HDD No Item Description 1 Power Supply 12 VDC power supply 2 Audio In RCA connector for audio input 3 HDMI Interfa...

Page 9: ...utput connector 4 LAN Network Interface 1 10 100 1000 Mbps self adaptive Ethernet interface 5 Audio Out RCA connector for audio output 6 VGA Interface DB9 connector for VGA output Display local video...

Page 10: ...ted devices Ensure the NVR is grounded Environmental temperature should be within the range of 10 to 55 C 14 to 131 F Environmental humidity should be within the range of 10 to 90 2 2 Hard Disk Instal...

Page 11: ...de 10 Figure 2 2 Connect Data Cable Step 3 Connect the power cable to the HDD Figure 2 3 Connect Power Cable Step 4 Place the HDD on the bottom of the device and then fasten the screws on the bottom t...

Page 12: ...ate Storage Used 96K 42M 128K 56M 160K 70M 192K 84M 224K 98M 256K 112M 320K 140M 384K 168M 448K 196M 512K 225M 640K 281M 768K 337M 896K 393M 1024K 450M 1280K 562M 1536K 675M 1792K 787M 2048K 900M 4096...

Page 13: ...ons Net Detect Video Tampering User Video Loss HDD Detect Alarm RS 232 VCA Normal Event Tag External File VCA Search Behavior Search Face Search Alarm Hot Spare Plate Search Figure 3 1 Menu Structure...

Page 14: ...initializing and recording To shut down the NVR Step 3 Enter the Shutdown menu Menu Shutdown Figure 3 2 Shutdown Step 4 Select the Shutdown button Step 5 Click the Yes button 3 3 Activating Your Devic...

Page 15: ...uct And we recommend you reset your password regularly especially in the high security system resetting the password monthly or weekly can better protect your product Step 2 In the IP Camera Activatio...

Page 16: ...tep 1 Use the mouse to draw a pattern among the 9 dots on the screen Release the mouse when the pattern is done Figure 3 5 Draw the Pattern Connect at least 4 dots to draw the pattern Each dot can be...

Page 17: ...password 7 times the current user account will be locked for 60 seconds 3 6 Using the Setup Wizard The Setup Wizard can walk you through some important settings of the device By default the Setup Wiz...

Page 18: ...NS Server Step 4 If the DHCP server is available you can check the checkbox of DHCP to automatically obtain an IP address and other network settings from that server Step 5 After having configured the...

Page 19: ...stom add the IP camera by editing the parameters in the corresponding text field and then click the Add button to add it 3 9 Live View Icons are provided on screen in Live View mode to indicate camera...

Page 20: ...option and select Continuous Record or Motion Detection Record on your demand Figure 3 11 Start Recording from Right click Menu Step 2 Click the Yes button in the pop up Attention message box to confi...

Page 21: ...Network Video Recorder Quick Start Guide 20 Figure 3 12 Playback Interface Step 4 Select the channel s to or execute simultaneous playback of multiple channels...

Page 22: ...0 Apple Safari Mozilla Firefox and Google Chrome The supported resolutions include 1024 768 and above Step 1 Open web browser input the IP address of the device and then press Enter Step 2 Login to th...

Page 23: ...in Step 3 Install the plug in before viewing the live video and managing the camera Please follow the installation prompts to install the plug in You may have to close the web browser to finish the in...

Page 24: ...Network Video Recorder Quick Start Guide 23 UD08041B...

Reviews: