Disassembly / assembly
50
18.
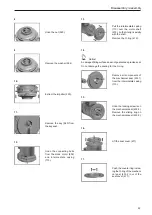
Clean the chrome-nickel steel motor shaft of any residue
and sediment deposits using fine emery cloth.
Clean any deposits from the seating for the O-ring.
Important!
Replace any seals that are removed. This ensures precise
sealing.
9.2 Assembly
Before starting to reassemble the pump all of the dismantled
parts are to be
- checked for signs of damage and wear,
- cleaned and
- replaced with original spare parts if necessary.
Important!
Nuts (920) with a self-locking plastic ring are to be replaced
when reattaching the impeller.
Important!
To reduce friction during assembly lubricate all sliding sur-
faces of the elastomers with low surface tension water (with
added detergent).
Notice - do not use oil or grease!
9.2.1 Assembling the standard version
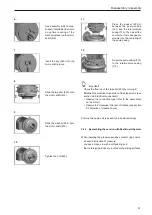
1.
When inserting the pressure-sensitive counter ring ensure
- an even distribution of pressure,
- you use a clean pin with a soft seating and
- that no foreign particles are located on the sliding surfaces.
Press the counter ring with
the O-ring of the mechanical
seal (433.1) into the interme-
diate casing (113) by hand.
2.
Slide assembly aids (acces-
sories) onto the motor shaft
(819) (if available).
3.
Important!
Do not damage the counter ring of the mechanical seal on
the thread and change-over of the motor shaft or press at
an angle!
Carefully slide the interme-
diate casing (113) over the
motor shaft (819) and onto
the centering of the block
motor (802).
4.
Screw the intermediate cas-
ing (113) to the block motor
(802).
Important!
- Make sure you degrease the shaft surface!
- The pretension of the spring is obtained through the instal-
lation of the impeller.
5.
Carefully slide the rotating
sliding ring with bellows and
spring over the motor shaft
shoulder and up to the inte-
grated counter ring using a
screwing motion.
Summary of Contents for herborner.X
Page 4: ......


