EN – Translation of the original user manual - 2.1 | 2019
64
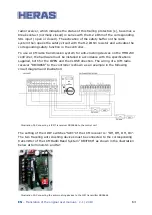
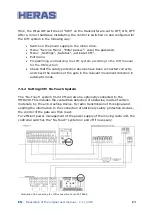
Here, the three DIP switches of "SW1" on the transmitter are set to OFF, ON, OFF.
After a correct hardware installation, the control is switched on and configured for
the JCM system in the following way:
•
Switch on the power supply to the motor drive.
•
Menu: "Service Menu", "Enter passw.": enter the password.
•
Menu: „Settings“, „Safeties“, „activate JCM “.
•
Exit menu
•
Programming and learning the JCM system according to the JCM manual
for the RB3 system
•
Check that the safety protection devices have been connected correctly
and check the reaction of the gate in the relevant movement direction in
automatic mode.
7.2.2
Setting JCM No-Touch System
The "No-Touch" system from JCM can also be optionally connected to the
HMD230. This includes the contactless detection of obstacles, made of certain
materials, by the anti-crushing device. By radio transmission of this signal and
sending the information to the connection of stationary safety protection devices,
the control of the gate can then react.
For efficient power management of the power supply of the moving radio unit, the
controller switches the "No-Touch" system on and off if necessary.
Illustration 36:
Connecting the JCM receiver No-Touch CAP R868
Summary of Contents for HGD230
Page 2: ...EN Translation of the original user manual 2 1 2019 2...
Page 112: ...EN Translation of the original user manual 2 1 2019 112 Appendix A Declarations Dop DoC...
Page 113: ...EN Translation of the original user manual 2 1 2019 113...
Page 114: ...EN Translation of the original user manual 2 1 2019 114...
Page 116: ...EN Translation of the original user manual 2 1 2019 116...
Page 117: ...EN Translation of the original user manual 2 1 2019 117...
Page 118: ...EN Translation of the original user manual 2 1 2019 118...
Page 119: ...EN Translation of the original user manual 2 1 2019 119...
Page 120: ...EN Translation of the original user manual 2 1 2019 120...
Page 121: ...EN Translation of the original user manual 2 1 2019 121...
Page 122: ...EN Translation of the original user manual 2 1 2019 122...
Page 123: ...EN Translation of the original user manual 2 1 2019 123...
Page 124: ...EN Translation of the original user manual 2 1 2019 124...
Page 125: ...EN Translation of the original user manual 2 1 2019 125...
Page 126: ...EN Translation of the original user manual 2 1 2019 126...
Page 127: ...EN Translation of the original user manual 2 1 2019 127...
Page 128: ...EN Translation of the original user manual 2 1 2019 128...
Page 129: ...EN Translation of the original user manual 2 1 2019 129 Appendix C ELECTRIC DIAGRAM IGD230...
Page 130: ...EN Translation of the original user manual 2 1 2019 130...
Page 131: ...EN Translation of the original user manual 2 1 2019 131...
Page 132: ...EN Translation of the original user manual 2 1 2019 132...
Page 133: ...EN Translation of the original user manual 2 1 2019 133...
Page 134: ...EN Translation of the original user manual 2 1 2019 134...
Page 135: ...EN Translation of the original user manual 2 1 2019 135...
Page 136: ...EN Translation of the original user manual 2 1 2019 136...
Page 137: ...EN Translation of the original user manual 2 1 2019 137...
Page 138: ...EN Translation of the original user manual 2 1 2019 138...
Page 139: ...EN Translation of the original user manual 2 1 2019 139...
Page 140: ...EN Translation of the original user manual 2 1 2019 140...
Page 141: ...EN Translation of the original user manual 2 1 2019 141...
Page 142: ...EN Translation of the original user manual 2 1 2019 142...
Page 143: ...EN Translation of the original user manual 2 1 2019 143...
Page 144: ...EN Translation of the original user manual 2 1 2019 144...
Page 145: ...EN Translation of the original user manual 2 1 2019 145...
Page 146: ...Local supplier stamp...

