background image

17730-299 

41


Component Replacement

ULTIMAAX

®

 for Fire and Rescue Vehicles

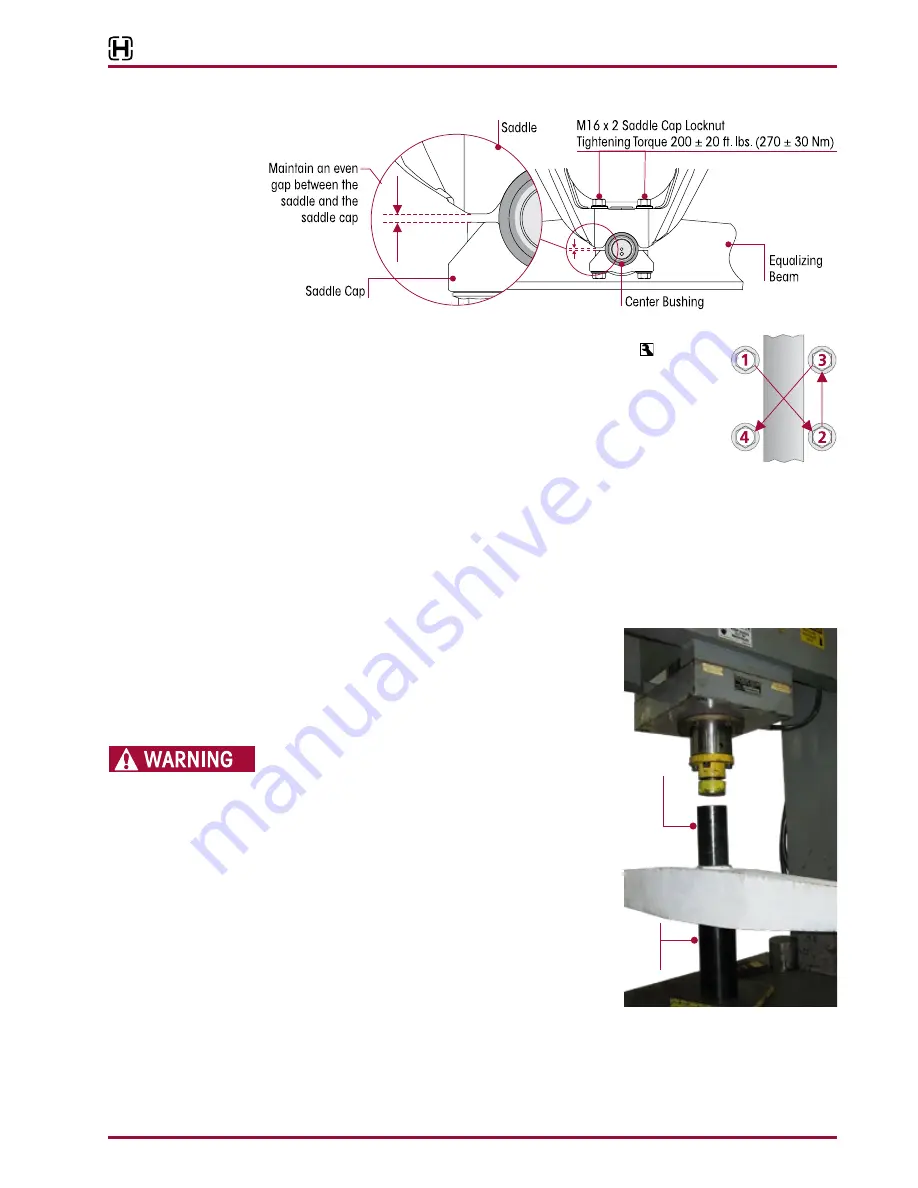
FIGURE 8-19


FIGURE 8-20

11 . Tighten the saddle cap fasteners evenly in several steps to   200 ± 20 

foot pounds torque in proper sequence to achieve uniform bolt tension, 

see Figure 8-20 .

12 . Install the tires .
13 . Remove the support from the axles and lower the vehicle onto the ground .
14 . Remove the wheel chocks .

EQUALIZING BEAM CENTER BUSHING

You will need:


Vertical shop press with a capacity of at least 100 Tons .


Center bushing tools – Receiving Tool No . 66086-112, Installation Tool No . 66086-107 and 

Removal Tool No . 66086-110, see Special Tools Section of this publication . 


FIGURE 8-21

DISASSEMBLY

1 .  Remove the equalizing beam assembly 

from the vehicle . Follow the equalizing 

beam disassembly procedure in this 

section .


DO NOT USE A CUTTING TORCH TO REMOVE 

ANY FASTENERS OR BUSHINGS . THE USE 

OF HEAT ON SUSPENSION COMPONENTS 

WILL ADVERSELY AFFECT THE STRENGTH OF 

THESE PARTS . A COMPONENT DAMAGED IN 

THIS MANNER CAN RESULT IN THE ADVERSE 

VEHICLE HANDLING AND POSSIBLE PERSONAL 

INJURY OR PROPERTY DAMAGE .
2 .  Place the equalizing beam assembly in 

a shop press with the center hub firmly 

supported on the receiving tool or on the 

press, see Figure 8-21 .

3 .  Install the center bushing removal tool, 

ensure it is centered on the center 

bushing .

4 .  Push directly on center bushing removal tool until the center bushing is pressed out of the 

equalizing beam bore, see Figure 8-21 .

5 .  Inspect the beam bore .

Equalizing Beam Assembly

Center Bushing

Removal Tool

Part No. 66086-110

Center Bushing

Receiving Tool

Part No. 66086-112

Summary of Contents for ULTIMAAX 54K

Page 1: ...8 Beam End Axle Brackets 19 Frame Hanger Assembly 20 Shear springs 20 Progressive Load Springs PLS 21 Saddle Connection 22 Cross Tube 23 Torque Rods 24 Shock Absorbers 25 Section 7 Alignment Adjustments Drive Axle Pinion Angle 27 Drive Axle Alignment 27 Axle Lateral Alignment 29 Bar Pin Alignment 29 Section 8 Component Replacement Fasteners 32 Shock Absorber 32 Shear Spring Frame Hanger Assembly S...

Page 2: ...utstanding durability empty ride quality loaded stability and mobility Through its unique design the system offers premium ride quality in both empty and loaded conditions with increasing stability as the load increases Equalizing beam Formed and robotically welded to provide a narrow profile for weight savings Distributes load equally between axles to improve maneuverability stability and handlin...

Page 3: ...er with the vehicle in its original as built configuration Contact Hendrickson and the respective vehicle manufacturer for approval of additional applications 1 Suspension articulation may exceed vehicle s capability and may be limited by vehicle manufacturer vehicle manufacturer installed axle stops may restrict suspension s articulation 2 Contact Hendrickson for availability of additional beam l...

Page 4: ...al injury to service personnel or possibility of improper service methods which may damage the vehicle or render it unsafe This is the safety alert symbol It is used to alert you to potential personal injury haz ards Obey all safety messages that follow this symbol to avoid possible injury or death Additional Notes or Service Hints are utilized to emphasize areas of procedural impor tance and prov...

Page 5: ...HE EQUALIZING BEAM SUCH IMPROPER ACTIONS CAN DAMAGE THE EQUALIZING BEAM ASSEMBLY AND CAUSE ADVERSE VEHICLE HANDLING AND POSSIBLE PERSONAL INJURY OR PROPERTY DAMAGE LOAD CAPACITY ADHERE TO THE PUBLISHED CAPACITY RATINGS FOR THE SUSPENSION ADD ON AXLE ATTACHMENTS AND OTHER LOADTRANSFERRING DEVICES CAN INCREASETHE SUSPENSION LOAD ABOVE ITS RATED AND APPROVED CAPACITIES WHICH CAN RESULT IN COMPONENT D...

Page 6: ...URE 3 1 REFER TO VEHICLE MANUFACTURER FOR PROPER JACKING INSTRUCTIONS ACCEPTABLE LIFTING POINTS FOR A VEHICLE AT THE RATED LOAD INCLUDE BUT ARE NOT LIMITED TO THE AXLE EQUALIZING BEAM AND THE VEHICLE FRAME RAIL REFER TO THE VEHICLE MANUFACTURER FOR PROPER JACKING INSTRUCTIONS FIGURE 3 1 SADDLE CONNECTION A SADDLE ASSEMBLY IS ATTACHED TO THE CENTER BUSHING OF EACH EQUALIZING BEAM WITH TWO 2 SADDLE ...

Page 7: ... HELP AVOID SERIOUS PERSONAL INJURY CAREFULLY FOLLOW THE MANUFACTURER S PRODUCT INSTRUCTIONS AND GUIDELINES AND THE FOLLOWING PROCEDURES 1 WEAR PROPER EYE PROTECTION 2 WEAR CLOTHING THAT PROTECTS YOUR SKIN 3 WORK IN A WELL VENTILATED AREA 4 DO NOT USE GASOLINE OR SOLVENTS THAT CONTAIN GASOLINE GASOLINE CAN EXPLODE 5 HOT SOLUTION TANKS OR ALKALINE SOLUTIONS MUST BE USED CORRECTLY FOLLOW THE MANUFAC...

Page 8: ...LTOOL Hendrickson Part No 66086 110 BAR PIN STYLE END BUSHINGTOOLS 54K 58K RECEIVINGTOOL Hendrickson Part No 66086 111 INSTALLATIONTOOL Hendrickson Part No 66086 106 REMOVALTOOL Hendrickson Part No 66086 109 ADAPTER STYLE END BUSHINGTOOLS 63K End Bushing Removal Replacement Adapter OTC Part Number 208350 Clamp OTC Part Number 208349 Center Bushing Removal Replacement Adapter OTC Part Number 28541 ...

Page 9: ... ROD BUSHINGTOOLS These shop made tools are made from cold rolled steel or equivalent The drawings are for reference only Hendrickson does not supply these tools RECEIVINGTOOL INSTALLATION REMOVALTOOL ULTRA ROD PLUS FUNNELTOOL Hendrickson Part No 66086 000L ...

Page 10: ...senbauer 9 Ride Height KME 10 Ride Height 58K Seagrave 9 10 and 11 Ride Height 63K Rosenbauer 10 Ride Height KME 10 Ride Height 63K Beam End Con guration 1 2 11 17 17 13 15 16 18 19 10 21 23 12 20 26 25 27 24 22 24 23 22 16 16 13 15 16 14 if equipped 14 if equipped 9 8 7 6 3 4 5 6 ...

Page 11: ...Spring Service Kit One Side Includes Key Nos 12 13 15 16 18 19 21 23 28 60961 750 Shear Spring Service Kit One Side Includes Key Nos 12 18 19 21 23 28 12 Shear Spring 8 60961 751 Progressive Load Spring Service Kit One Side Includes Key Nos 13 15 16 13 Progressive Load Spring 4 14 70824 001 Spacer 63K only 4 34013 196 Progressive Load Spring Fasteners Service Kit One Side Includes Key Nos 15 16 15...

Page 12: ... 4 65781 002 Two piece Transverse Torque Rod 2 Straddle Tapper Includes Key Nos 5 6 5 66649 002L XTRB Straddle Bushing 6 6 66649 004 XTRB Taper Bushing 2 7 22186 000 Torque Rod Frame Bracket 2 8 Torque Rod Cross Member Bracket 2 a 30828 000 Rosenbauer b 22186 000 KME 9 Torque Rod Shim As Req a 49689 000 111 mm b 67779 002 133 mm 1 ULTRA ROD PLUS Longitudinal Torque Rod Straddle Straddle Includes K...

Page 13: ... equalizing beam end connections Every 6 Months 1200 Hours or 25 000 Miles 40 000 km Visually Inspect proper assembly and function Check for all of the following and replace components as necessary Signs of unusual movement loose or missing components Signs of abrasive or adverse contact with other components example brake lines wheel wells frame hangers etc Damaged or cracked parts Proper suspens...

Page 14: ...steners Inspect the locknuts for proper torque to prevent wear of the beam center bushing into the saddle SeeTorque Specification Section of this publication for recom mended torque requirements Shock absorbers Look for any signs of dents or leakage Misting is not considered a leak See Shock Absorber Inspection in this section Transverse torque rods Longitudinal torque rods The torque rods must be...

Page 15: ...ightly tap on the alignment shims to see if they can be moved If movement is detected tighten fasteners to the proper torque value see Figure 6 2 Inspect the equalizing beam end connection for signs of excessive wear or looseness SERVICE HINT An equalizing beam end connection that is visibly cleaner than the other connections may indi cate a loose connection Look for worn frayed or distorted rubbe...

Page 16: ...ecting parts Refer to the Component Replacement Section of this publication 3 Check and record torque values as received for each 1 bar pin fastener see Figure 6 2 Ensure all fasteners are tightened to At the locknut to 525 75 foot pounds torque or At the bolt head to 575 75 foot pounds 4 Recheck equalizing beam end connections for signs of looseness Inspect alignment shims in equalizing beam end ...

Page 17: ...d bushing is normal see Figure 6 8 and is not an indication to replace the bushing Because all rubber end bushings are in compression with the load bearing on the top side the lower side of the rubber is slightly relieved allowing the rubber to move inward and a gap appears PHYSICAL INSPECTION IF BUSHING MOVEMENT OR LOOSENESS IS NOTED IN THE EQUALIZING BEAM END HUB DO NOT OPERATE THE VEHICLE REPLA...

Page 18: ...cessive wear Replace if bar pin thickness measures less than 17 8 47 59 mm If bar pin bolt holes bores reveal signs of elonga tion or wear see Figure 6 10 BAR PIN SHIMS An indication that the bar pin shims require replacement is when one or more of the following conditions apply Visual inspection of contact area on the shim reveals signs of excessive wear The thickness of any single leg on the shi...

Page 19: ... measurement location and dimensions An axle bracket outside of the measurement range must be repaired or replaced c Consult the vehicle manufacturer for inspection component repair and replacement instructions FIGURE 6 12 FIGURE 6 13 Adapter Style FIGURE 6 14 a Inspect the 2 64 mm diameter holes in each of the axle bracket legs Figure 6 14 b Remove any burrs or material left there by the old adap...

Page 20: ...ent Retighten any loose fasteners to specified torque Components damaged by loose fasteners must be replaced FIGURE 6 15 SHEAR SPRINGS INSPECTION Inspection of the shear spring should always be conducted with the vehicle in the UNLOADED condition Bent or burred edges on the rate plates extending beyond the rubber are acceptable provided the rubber can freely expand during vehicle operation see Fig...

Page 21: ... height of the progressive load spring PLS plus the length of cuts splits and depth of separation of the shear spring and the PLS Visually inspect the progressive load springs at regular preventive maintenance intervals The follow ing points are for guidance and intended to assist personnel in determining when progressive load spring component requires replacement refer to the Component Replacemen...

Page 22: ... Figure 6 23 SADDLE CONNECTION Visually inspect for any signs of movement or looseness and ensure Each saddle is centered on each equalizing beam center bushing The center bushing inner metal is fully seated to the saddle Saddle cap locknuts are tightened to proper torque as specified in the Torque Specifications Section of this publication Saddle cap fasteners While tightening the saddle cap fast...

Page 23: ... INJURY AND WILL VOID HENDRICKSON S WARRANTY DO NOT USE THE SUSPENSION CROSS TUBE AS A JACKING POINT REFER TO VEHICLE MANUFAC TURER FOR PROPER JACKING INSTRUCTIONS ACCEPTABLE LIFTING POINTS FOR A VEHICLE AT THE RATED LOAD INCLUDE BUT NOT LIMITED TO THE AXLE EQUALIZING BEAM AND THE VEHICLE FRAME RAIL REFER TO THE VEHICLE MANUFACTURER FOR PROPER JACKING INSTRUCTIONS DO NOT grease or lubricate the cr...

Page 24: ...ateral alignment of the axles is incorrect it may be necessary to shim the transverse torque rod at the straddle mount end Shims can be installed between the transverse torque rod and the transverse torque rod frame bracket or between the transverse torque rod and axle tower bracket Refer to vehicle manufacturer for proper shim location also see Lateral Alignment in the Alignment Adjustments Secti...

Page 25: ...cement Section of this publication HEATTEST 1 Drive the vehicle at moderate speeds on rough road for minimum of fifteen minutes DO NOT GRAB THE SHOCK AS IT COULD POSSIBLY CAUSE PERSONAL INJURY 2 Use an infrared thermometer to check the temperature of the shock absorber This can also be performed by carefully touching the shock body below the dust cover Touch the frame to get an ambient reference s...

Page 26: ...ction of the shock The fluid which evaporates through the seal area helps to lubricate and prolong the life of the seal A shock that is truly leaking and needs to be replaced will show signs of fluid leaking in streams from the upper seal These streams can easily be seen when the shock is fully extended underneath the main body dust cover of the shock Look for these potential problems when doing a...

Page 27: ... will slacken or loosen the suspension as the vehicle is positioned End with all wheels positioned straight ahead Roll to a stop without the brakes being applied DO NOT set the parking brake 3 Chock the front wheels of the vehicle 4 Place a digital protractor on the axle housing as shown in Figure 7 1 5 Check to see if the pinion angle is correct per the vehicle manufacturer s specified range 6 If...

Page 28: ...des of the vehicle as shown in Figure 7 2 dimensions A and B 10 Calculate the difference between measurements A and B a If the front drive axle is within vehicle manufacturer s specifications proceed to check the rear drive axle Step 11 b If alignment of the front drive axle IS NOT within the vehicle manufacturer s specifications then the alignment of this axle MUST be corrected BEFORE measuring t...

Page 29: ... normally correct the axle lateral alignment A general rule of thumb is to use a torque rod shim with a thickness that is half of the dif ference between the two measurements EXAMPLE If the axle lateral alignment is out of specification by 6 mm remove or install a 1 8 3 mm torque rod shim between the transverse torque rod and frame rail as needed Refer to Longitudinal and Transverse Torque Rod Sec...

Page 30: ...TE Computerized alignment equipment is the preferred method of measuring alignment To calculate the shim thickness required the target offset must be converted to thrust angle see alignment equipment manufacturer for procedures 3 Chock the wheels of the front axles to prevent vehicle movement during service 4 Raise the frame of the vehicle to remove the load from the suspension Support the frame a...

Page 31: ...n will correct the 0 40 thrust angle 1 8 AND 1 8 If a finer adjustment is required use alignment shim P N 50131 000 This alignment shim has one 3 2 mm leg one 6 4 mm leg and a 9 5 mm back A total of 19 mm adjustment is achievable to the axle A 9 5 mm flat shim is also available P N 57026 000 1 8 3 8 3 8 The standard alignment shims supplied with each suspension P N 50130 000 have two 4 8 mm legs a...

Page 32: ... is not necessary to replace shock absorbers in pairs if one shock absorber requires replacement DISASSEMBLY 1 Chock the front wheels of the vehicle 2 Remove the lower shock absorber nylon locknut retainer washer and rubber bushing from the shock absorber stud see Figure 8 1 3 Remove the fasteners from the upper shock bracket and remove shock absorber FIGURE 8 1 ASSEMBLY 1 Mount the shock absorber...

Page 33: ...Remove the progressive load springs M10 fasteners and discard see Figure 8 4 7 Remove the progressive load springs 8 Apply NLGI 2 EP Extreme Pressure chassis lubricant to the threaded rod of the saddle disassembly tool No 66086 113L see Figure 8 3 FIGURE 8 3 FIGURE 8 4 NOTE The threaded rod spacer and spacer nut are designed and orientated to fit into the saddle assem bly openings see Figure 8 5 9...

Page 34: ...ing or servicing shear springs or saddle assembly proceed to Step 3 EACH FRAME HANGER ASSEMBLY WEIGHS APPROXIMATELY 104 TO 140 POUNDS 47 TO 63 KILOGRAMS USE APPROPRIATE LIFTING DEVICES TO REMOVE OR INSTALL THE FRAME HANGER ASSEMBLY FAILURE TO DO SO CAN RESULT IN DAMAGE TO THE VEHICLE OR PERSONAL INJURY 2 Position the frame hanger assembly against the frame rail Install fasteners per the vehicle ma...

Page 35: ...the saddle halves during installation or have an additional person assist to align the saddle halves properly 7 Position the inner saddle half into the frame hanger along with the shear springs outer saddle half and the saddle assembly tool see Figure 8 11 8 Bring both saddle halves together with the saddle assembly tool Evenly tightening the saddle assembly tool until both saddle halves are seate...

Page 36: ...ry tape from the shear springs if used during assembly 11 Remove each of the saddle assembly tools 12 Install the progressive load springs PLS 13 Install the progressive load spring M10 flange fasteners Tighten to 30 2 foot pounds torque 14 Remove the frame supports 15 Lower the frame of the vehicle while engaging the saddles on the equalizing beam s center bushings see Figure 8 13 Threaded Rod Sp...

Page 37: ...TALLED SO THAT THERE IS AN EVEN GAP BETWEENTHE SADDLE CAP ANDTHE BASE OFTHE SADDLE LEGS AS SHOWN IN FIGURE 8 14 IF EACH SADDLE CAP IS NOT INSTALLED EVENLY THE SADDLE LEGS COULD BECOME DEFORMED RESULTING IN BENT BOLTS OR DAMAGED SADDLES NOTE Tightening the saddle cap fasteners properly will help prevent wear of mating components such as the beam center bushing saddle and saddle cap 16 While tighten...

Page 38: ...embly contacts the bottom of the frame hanger assembly Support the vehicle s frame at this height with safety stands 3 Remove and discard the four M10 flange bolts that attach the progressive load springs to the saddle assembly see Figure 8 16 4 Remove the PLS from the frame hanger assembly FIGURE 8 16 ASSEMBLY 1 Install the PLS into the frame hanger assembly 2 Install the four M10 flange bolts th...

Page 39: ... pin alignment shims It is required that the bar pin alignment shims are installed in the same orientation and location as removed to preserve the existing vehicle alignment Improper vehicle alignment can increase tire wear 10 Bar Pin Style End Bushing Note the orientation and location of the bar pin shims 11 Remove and discard end bushing fasteners SERVICE HINT The center bushing will allow the c...

Page 40: ...d bushing fasteners into both beams Tighten the end bushing fasteners to Adapter Style End Bushing 125 foot pounds 90 rotation or 700 50 foot pounds torque Bar Pin Style End Bushing at the Locknuts 525 75 foot pounds 712 102 Nm or Bolt head 575 75 foot pounds 780 102 Nm torque 7 Remove the frame supports 8 Lower the frame of the vehicle while engaging and centering the saddles on the equalizing be...

Page 41: ...g beam assembly from the vehicle Follow the equalizing beam disassembly procedure in this section DO NOT USE A CUTTING TORCH TO REMOVE ANY FASTENERS OR BUSHINGS THE USE OF HEAT ON SUSPENSION COMPONENTS WILL ADVERSELY AFFECT THE STRENGTH OF THESE PARTS A COMPONENT DAMAGED IN THIS MANNER CAN RESULT IN THE ADVERSE VEHICLE HANDLING AND POSSIBLE PERSONAL INJURY OR PROPERTY DAMAGE 2 Place the equalizing...

Page 42: ...beam is required NOTE Always use the bushing outer metal for pressing operations Pressing on the bushings inner metal may damage the bushing and require bushing replacement FIGURE 8 22 FIGURE 8 23 FIGURE 8 24 ASSEMBLY 1 The equalizing beam bore may have a more substantial lead in chamfer at one end of the bore than the other see Figure 8 23 Take advantage of the larger chamfer by pressing in the n...

Page 43: ...eam assembly to the vehicle Follow the equalizing beam installation procedure in this section FIGURE 8 27 FIGURE 8 28 Equalizing Beam Center Bushing Outer Metal End Hub C L C L C L C L Press the center bushing until the center bushing outer metal sleeve is centered in the end hub C L Void Void Center Hole Verify the voids are perpendicular to the horizontal centerline and the second locating hole ...

Page 44: ...ed for repair or inspection of the equalizing beam end connection reveals movement measure the distance between the axle bracket legs for correct width Refer to Axle Bracket in Preventive Maintenance Section of this publication for measurement location and dimensions An axle bracket outside of the measurement range must be repaired or replaced Consult the vehicle manufacturer for inspection compon...

Page 45: ...nd require bushing replacement FIGURE 8 31 1 The equalizing beam bore may have a more substantial lead in chamfer at one end of the bore than the other Take advantage of the larger chamfer by pressing in the new end bushing from this end 2 Lubricate the equalizing beam end hub inside bore and the bar pin end bushing outer sleeve with a NLGI 2 EP Extreme Pressure grease 3 Place the equalizing beam ...

Page 46: ...ections 1 Remove the cotter pins slotted nuts and end bushing adapter tube see Figure 8 35 2 The beam end adapters have two chisel recesses located in their flanges as shown in Figure 8 36 3 Locate the recess for the chisel rotate the adapter if necessary Place the air hammer chisel in the recess 4 If the adapter does not turn use a hammer to rap the outside of the axle bracket legs around the ada...

Page 47: ...AULIC PRESSURE WITH A SHOP PRESS 10 Apply hydraulic force and push out the old bushing FIGURE 8 37 FIGURE 8 38 ASSEMBLY FIGURE 8 39 1 Clean the end bushing bore with a cylinder ball hone or emery paper Clean any debris 2 Lubricate the equalizing beam bore and the equalizing beam center bushing outer metal sleeve with an NLGI 2 EP Extreme Pressure grease see Figure 8 39 3 Position the end bushing r...

Page 48: ...UE IS NOT PROPERLY MAINTAINED THE METAL SURFACES OF THE AXLE BRACKET LEGS HOLES ADAPTERS AND RUBBER BUSHING INNER METALS CAN EXPERIENCE EXCESSIVE WEAR AND OR FAILURE THIS CAN CAUSE SEPARATION OF COMPONENTS AND ADVERSE VEHICLE HANDLING PROPERTY DAMAGE OR PERSONAL INJURY A simple torque wrench will not be sufficient to obtain the proper torque requirement The proper torque requirement can be obtaine...

Page 49: ...TIGHTENING TORQUE BELOW THE REQUIRED SPECIFICATION REPEATED HAMMERING BEYOND THE DEGREE SPECIFIED CAN CAUSE COMPONENT DAMAGE c Install cotter pin The nut may be advanced to the next nut slot DO NOT back off nut INSUFFICIENT TIGHTENING TORQUES CAN CAUSE PREMATURE WEAR AND DAMAGE TO THE AXLE BRACKET LEGS HOLES AND OR BEAM END CONNECTION COMPONENTS THIS CAN FURTHER CAUSE FAILURE AND SEPARATION OF COM...

Page 50: ...ss Tube Service Kit 60961 759 see Parts Lists Section Cutting Torch Welding Equipment Hole Saw DISASSEMBLY 1 Use a work bay with a level on a flat surface 2 Chock the front steer axle wheels FOLLOW THE SAFETY GUIDELINES FOR OPERATING THE TORCH USE CAUTION AS PARTS MAY BE HOT 3 Using a cutting torch make two cuts in the cross tube see Figure 8 44 4 Remove the cut section of the cross tube slide eac...

Page 51: ...NALTORQUE RODS DISASSEMBLY 1 Chock the front wheels of the vehicle SERVICE HINT To remove all the load from the longitudinal torque rod raise or lower the pinion as needed This will ease the removal of the longitudinal torque rod 2 Support the pinion on the axle being serviced NOTE Prior to disassembly of the longitudinal torque rod note the quantity and orientation of the longi tudinal torque rod...

Page 52: ...ve the torque rod mounting fasteners 3 Remove the transverse torque rod see Figure 8 46 4 Inspect the mounting surfaces for any wear or damage Repair or replace as necessary ASSEMBLY 1 Install the transverse torque rod 2 Install the mounting fasteners and any shims that were removed NOTE Hendrickson recommends the using Grade 8 bolts and Grade C locknuts for all torque rod attachments 3 Prior to t...

Page 53: ...bushing clears the torque rod end tube ASSEMBLY 1 Clean and inspect the inner diameter of the torque rod end tubes NOTE DO NOT use paraffinic oil or soap base lubricant Such lubricants can cause adverse reactions with the bushing such as deterioration of the rubber causing premature failure Use ONLY a light Naphthenic base oil such as 60 SUS at 100 F FIGURE 8 48 2 Lubricate the inner diameter of t...

Page 54: ...e 10 Install the torque rod as detailed in the Torque Rod Assembly instructions in this section FIGURE 8 54 XTRB see Figure 8 54 You Will Need A vertical press with a capacity of at least 10 tons Shop made receiving tool and installation removal tool refer to the Special Tools Section of this publication for more information BUSHING REMOVAL 1 Remove torque rods as detailed in Torque Rod Disassembl...

Page 55: ...Install the removal tool see Figure 8 56 6 Press directly on the removal tool until the bushing clears the torque rod end hub see Figure 8 57 FIGURE 8 55 FIGURE 8 56 FIGURE 8 57 BUSHING INSTALLATION 1 Clean and inspect the inner diameter of the torque rod end hubs see Figure 8 58 SERVICE HINT DO NOT use a paraffinic oil or soap base lubricant Such lubricants can cause adverse reactions with the bu...

Page 56: ... the mark made prior to removal as shown in Figure 8 55 5 Taper Pin Place the taper pin bushing in the end hub with the taper pointing down Tighten 5 8 bolt head to 65 5 torque see Figure 8 60 6 Using the shop made tool place the installation tool on the bushing and press in see Figure 8 57 7 Ensure the bushing is centered within the hub of the torque rod 8 Wipe off the excess lubricant 9 Replace ...

Page 57: ...nent Replace damaged component Loose or missing suspension fasteners Suspension is overloaded Reduce and or redistribute load to correct weight Replace and or properly tighten fasteners to the proper torque specification Improper torque or over torque Increase inspection interval of fasteners Replace and or properly tighten fasteners to the proper torque specification Frame hanger cracked Suspensi...

Page 58: ...cue Vehicles SECTION 10 Torque Specifications 63K Beam End Con guration 3 325 ft lbs 440 Nm 90 Rotation 560 30 ft lbs 760 40 Nm OR 1 200 20 ft lbs 270 30 Nm 2 30 2 ft lbs 41 3 Nm 6 170 20 ft lbs 231 27 Nm 4a 525 75 ft lbs 712 102 Nm 4b 575 75 ft lbs 780 102 Nm 7 80 10 ft lbs 109 19 Nm 5 125 ft lbs 170 Nm 90 Rotation 700 50 ft lbs 949 68 Nm OR ...

Page 59: ...or 560 30 440 90 rotation or 760 40 4a End Bushing Bar Pin Style At Locknut 8 1 525 75 712 102 4b At Bolt Head 8 1 575 75 780 102 5 End Bushing Adapter Style 4 17 8 125 90 rotation or 700 50 170 90 rotation or 949 68 6 Shock Absorber to Upper Shock Bracket 4 M16 170 20 231 27 7 Shock Absorber to Lower Shock Bracket 4 5 8 80 10 109 14 NOTE Quantities shown are per suspension Torque values shown in ...

Page 60: ...630 910 2899 Hendrickson RecommendedTorque Values Provided in Foot Pounds and in Newton Meters ULTIMAAX for Fire and Rescue Vehicles One andTwo pieceTorque Rods ULTIMAAX for Fire and Rescue Vehicles HENDRICKSON RECOMMENDEDTORQUE SPECIFICATIONS NO COMPONENT FASTENER TORQUE VALUE QUANTITY SIZE FOOT POUNDS NEWTON METERS 1a Transverse Torque Rod At the Locknut 2 1 200 25 271 34 1b At the Bolt Head 2 5...

Reviews: