Helo Rocher DES Installation And User Manual Download Page 1


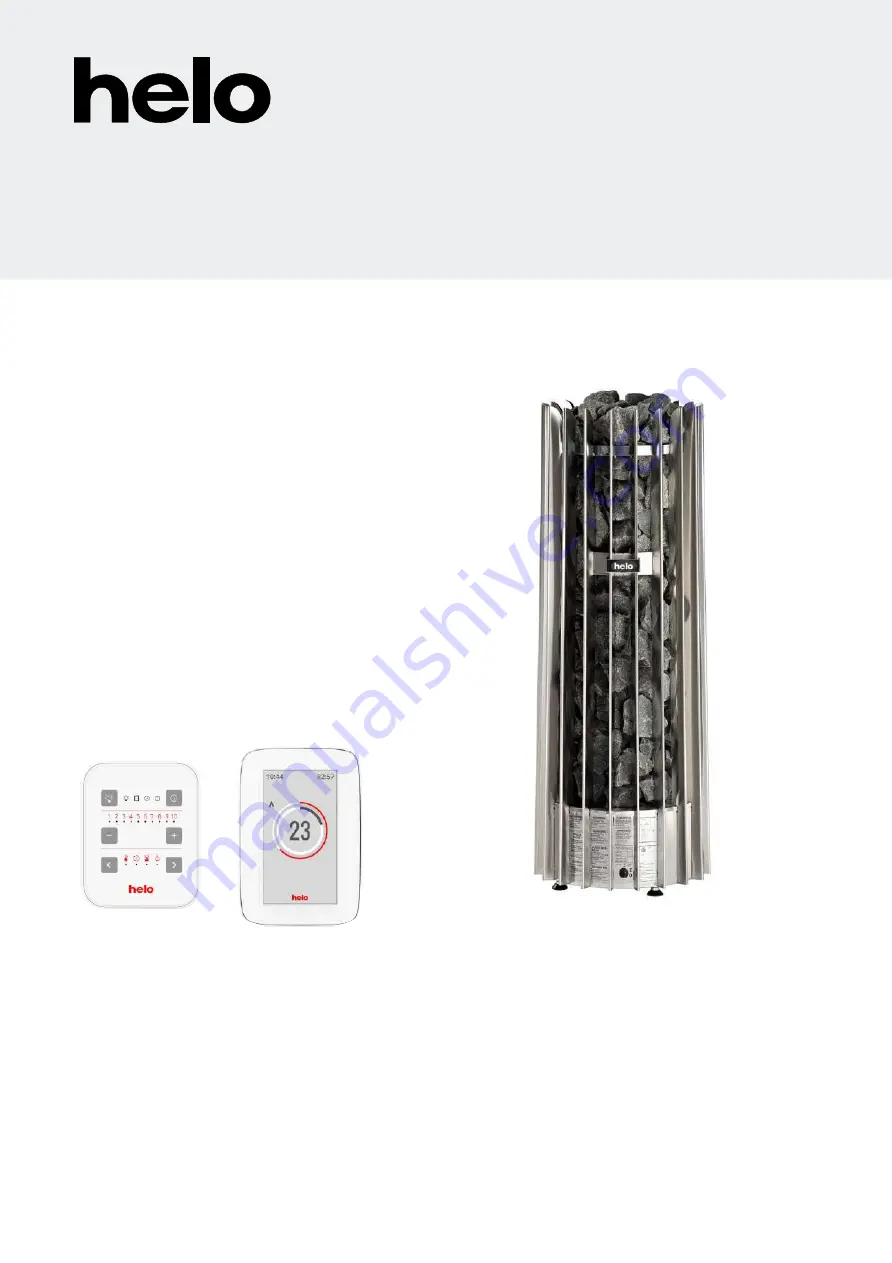
ELECTRIC SAUNA HEATER: 


1102 

 70 

 040517  

1102 

 105 

 040517  

 
230V 

 240V 1N~ / 2~ 

230V 3~ 
400V 

 415V 3N~ 


CONTROL PANEL: 


1601 

 31  (RA 

 31) Trend)  

1601 

 33  (RA 

 33) Premium Wifi   


314 SKLT 68-3 A 

Installation and User Manual 

Rocher DES


REWARD YOURSELF


Summary of Contents for Rocher DES

Page 1: ...AUNA HEATER 1102 70 040517 1102 105 040517 230V 240V 1N 2 230V 3 400V 415V 3N CONTROL PANEL 1601 31 RA 31 Trend 1601 33 RA 33 Premium Wifi 314 SKLT 68 3 A Installation and User Manual Rocher DES REWAR...

Page 2: ...ng toggle 10 2 16 Locating the connecting box for the connection cable in the sauna room 11 2 17 Remote controlling 11 2 18 Door switch 12 2 19 Wiring diagram 13 2 20 Principle image when 1601 31 RA 3...

Page 3: ...e safe use of the device and the risks involved Children must not be allowed to play with the appliance or to clean and service it without supervision 7 12 EN 60335 1 2012 2 1 Sauna room The walls and...

Page 4: ...ZONE C IF THE SAUNA HEATER S CONTROL THERMOSTAT IS LOCATED IN THE SAME ZONE 2 4 Installing the sensor near a supply air vent The sauna room air should be exchanged six times in an hour The diameter o...

Page 5: ...ompartment regularly at least once a year in private use remove small and broken stones and replace them with new ones In commercial use this operation must be performed at least every second month St...

Page 6: ...arance around the sauna heater Please refer to page 6 There should be enough room around the control panel for maintenance purposes Also a doorway can be considered as a maintenance area 2 9 Installat...

Page 7: ...ture using a wall support The OLET 28 sensor is always installed on the ceiling Figure 2 Safety clearances Installation and User Manual Rocher DES 7 1900 60 mm 60 770 40 1130 A D F H mm 60 60 425 mm O...

Page 8: ...m its normal position Lift off the support bars Pile stones up to the Helo marker Reinstall the support bars Install the support bars as above in the reversed order Pile the stones so that they cover...

Page 9: ...ings Tilt the support and press the pivots at each end of the support to the grooves in the inside of the heater s vertical beams one end at a time The support for heating elements should stay levelle...

Page 10: ...F 60245 IEC 66 mm 230V 1 N 2 Fuse A 6 8 5 x 1 5 3 x 10 4 x 4 3 x 20 3 x 6 1 x 35 10 5 5 x 2 5 3 x 16 4 x 6 3 x 35 Table 2 Connection cable and fuses NOTE Controlling the lights in the sauna with the...

Page 11: ...power button or via a normally open contact Remote control can be pulsed or it can always remain on NOTE Heater regulations require door switches if the heater is turned on from outside of the sauna...

Page 12: ...Door switch instructions for installation and connection The door switch is installed outside the sauna room on the upper edge of the door at least 300 mm from the inner corner The switch part is inst...

Page 13: ...ct signaalcontact Signal kontakts Elektrik tte kontakt Wisselschakelaar elektrische verwarming Sterowanie ogrzewaniem elekt rycznym 3 Saunavalo Bastu belysning Saunabeleuchtung Sauna light Sauna icht...

Page 14: ...llow A2 Green A3 Red A4 Black Adapter circuit board OLEA 102 Control panel 1601 31 Sensor cable Sensor OLET 28 Limiter 1 Blue 2 White 3 Red 4 Yellow Adapter circuit board OLEA 102 Principle image Sens...

Page 15: ...103 1 1 3 5716203 Finder relay 2 2 4 7801711 Fuse 1 AT 1 1 4 7801710 Fuse 3 15 AT 1 1 5 7817536 Fuse holder 2 2 6 6101741 Rocker switch OAAA 2 1 1 7 7306008 Rubber cover for rocker switch 1 1 8 520777...

Page 16: ...ental protection This product must not be disposed with normal household waste at the end of its life cycle Instead it should be delivered to a collecting place for the recycling of electrical and ele...

Reviews: