background image

Helios PD2-6400 High Voltage & High Current Meter 

Instruction Manual 


Introduction 

The Helios PD2-6400 is a multi-purpose, easy to use, 
large-display high voltage and current input meter 
ideal for measuring direct voltage and current or the 
output from voltage shunts and current transformers. 
It features large 1.8 inch superluminous LED digits, 
which can be read from up to 100 feet away. It is 
housed in a water-resistant, field mountable NEMA 
4X/IP65 rated enclosure for convenient indoor and 
outdoor installation. 

The programming buttons are located behind the 
lower panel door and are not generally accessible 
during operation. For that reason, we recommend the 
use of the PDA2364-MRUE remote control station 
which has four buttons to mimic the buttons behind 
the panel. 

The meter has one 0-300 VAC or VDC voltage input 
and one 0-5 AAC or ADC current input. It may be 
used with a single voltage or current input, or to 
measure both simultaneously. A math channel P 
calculates apparent power as the product of the 
voltage and current inputs. 

The Helios PD2-6400 can display voltage, current, 
and apparent power. The dual line display can display 
any two parameters simultaneously, or can alternate 
between any parameters as well as their 
programmable units and tags. 

A fully loaded Helios PD2-6400 meter comes with four 
SPDT relays, a 4-20 mA output, two 24 VDC power 
supplies, five digital inputs and four digital outputs, 
and RS-485 serial communications. The four relays 
can be used for alarm indication or process control 
applications. The 4-20 mA isolated output, Modbus 
RTU serial communications, and digital I/O features 
make the Helios an excellent addition to any system. 

Ordering Information 

85-265 VAC Models 

Model 

Standard 
Features 

Options 
Installed 

PD2-6400-6H0 

5 Digital Inputs,  
4 Digital Outputs, 
RS-485 
Communications 

No options 

PD2-6400-6H7 

4 relays 
4-20 mA output 

12-24 VDC Models 

Model 

Standard 
Features 

Options 
Installed 

PD2-6400-7H0 

5 Digital Inputs,  
4 Digital Outputs, 
RS-485 
Communications 

No options 

PD2-6400-7H7 

4 relays 
4-20 mA output 

Accessories 

Model 

Description 

PDA0004


Cable Gland 

PDA7485-I


RS-232 to RS-485 isolated converter 

PDA8485-I


USB to RS-485 isolated converter 

PDAPLUG2


Plastic Conduit Plug 

PDX6901


Snubber: 0.01 μF/470 Ω, 250 VAC 

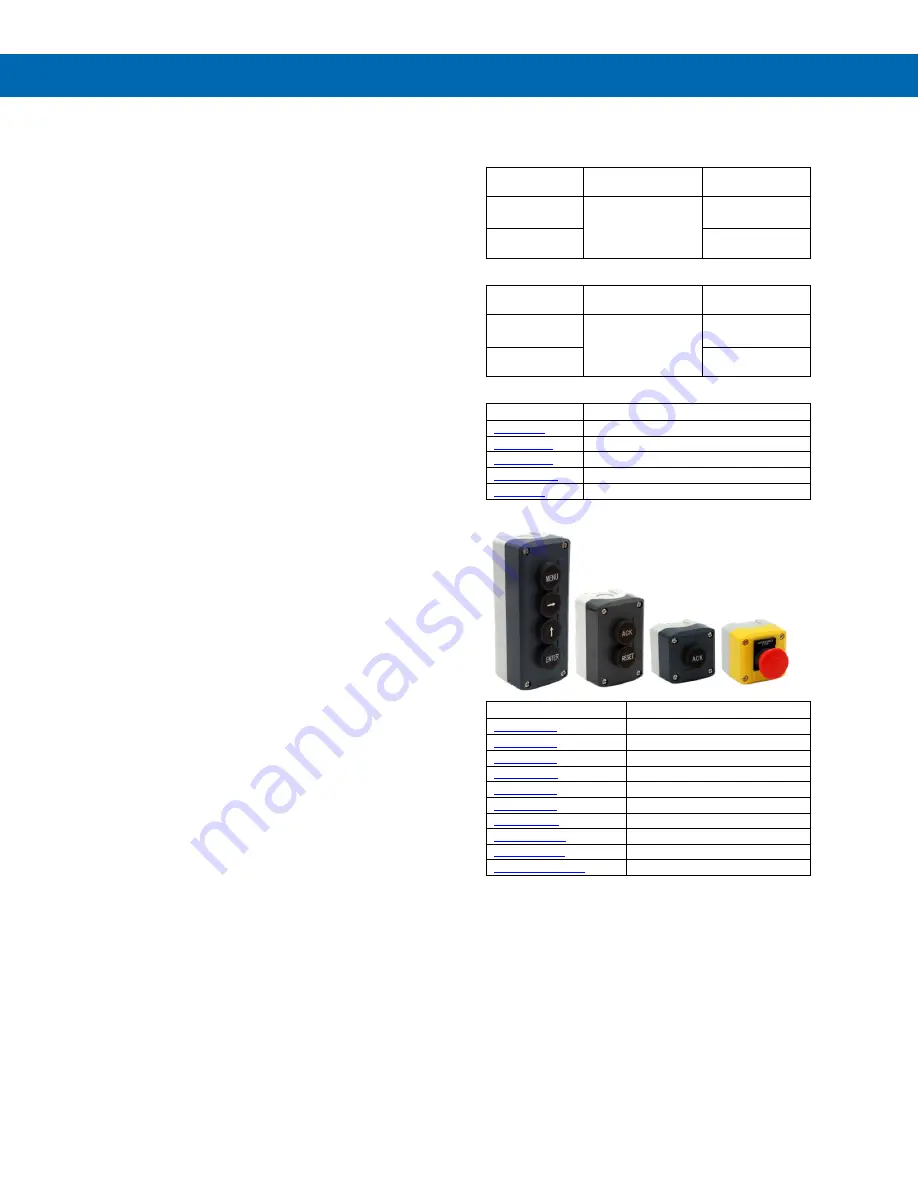
PDA2360 Control Stations


Model 

Description 

PDA2360-E


Emergency button 

PDA2361-A


Ack button 

PDA2361-B


Blank button 

PDA2361-R


Reset button 

PDA2361-T


Tare button 

PDA2361-S


Stop button 

PDA2361-Q


Silence button 

PDA2362-AR


Ack and Reset buttons 

PDA2362-BB


Two blank buttons 

PDA2364-MRUE


Menu, right, up, enter buttons 

Note: 

Control stations can be connected directly to the Helios meter’s 

on-board digital inputs. Se

Remote Operation of Meter

 on pag

20


for details. 


Summary of Contents for PD2-6400

Page 1: ...MeterView Pro USB Programming Software SunBright Display Standard Feature Great for Outdoor Applications Operating Temperature Range 40 to 65 C 40 to 149 F Conformal Coated PCBs for Dust and Humidity Protection UL C UL Listed E160849 508 Industrial Control Equipment Input Power Options 85 265 VAC 90 265 VDC or 12 24 VDC 12 24 VAC Programmable Display Function Keys Digital Inputs On Board RS 485 Se...

Page 2: ...lete details Registered Trademarks All trademarks mentioned in this document are the property of their respective owners 2021 Precision Digital Corporation All rights reserved FREE MeterView Pro Programming Software The meter can be powered from the USB connection When using the USB connection DO NOT apply AC or DC power to the meter The easiest and quickest way to program your Helios meter is to ...

Page 3: ... Signal Connections 16 Relay Connections 17 Switching Inductive Loads 18 RS 485 Connections 18 RS 485 Multi Drop Connection 18 RS 485 Serial Converters 18 Digital I O Connections 19 F4 Digital Input Connections 20 4 20 mA Output Connections 20 Analog Output Transmitter Power Supply 20 Remote Operation of Meter 20 Interlock Relay Feature 20 Setup and Programming 21 Overview 21 LED Status Indicators...

Page 4: ...6 Reset Menu reset 36 Manual Control Menu Contrl 36 Setting Up the Password pass 37 Protecting or Locking the Meter 37 Making Changes to a Password Protected Meter 37 Disabling Password Protection 37 Advanced Features Menu 38 Advanced Features Menu Display Messages 38 Noise Filter filter 39 Noise Filter Bypass bypass 39 Rounding Feature round 39 Modbus RTU Serial Communications serial 40 Select Me...

Page 5: ...sformer Connections 16 Figure 15 DC Current Connections 16 Figure 16 AC Current and Voltage Connections 17 Figure 17 AC Current Transformer and Voltage Connections 17 Figure 18 DC Current and Voltage Connections 17 Figure 19 Relay Connections 17 Figure 20 AC and DC Loads Protection 18 Figure 21 Low Voltage DC Loads Protection 18 Figure 22 RS 485 Connection 18 Figure 23 Five Wire RS 485 Connections...

Page 6: ...tags A fully loaded Helios PD2 6400 meter comes with four SPDT relays a 4 20 mA output two 24 VDC power supplies five digital inputs and four digital outputs and RS 485 serial communications The four relays can be used for alarm indication or process control applications The 4 20 mA isolated output Modbus RTU serial communications and digital I O features make the Helios an excellent addition to a...

Page 7: ...ed Yellow Green Light Layers Button Mounted and Wired to Helios 1 Note 1 Specify MOD PD2LH model as a separate item on the order for the Helios to order the Light Horn Button accessory installed and wired Meter is sold separately 2 An external 24 VDC power supply PDA1024 01 is required to power the Light Horn 9 labels are provided for the button Pipe Mounting Kit Helios Meter Shown mounted to pipe...

Page 8: ... programmed settings are stored in non volatile memory for a minimum of ten years if power is lost Power Options 85 265 VAC 50 60 Hz 90 265 VDC 20Wmax 12 24 VDC 12 24 VAC 15 W max Powered over USB for configuration only Fuse Required external fuse UL Recognized 5 A max slow blow up to 6 meters may share one 5 A fuse Isolation 500 V AC DC potential allowed between voltage and current input channels...

Page 9: ...5 250 VAC resistive load 1 14 HP 50 W 125 250 VAC for inductive loads Noise Suppression Noise suppression is recommended for each relay contact switching inductive loads see Switching Inductive Loads on page 17 for details Relay Assignment Each relay independently assigned to Ch A Ch V CH P or Modbus Deadband 0 100 of span user programmable High or Low Alarm User may program any alarm for high or ...

Page 10: ...r None with 1 or 2 stop bits Byte To Byte Timeout 0 01 2 54 second Turn Around Delay Less than 2 ms fixed Note Refer to the Helios Modbus Register Tables located at www predig com for details Digital Input F4 Function Remote operation of front panel buttons acknowledge reset relays reset max min values See Function Keys Digital I O Available Settings on page 42 for a complete list of capabilities ...

Page 11: ...rogramming is done using MeterView Pro software or through the buttons and switches located under the lower door panel and are accessible by removing the single securing screw Wires should be run through the knockout holes located on the bottom of the meter see Figure 5 Conduit Holes Location Bottom View on page 12 for details There are a total of four pre drilled conduit entry holes located at th...

Page 12: ... girth of the mounting screws pre drill holes at the mounting locations previously marked Insert mounting screws into the four mounting holes and screw them into the pre drilled holes DO NOT overtighten the mounting screws as it is possible that the enclosure could crack and become damaged Figure 1 Meter Mounting Holes Location Figure 2 Meter Mounting Holes Dimensions Mounting Dimensions Figure 3 ...

Page 13: ... the top and bottom for vertical pipes or left and right for horizontal pipes of the reverse side of the meter enclosure using the provided fasteners DO NOT overtighten the fasteners as it could cause damage to the enclosure Using the provided nuts and U bolts secure the mounting plates to the pipe applying enough torque such that the meter cannot be moved up or down or side to side Figure 6 Verti...

Page 14: ...oftware Video at www predig com meterviewpro MeterView Pro Installation 1 Connect one end of the provided USB cable to the meter and the other end to the computer The computer will automatically install the driver software it needs to talk to the meter Follow the on screen instructions and allow sufficient time for the process to complete This can take a few minutes If the process is interrupted t...

Page 15: ... of the lower door panel shows the location of all connectors available with the ordered configuration DO NOT connect any equipment to the RJ45 M LINK connector Otherwise damage will occur to the equipment and the meter DO NOT disconnect the RJ45 connector located to the left of the power terminal block Doing so will disable the on board digital I O and the RS 485 serial communications Figure 8 PD...

Page 16: ...nal connections the switch labeled TYPE must be set to AC alternating current or DC direct current to accept the corresponding type of voltage and current signals Voltage Input The following figures show examples of connecting the meter for a voltage input Note that in addition to the connections the AC DC type switch much also be set Figure 11 AC Voltage Input Connection Figure 12 DC Voltage Inpu...

Page 17: ...AC Current Transformer and Voltage Connections Figure 18 DC Current and Voltage Connections Relay Connections Relay connections are made to two six terminal connectors labeled RELAY1 RELAY4 Each relay s C terminal is common only to the normally open NO and normally closed NC contacts of the corresponding relay The relays C terminals should not be confused with the COM common terminal of the INPUT ...

Page 18: ...t number PDX6901 Note Relays are de rated to 1 14th HP 50 watts with an inductive load RS 485 Connections The RS 485 connections are made to a five terminal connector used for Modbus RTU serial communications The RS 485 terminals include Transmit Data DO and DO Receive Data DI and DI and Signal Ground See Modbus RTU Serial Communications serial on page 40 for more information There are three diagn...

Page 19: ...DO Figure 25 Connections for RS 485 Connector to Serial Converter Three Wire Connection In order to wire the five pins for use as a three wire half duplex RS 485 connection it is necessary to create a jumper connection between DI to DO and DI to DO as shown below Figure 26 Three Wire RS 485 Connection Digital I O Connections Digital inputs and outputs are provided in order to expand the functional...

Page 20: ...ons as illustrated in Figure 31 Meter to PDA2364 MRUE Control Station Connection Figure 31 Meter to PDA2364 MRUE Control Station Connection Interlock Relay Feature As the name implies the interlock relay feature reassigns one or more alarm control relays for use as interlock relay s Interlock contact s are wired to digital input s and activate the interlock relay This feature is enabled by configu...

Page 21: ...put on page 17 for further details Setup and programming is done using MeterView Pro or through the programming buttons After power and input signal connections have been completed and verified apply power to the meter LED Status Indicators LED State Indication 1 4 Steady Alarm condition based on set and reset points independent of relay status in certain configurations Available on all meter conf...

Page 22: ...s and hold the Menu button for three seconds to access the advanced features of the meter Remote Buttons The meter can be operated via a remote control station PDA2364 MRUE using the digital input connections The PDA2364 MRUE mimics the Helios s four programming buttons Menu Right Arrow Up Arrow and Enter See Remote Operation of Meter on page 20 for details Lower Door Panel 1 2 3 4 5 6 7 8 M LINK ...

Page 23: ...gn display to channel V D Ch P Display Ch P Assign display to channel P P A V D AV Display AV Alternate display of channel A V D Ap Display AP Alternate display of channel A P Display Functions Messages Display Parameter Action Setting Description D Vp Display VP Alternate display of channel V P D AVp Display AVP Alternate display of channel A V P D set1 Display set 1 Displays relay 1 through 4 se...

Page 24: ...r the Analog output scaling menu AOut 1 Aout channel Analog Output source channel Dis 1 Display 1 Program display 1 value Out 1 Output 1 Program output 1 value e g 4 000 mA Dis 2 Display 2 Program display 2 value Out 2 Output 2 Program output 2 value e g 20 000 mA reset Reset Press Enter to access the Reset menu Rst Hi Reset high Press Enter to reset max display Rst Lo Reset low Press Enter to res...

Page 25: ... meter will accept for channel A and channel V 2 Units for A V and P 3 Decimal point position for A B and C 4 Program the meter using the Scale or Calibrate functions 5 Display parameter and intensity 6 Relay assignment and operation 7 4 20 mA analog output scaling Press the Menu button to exit at any time Setting the Decimal Point dEc pt The decimal point may be set with up to five decimal places...

Page 26: ...t is 2 The number of points should be set in the Advanced Menu under the menu selection prior to scaling and calibration of the meter See Multi Point Linearization Linear on page 40 for details Multi Point Linearization Linear The process inputs may be calibrated or scaled to any display value within the range of the meter The meter is set up at the factory for 2 point linear calibration Up to 32 ...

Page 27: ...ut 1 and input 2 signals required to complete the calibration or scaling of the meter Input Range Input 1 Input 2 Span 0 5 ADC 0 005 ADC 0 5 AAC 0 010 AAC 0 300 VDC 0 1 VDC 0 300 VAC 0 3 VAC Calibrating the Meter with External Source To scale the meter without a signal source refer to Scaling the Meter without a Signal Source page 26 Warm up the meter for at least 15 minutes before performing cali...

Page 28: ...ls A V or P toggle between A V V P A P A V P toggle between channels A V or P units the max min of any of the channels including the power channel P set points or the Modbus input In addition to the parameters available on display line 1 line 2 can display Engineering units or it could be turned off Display Intensity d Inty The meter has eight display intensity levels to give the best performance ...

Page 29: ... when selected the characters to the right are shifted one position 3 Press and hold up arrow to auto scroll the characters in the display Setting the Relay Operation relay This menu is used to set up the assignment and operation of the relays During setup the relays do not follow the input and they will remain in the state found prior to entering the Relay menu 1 Relay assignment a Channel A b Ch...

Page 30: ...n Programming Set and Reset Points High alarm indication program set point above reset point Low alarm indication program set point below reset point The deadband is determined by the difference between set and reset points Minimum deadband is one display count If the set and reset points are programmed with the same value the relay will reset one count below the set point Note Changes are not sav...

Page 31: ...t go below the set point and then go above it Low Alarm Operation Set Reset For Manual reset mode ACK can be pressed anytime to turn off relay To detect a new alarm condition the signal must go below the set point and then go above it High Alarm with Fail Safe Operation Set Reset Note Relay coil is energized in non alarm condition In case of power failure relay will go to alarm state Low Alarm wit...

Page 32: ...ay timer starts and the relay trips when the time delay has elapsed If the signal drops below the set point high alarm before the time delay has elapsed the On time delay timer resets and the relay does not change state The same principle applies to the Off time delay Note If Automatic or Manual A nmAn reset mode is selected the LED follows the reset point and not the relay state when the relay is...

Page 33: ... The meter is supplied with four alarm points that include front panel LEDs to indicate alarm conditions This standard feature is particularly useful for alarm applications that require visual only indication The LEDs are controlled by the set and reset points programmed by the user When the display reaches a set point for a high or low alarm the corresponding alarm LED will turn on When the displ...

Page 34: ...Manual reset any time Condition LED Relay Normal Off Off Alarm On On Ack Off Off Latching Relay with Clear Lt Clr In this application the meter is set up for manual reset only after the signal passes the reset point alarm condition has cleared Acknowledging the alarm while it is still present has no effect on either the LED or the relay When the alarm is acknowledged after it returns to the normal...

Page 35: ...be set up as interlock relays To set up the relays for the interlock feature 1 Access the Setup Relay Action menu and set the action to off 2 In the Advanced features User menu program any of the digital inputs to Force On any of the internal relays 1 4 3 Connect a switch or dry contact between the 5V terminal and the corresponding digital input dI 1 to dI 4 terminal Interlock Relay Operation Exam...

Page 36: ...og Output menu is used to program the 4 20 mA outputs based on display values For instructions on how to program numeric values see Setting Numeric Values page 25 Reset Menu reset The Reset menu is used to reset the maximum or minimum reading peak or valley reached by the process both may be reset at the same time by selecting reset high low rst HL Manual Control Menu Contrl The Manual Control men...

Page 37: ...n is pressed Press the Enter button while the message is being displayed and enter the correct password to gain access to the menu After exiting the programming mode the meter returns to its password protected condition Disabling Password Protection To disable the password protection access the Password menu and enter the correct password twice as shown below The meter is now unprotected until a n...

Page 38: ...tion nmulti Multiplication Channel P A V C F Const Constant Constant used in channel P math Advanced Features Menu Display Messages Display Parameter Action Setting adder Adder Addition constant used in channel P math calculation C factor Factor Multiplication constant used in channel P math calculation F CutofF Cutoff Set low value cutoff Ch A Channel A Set low value cutoff for Channel A Ch V Cha...

Page 39: ...gth of time over which the signal is averaged The filter level can be set between 2 and 199 The higher the filter level the longer the averaging time and so the longer it takes the display to settle to its final value Setting the filter level to zero disables the filter function Noise Filter Bypass bypass The noise filter bypass changes the behavior of the meter so that small variations in the sig...

Page 40: ...Tables located at www predig com for details When using more than one meter in a multi drop mode each meter must be provided with its own unique address The meter address Slave ID may be programmed between 1 and 247 The transmit delay may be set between 0 and 199 ms The parity can be set to even odd or none with 1 or 2 stop bits Select Menu SElect The Select menu is used to select the number of li...

Page 41: ...ue with display in underrange condition 4 Break Analog output value when current input break is detected 5 Max Maximum analog output value allowed regardless of input 6 Min Minimum analog output value allowed regardless of input 7 Calibrate Calibrate the internal 4 20 mA source reference used to scale the 4 20 mA output Analog Output Source The analog output source can be based on either of the in...

Page 42: ...ue relay states and analog output momentarily while the function key or digital input is active The process value will continue to be calculated in the background D AVP Scrolls values for A V P when activated Keeps the last value for 10 seconds and then it returns to its assignment Values are displayed on display line 1 and the corresponding channel and units on display line 2 Ln1 Hi Display maxim...

Page 43: ... flashing a number is displayed with the leftmost digit brighter than the rest The bright digit is the active digit that can be changed by pressing the Up arrow button Press the Right arrow button to move to the next digit 7 Set the display value to correspond to the input signal being calibrated e g 0 000 A 8 The display moves to the high input calibration C Hi Apply the high input signal 5 A and...

Page 44: ...ts Operation Five 5 digital inputs F4 DI 1 to DI 4 come standard on the meter These digital inputs are programmed identically to function keys F1 F2 and F3 The inputs are triggered with a contact closure to 5 in the case of digital inputs 1 4 or with an active high signal see Digital I O Connections on page 19 for details The F4 is triggered with a contact closure to COM or with an active low sign...

Page 45: ... Press the Enter button to activate the LED Test The meter will cycle through all digits decimal points and relay indicators to enable the operator to check that all LEDs are functioning properly 4 Press the Enter button again to access the Information menu info or press the Menu button to return to Run Mode Determining Software Version To determine the software version of a meter 1 Go to the Diag...

Page 46: ...int Set 1 100 0 Relay 1 reset point RSt 1 50 0 Relay 2 assignment Ch V Channel V Relay 2 action Act 2 Automatic Relay 2 set point Set 2 200 0 Factory Defaults User Settings Parameter Display Default Setting Relay 2 reset point RSt 2 150 0 Relay 3 assignment Ch V Channel V Relay 3 action Act 3 Automatic Relay 3 set point Set 3 300 0 Relay 3 reset point RSt 3 250 0 Relay 4 assignment Ch V Channel V ...

Page 47: ...n key F3 Acknowledge relays F4 function digital input F4 Acknowledge relays Digital input 1 DI 1 Menu Digital input 2 DI 2 Right arrow Digital input 3 DI 3 Up arrow Digital input 4 DI 4 Enter Digital output 1 DO 1 Alarm 1 Digital output 2 DO 2 Alarm 2 Digital output 3 DO 3 Alarm 3 Digital output 4 DO 4 Alarm 4 Password 1 Pass 1 000000 unlocked Password 2 Pass 2 000000 unlocked Password 3 Pass 3 00...

Page 48: ...ys 1 999999 2 99999 Check 1 Input selected in Setup menu 2 Corresponding signal at Signal connector Display is unstable Check 1 Input signal stability and value 2 Display scaling vs input signal 3 Filter and bypass values increase Display response is too slow Check filter and bypass values Display reading is not accurate Check 1 Input signal with a multimeter 2 Scaling or calibration Display does ...

Page 49: ...8990 www predig com LIM2 6400_D SFT106 Ver 4 000 up 08 21 Contact Precision Digital Technical Support Call 800 610 5239 or 508 655 7300 Fax 508 655 8990 Email support predig com Sales Support Call 800 343 1001 or 508 655 7300 Fax 508 655 8990 Email sales predig com Place Orders Email orders predig com For the latest version of this manual please visit www predig com ...

Reviews: