

USER MANUAL
Item no. 3053300
GIL
The information in this document is furnished for informational use only, is subject to change without notice, and should not be construed as a commitment by Victor Hasselblad AB. The text and images in this document cannot be reprinted or reused without the express permission of Victor Hasselblad AB. Victor Hasselblad AB assumes no
responsibility or liability for any errors or inaccuracies that may appear in this document. Victor Hasselblad AB assumes no responsibility or liability for loss or damage incurred during or as a result of using Hasselblad products. Copyright © 2013 - Victor Hasselblad AB. All rights reserved.
1/2
Document ID:
GIL / 3053300 / User Manual D / V4 / 2013
www.hasselblad.com
GIL (Global Image Locator)
The Hasselblad GIL (3053300 ) provides auto-
matic creation and storage of GPS informa-
tion for all H-system digital cameras. The data
is tagged to each individual image file and can
be read directly by Phocus. The unit requires
no extra external battery or power source and
works seamlessly in the background for ease
of use.
Requirements
The latest FlexColor firmware update 4.8.5 (or
later) of the digital back/sensor unit is required
for operation.
A
Please note that FlexColor does not retain GPS
information when importing captures.
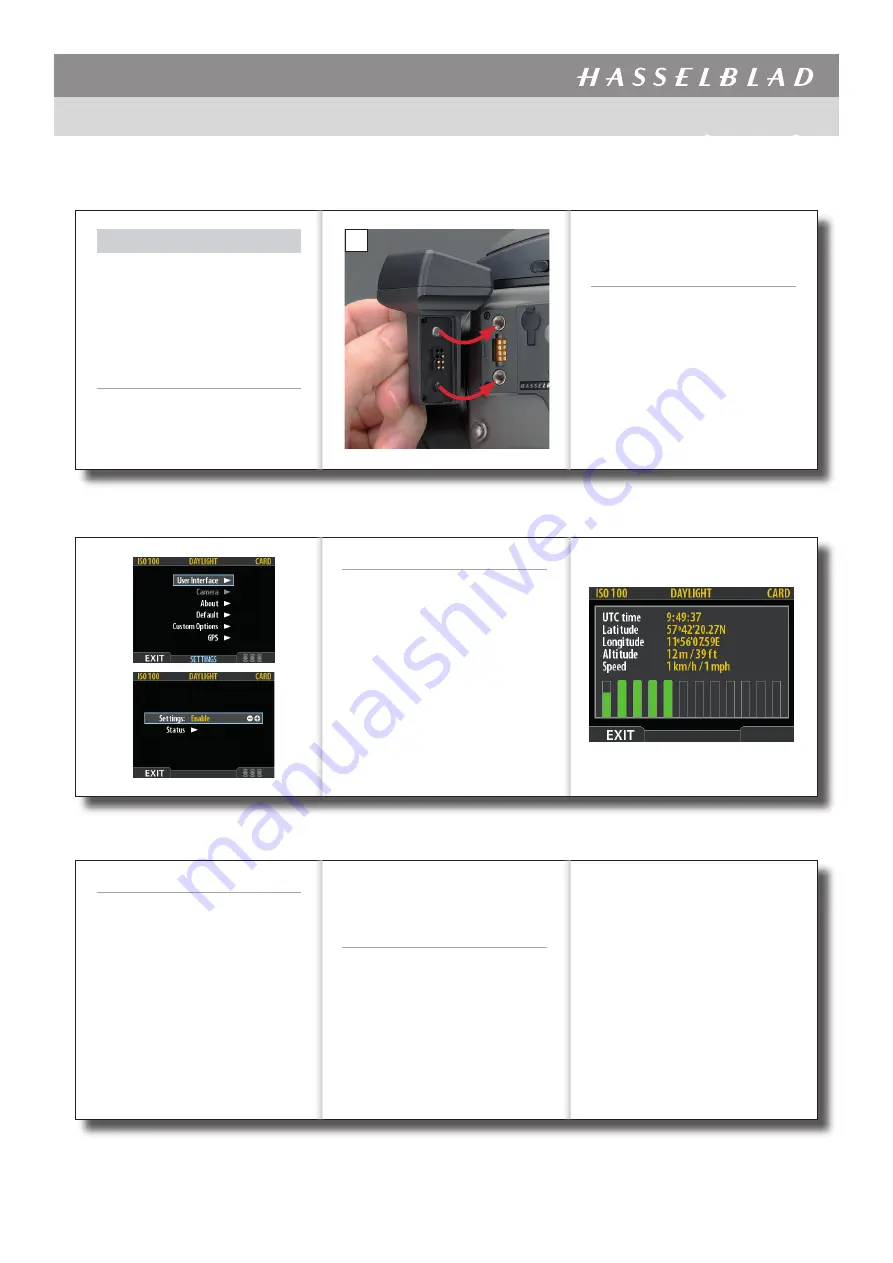
Fitting
Remove the accessory connection cover on the
camera as described in the user manual. Position
the unit as in the illustration
A
, ensuring that the
retaining screw is fully retracted first. Correct po-
sitioning is assured when the LED blinks green
to signal that a databus connection has been
made. While maintaining the position, rotate
the attachment screw in a clockwise direction
until the unit is firmly attached. Remember to
re-attach the accessory connection cover on the
camera afterwards if you remove the GIL unit.
B
C
Settings
No settings are required on the camera, only on
the digital capture unit as follows:
1. Press
MENU > Settings
to display the selec-
tion
B
.
2. Go to
GPS > Settings
to display the menu
C
.
3. In Settings select Enable (via the + / – button)
to activate the unit. (You can also deactivate
the unit here after use by selecting “Disable”).
Go to
Settings > GPS > Status >
to access a sta-
tus screen
D
. This contains the current data con-
cerning UTC time, Longitude, Latitude, Altitude
and Speed.
In addition is a graphical display indicating sat-
ellite signal strength. Each green bar represents
one successful satellite contact.
D
Tags
The captured file will contain a ‘tag’ (metadata
information) that includes the UTC time, Longi-
tude, Latitude, Altitude and Speed information.
This information can be exploited in Phocus by
going to
Image > Map
(or pressing Alt + Com-
mand + M) to automatically open Google Earth
(on-line), and display the location of the selected
image.
In addition, a separate ‘KML’ tag file will also be
created. This single file will collectively include
data on all the captures in the folder and can be
utilized and read by a variety of virtual globe pro-
grams, such as Google Earth, etc.
Each new folder created will contain a new KML
tag file that is linked to those particular captures
in that particular folder.
In use
When activated, the LED on the unit blinks red
to indicate that a search for communication
with satellites is in progress. In addition, a red
satellite icon flashes on the digital back screen
to signal the same. When sufficient contact has
been made, the icon on the digital back screen
will change to green for 3 seconds before be-
ing deactivated and the LED on the GIL unit will
steadily blink green. If contact is broken for any
reason, then the unit will revert to search mode
again, displaying the appropriate icon and sig-
nal. Re-establishing contact in these incidences
might only take a few seconds in favourable
conditions. Remember that an initial search
procedure can take up to three minutes even in
good conditions before sufficient contact is es-
tablished.
When the capture has been made, its location
can be immediately checked on the digital back
display if required. Press the ‘I’ button to show
the data lists which will now include the latitude
and longitude information as well
E
.
In Phocus, the GPS coordinates are also dis-
played in the Capture Info tool
F
.