


G1 SCBA Radio Pairing Guide |
Harris
Rev. 5-23-2019
Page
13
of
13
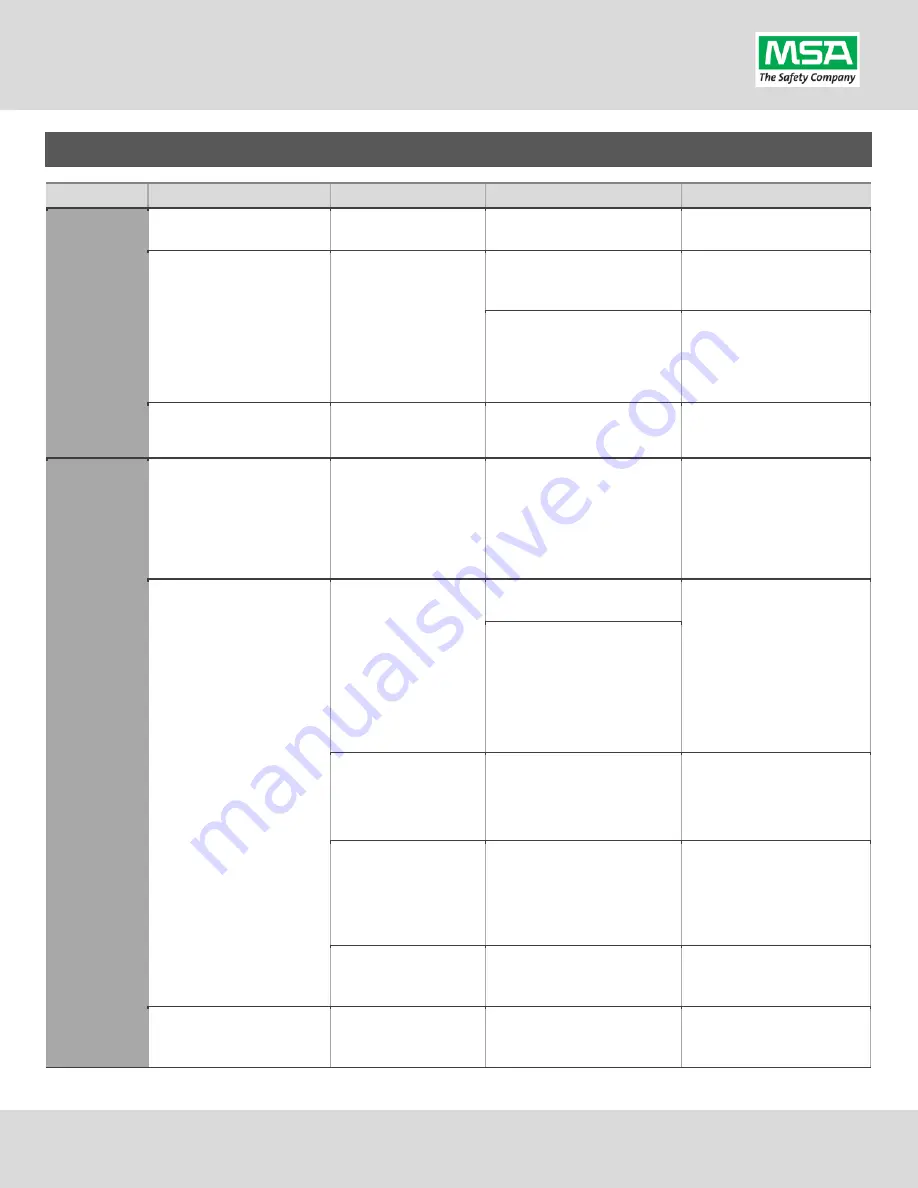
Troubleshooting
Topic
Problem/Issue
Diagnosis
Possible Solution
Expected Result
Audio
Intermittent Audio
Facepiece may not be
properly sealed
Adjust the facepiece until a
proper seal is formed
Outgoing audio will function
as expected
Incoming and/or outgoing
audio from G1 is not working
Bluetooth icon is visible
on the Radio
Power the portable radio on
and off to reset the auto
connect.
Radio will automatically
connect to G1 and emit an
audible indication for success.
If power cycling the radio does
not result in a successful connect,
clear the G1 & Radio pairing
history and re-pair the G1 &
Radio.
G1 & Radio will now connect
and audio will function as
expected
Poor audio quality from G1
to Radio
G1 has Firmware SW
2.003 or prior SW
version
Update G1 to Firmware SW 3.0
via A2 Software
Improved G1 outgoing
audio quality
Pairing
Bluetooth pairing
information lost from G1
Pairing information is
cleared when the
battery G1 battery is
removed. (When G1
“Bluetooth Pair Save”
is not set to enabled.)
G1 with SW 3.0 or higher is
configurable to retain pairing
information across battery
removals. Review instructions
for “G1 SCBA Configuration
Tag” and Bluetooth
Paring Save settings.
Bluetooth pairing
information will no longer
be cleared on every battery
removal.
Radio will not pair with G1
Bluetooth icon is NOT
visible on the radio
Turn Bluetooth on, on the
Radio.
Bluetooth icon is visible on
Radio and pairing is now
successful.
If turning on Bluetooth on the
radio does not work: clear the
G1 & Radio pairing history.
Re-pair the G1 & Radio.
Bluetooth Discoverable
is set to “NO”
Go to Radio Bluetooth Settings
and Set Discoverable to “YES”
and
STAY ON THIS SCREEN
DURING PAIRING.
Re-apply
the Pairing Tag to the G1.
Paring will successfully
complete.
G1 is not Bluetooth
enabled, icon on control
module is gray.
Enable Bluetooth on the G1
using a G1 Configuration tag
that enables Bluetooth.
Bluetooth icon on the G1
control module will be:
Red
= enabled/unpaired OR
enabled/paired, not
connected
Green
= enabled/connected
Radio is a not a
Harris XL-185P | XL-
200P Bluetooth Radio
G1 is compatible with
Harris XL-185P | XL-200P
Bluetooth Radios.
To use G1 Bluetooth
audio, pair with a Harris
XL-185P | XL-200P
Radio is paired to an
incorrect G1
Radio and/or G1 was
previously paired to a
different radio or G1
Clear the pairing information on
both the G1 & Radio. Pair
desired G1 & Radio
Desired G1 and Radio will
be paired together


