INSTRUCTION
& INSTALLATION GUIDE
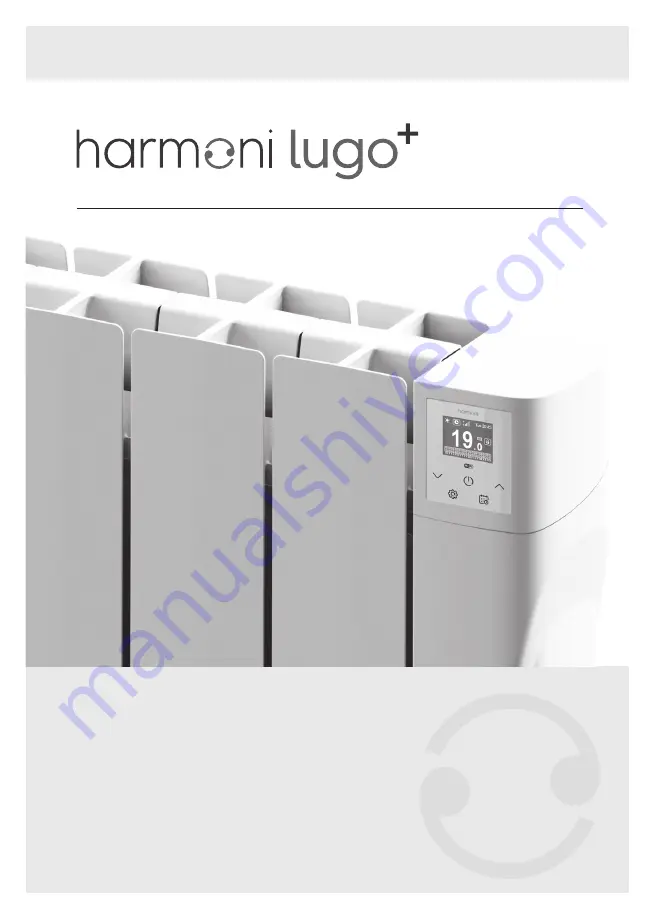
Digital electric conservatory radiator with Wi-Fi
conservatory
Page 1: ...INSTRUCTION INSTALLATION GUIDE Digital electric conservatory radiator with Wi Fi conservatory...
Page 2: ...user maintenance should not be carried out by children without supervision Children must be supervised at all times to ensure that they do not interfere with the product This product is filled with a...
Page 3: ...he product It is very important to keep the manual with the product after its installation Contents 1 Harmoni Technical Specifications 4 2 Harmoni system Installation 5 2 1 Mounting 5 2 2 Fixing the s...
Page 4: ...CHANICAL CHARACTERISTICS Armoured steel heating element High purity aluminium Thermal oil PC ABS panel with touch control panel Left side cover PC ABS Weight kg 18 5 20 5 23 Finish White RAL 9010 ELEC...
Page 5: ...any wall or brickwork in order for it to function correctly Figure 2 2 2 Fixing the supports Inside the packaging you will find a fixing kit Please find the instructions below 1 Choose the right part...
Page 6: ...m 505 mm 225 mm 400 mm 880 mm 444 mm 505 mm 225 mm 1500T 400 mm 880 mm 444 mm 505 mm 225 mm 3 Harmoni system Information Instructions 3 1 Touchpad Settings Back ON OFF Confirm Decrease temperature Mov...
Page 7: ...press the button once To turn off press the button again When you turn the product on for the first time it will ask you to set the date and time Use the buttons to select the correct time and press...
Page 8: ...just brightness This function allows you to adjust the brightness when the product is on or in standby To adjust the brightness select BACKLIGHT With the buttons you can turn the brightness up or down...
Page 9: ...roduct To select MANUAL AUTO PRE PROGRAMMING or PILOT MODE access the programming menu by pressing the button MODE allows you to select between MANUAL or AUTOMATIC mode PRE PROGRAMS allows you to sele...
Page 10: ...dy established in the product will be activated You can choose between the four pre installed schedules in your Harmoni product Pre programs COMFORT ECO OFF PRE PROGRAM 1 0 1 2 3 4 5 6 7 8 9 10 11 12...
Page 11: ...by a box Use the buttons to move between the days Press after day 7 to go to the next step STEP 3 1 Select the programming mode for the hours Use the buttons to move between the hours Select a pro gr...
Page 12: ...INDOWS mode is activated for two hours When the OPEN WINDOWS mode is active the radiator will be in ANTI FROST mode at 7 C 3 7 2 BALANCE function The BALANCE submenu causes the product to work in Manu...
Page 13: ...end that all parts of the product are kept clean behind underneath upper fins etc Do not use any abrasive product on the aluminium Clean it with a damp cloth and a pH neutral soap and the control pane...
Page 14: ...and electrical components 5 3 If during the guarantee period the product does not work correctly under normal use and any design material or manufacturing defect is found Harmoni will repair or subst...
Page 15: ...replaced shall become the property of Harmoni 5 4 The technical service of Harmoni will advise you if you need to buy any parts not covered under the guarantee or out of guarantee 5 5 This guarantee...
Page 16: ...1 3 1 5 In standby mode el SB kW 0 0008 0 0008 0 0008 TYPE OF HEAT OUTPUT ROOM TEMPERATURE CONTROL SELECT ONE Single stage heat output and no room temperature control Two or more manual stages no room...
Page 17: ...tain the Harmoni guarantee an authorised installer electrician must fill in the details below INSTALLER ELECTRICIAN NAME INSTALLATION DATE PRODUCT NAME STAMP SIGNATURE PLEASE NOTE This Guarantee Certi...
Page 18: ...18...
Page 19: ...19 NOTES...
Page 20: ...other printed materials Harmoni reserves the right to al ter its products without notice This also applies to products already on order provided that such alterations can be made without subsequent c...