AVR 3000
Audio/VideoReceiver
OWNER’S MANUAL
Power for the Digital Revolution
™
®
Page 1: ...AVR 3000Audio VideoReceiver OWNER S MANUAL AVR 3000 Power for the Digital Revolution ...
Page 2: ...he Remote 36 Programming the Remote with Codes 37 Macro Programming 38 Programmed Device Function 38 Volume Punch Through 39 Channel Control Punch Through 39 Transport Control Punch Through 39 Resetting the Remote Memory 40 Function List 42 Setup Code Tables 50 Troubleshooting Guide 50 Processor Reset 51 Technical Specifications Table of Contents Typographical Conventions In order to help you use ...
Page 3: ...e computers or playback devices with the power and fidelity you expect from Harman Kardon Another Harman Kardon exclusive is VMAx which uses proprietary processing to create an open spacious sound field even when only two front speakers are available In addition to providing a wide range of listening options the AVR 3000 is easy to configure so that it provides the best results with your speak ers...
Page 4: ...t proper space is provided both above and below the unit for ventilation If this product will be installed in a cabinet or other enclosed area make certain that there is sufficient air movement within the cabinet Under some circumstances a fan may be required Do not place the unit directly on a carpeted surface Avoid installation in extremely hot or cold locations or an area that is exposed to dir...
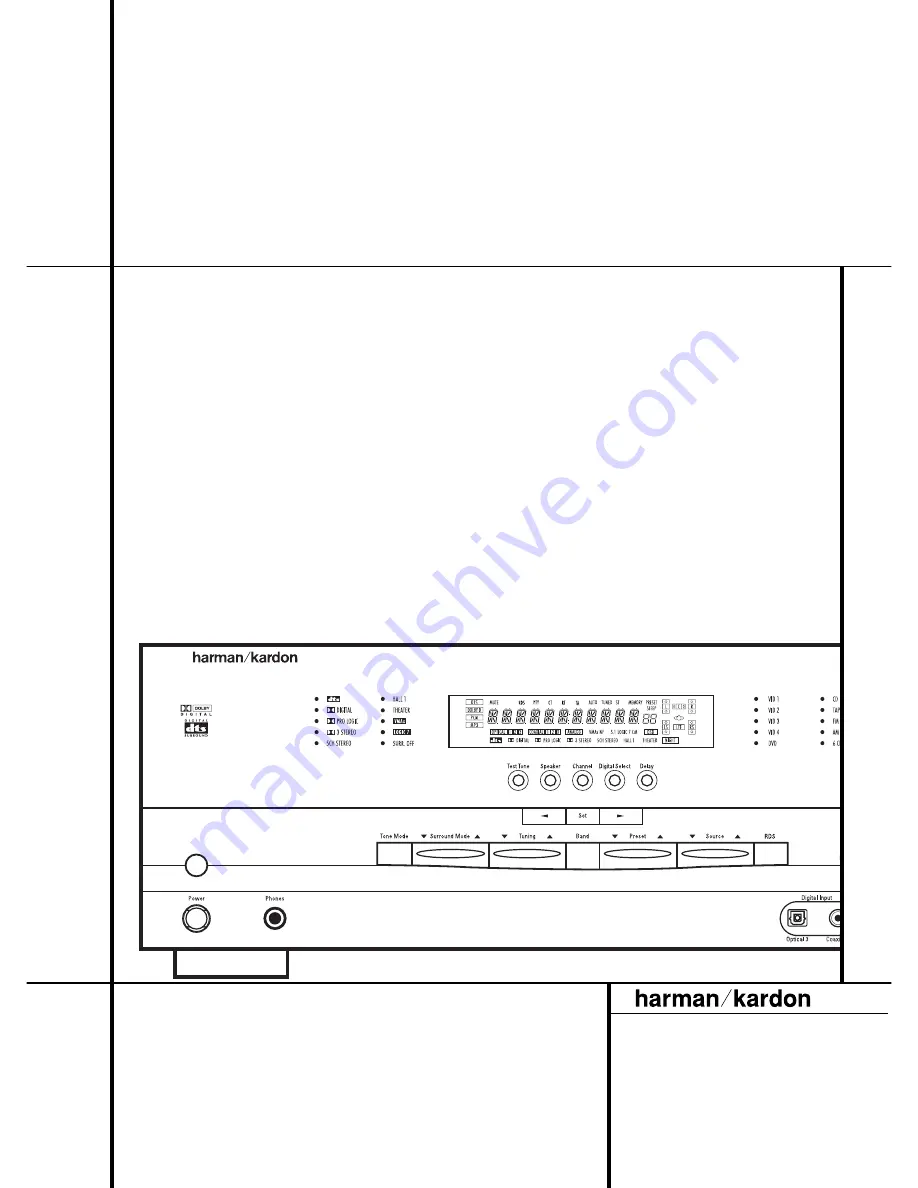
Page 5: ...all Preamp Outputs will automatically be turned off when the headphone jack is in use 5 Selector Buttons When you are establish ing theAVR 3000 s configuration settings use these buttons to select from the choices available as shown in the Main Information Display Ú 6 Tone Mode Pressing this button enables or disables the Balance Bass and Treble tone con trols When the button is pressed so that th...
Page 6: ...lance Control Turn this control to change the relative volume for the front left right channels NOTE For proper operation of the surround modes this control should be at the midpoint or 12 o clock position Treble Control Turn this control to modify the high frequency output of the left right chan nels by as much as 10dB Set this control to a suitable position for your taste or room acoustics Volum...
Page 7: ...This indica tor lights when the 5 Channel Stereo mode has been selected K Logic 7 Mode Indicators These indicators illuminate when the Logic 7 mode is in use LOGIC 7C appears for the Cinema version of Logic 7 LOGIC 7M appears for the Music version of Logic 7 See page 26 for a description of the Logic 7 Modes L Hall Mode Indicator This indicator lights when the Hall mode has been selected M OSD Ind...
Page 8: ...on is being received with sufficient sig nal strength to provide acceptable listening quality X Auto Indicator This indicator illuminates when the tuner s Auto mode is in use Y Main Information Display This display shows messages relating to the status input source surround mode tuner volume level or other aspects of unit s operation AA TA Traffic Announcement Indicator This indicator illuminates ...
Page 9: ...utputs Tape Inputs Connect these jacks to the PLAY OUT jacks of an audio recorder Tape Outputs Connect these jacks to the RECORD INPUT jacks of an audio recorder Video 1 Audio Inputs Connect these jacks to the PLAY OUT audio jacks on a VCR or other video source AM Antenna Connect theAM loop antenna supplied with the receiver to these terminals If an externalAM antenna is used make connections to t...
Page 10: ...o serve other remote controlled devices Connect this jack to the IR IN jack on Harman Kardon or other compatible equipment Remote IR Input If the AVR 3000 s front panel IR sensor is blocked due to cabinet doors or other obstructions an external IR sensor may be used Connect the output of the sensor to this jack DVD Video Inputs Connect these jacks to the composite or S Video output jacks on a DVD ...
Page 11: ...n Preset Up Down Clear Button Memory Button Delay Prev Ch Button Speaker Select Spare Button Volume Up Down TV Video Selector SPL Indicator Select 6 Channel Direct Input Mute NOTE The function names shown here are each button s feature when used with the AVR Most buttons have additional functions when used with other devices See page 40 41 for a list of these functions POWER AVR AM FM VCR 6CH OFF ...
Page 12: ...t in the Sleep mode After the time shown in the display the AVR 3000 will automatically go into the Standby mode Each press of the button changes the time until turn off in the fol lowing order Hold the button pressed for two seconds to turn off the Sleep mode setting Note that this button is also used to change channels on your TV VCR and SAT receiver when selected A Surround Mode Selector Press ...
Page 13: ...y Prev Ch Press this button to begin the process for setting the delay times used by the AVR 3000 when processing surround sound After pressing this button the delay times are entered by pressing the Set button F and then using the buttons D to change the setting Press the Set button again to complete the process See page 21 for more information Button Press this button to change a set ting or sel...
Page 14: ...g with UL CSA or other appropriate testing agency stan dards Questions about running cables inside walls should be referred to your installer or a licensed electrical contractor who is familiar with the applicable local building codes in your area When connecting wires to the speakers be cer tain to observe proper polarity Remember to connect the negative or black wire to the same terminal on both...
Page 15: ...and with a VCR con nect the Out plugs to the Out jacks on the AVR Note that with some adapter types it may be just turned around If no signal is audible visi ble when the VCR is playing connect the Out plugs to the In jacks on the AVR and turned around If the adapter plugs are not labeled in that way pay attention to the signal flow direc Black Yellow Red Figure 1 SCART Cinch Adapter for playback ...
Page 16: ... conjunction with optional exter nal decoders for digital audio systems other than the AVR 3000 s own built in Dolby Digital and DTS decoding system or with DVD players hav ing those decoders integrated If an external decoder is used connect the output jacks of the decoder to the 6 Channel Direct inputs making sure to match channels These jacks may also be used for connections to devices such as D...
Page 17: ...rs so that they are aimed at ear height when you are seated in the listening position Using these guidelines you ll find that it takes some experimentation to find the correct location for the front speakers in your particular installation Don t be afraid to move things around until the system sounds correct Optimize your speakers so that audio transitions across the front of the room sound smooth...
Page 18: ...n buttons the on screen display will show a single line of text with the current menu selection That selection will also be shown in the Main Information Display Y Selecting the On Screen display The full OSD system is always available by press ing the OSD button L When this button is pressed the MASTER MENU Figure 1 will appear and adjustments are made from the individual menus Note that the menu...
Page 19: ... Dolby Digital for inputs connected to digital sources In the case of inputs such as a CD Player Tape Deck or Tuner you may wish to set the mode to Stereo if that is your preferred listening mode for stan dard stereo sources where it is unlikely that sur round encoded material will be used Alternatively the 5 Channel Stereo or Logic 7 Music mode may also be a good choice for stereo only source mat...
Page 20: ... 7M works well without a Center too 5 When you have completed your selection for the center channel press the button D on the remote to change the cursor to SURROUND 6 Press the buttons E on the remote to select the option that best describes the sur round speakers in your system based on the speaker definitions shown on this page When SMALL is selected low frequency sur round channel sounds will ...
Page 21: ...riginal input Making Settings independent of selected Input After the settings described above have been made for all input sources in your system the following settings made with any input will remain in effect independent of the input selected Delay Settings Only for the Dolby Digital or Dolby Pro Logic modes you will need to adjust the delay time setting Note that the delay time is not adjustab...
Page 22: ...ctor buttons 5 on the front panel until the desired figure appears in the Main Information Display Y Night Mode Settings The Night mode is a feature of Dolby Digital that uses special processing to preserve the dynamic range and full intelligibility of a movie sound track while reducing the peak level This prevents abruptly loud transitions from disturbing others without reducing the sonic impact ...
Page 23: ...stment the test tone may seem to pulse or click as EzSet changes the level This is a normal aspect of the system s operation As the other channels are set the channel name and the adjustment offset will appear in the on screen display if connected and the Main Information Display Y While the level is changing the Program SPL Indicator 2 will change colors to reflect the output level in relation to...
Page 24: ...shown in the display or on screen Once the buttons are released the test noise will begin to circulate again in five seconds When all channels have the same output level turn the Volume down to about 40dB otherwise the listening level may be too high as soon as the source s music starts to play After wards press the Test Tone Selector ı8 button again to turn the test tone off and com plete the pro...
Page 25: ...anged by pressing the front panel Input Source Selector button Each press of the button will move the input selection through the list of available inputs As the input is changed the AVR 3000 will automatically switch to the digital input if selected surround mode and speaker configura tion that were entered during the configuration process for that source The front panel Video 4 Inputs may be use...
Page 26: ...LL The Hall mode offers matrix surround decoding that simulate Delay time not adjustable a medium sized chamber hall or opera house with stereo and even pure mono sources VMAx Near When only the two front channel loudspeakers are used Harman s patented VMAx mode No surround channels VMAx Far delivers a three dimensional sound space with the illusion of phantom speakers at the center and surround p...
Page 27: ...mote until SURR OFF appears in the Main Information Display Y Digital Audio Playback Digital audio is a major advancement over past systems such as Dolby Pro Logic It delivers five dis crete channels left front center right front left sur round and right surround Each channel reproduces full frequency range 20Hz to 20kHz and offers dramatically improved dynamic range and signifi cant improvements ...
Page 28: ... A will light in the Main Information Display Ú to confirm that the digital signal is Dolby Digital DTS MP3 or PCM Note that a digital input e g coaxial remains associated with any analog input e g DVD as soon as it is selected thus the digital input need not be re selected each time the appropriate input choice e g DVD is made Digital Status Indicators When a digital source is playing the AVR 300...
Page 29: ...ard or chapter search mode the digital audio data will momentarily stop and the channel position letters inside the Speaker Channel Indicators Q will flash This is normal and does not indicate a problem with either the AVR 3000 or the source machine The AVR 3000 will return to digital playback as soon as the data is available and when the machine is in a standard play mode 2 Although the AVR 3000 ...
Page 30: ...ssisting person After the output levels of all channels are aligned press the SPL Indicator Select to turn the sensor and indicator off The channel output may also be adjusted using the full OSD on screen menu system First set the volume to a comfortable listening level using the Volume Control Then press the OSD button L to bring up the MASTER MENU Figure 1 Press the Button D until the on screen ...
Page 31: ...ated tap the Tuning button 8 K to advance one frequen cy increment at a time or press and hold it to locate a specific station When the TUNED indi cator W illuminates the station is properly tuned and should be heard with clarity 5 Stations may also be tuned directly by press ing the Direct button J and then pressing the Numeric Keys H that correspond to the station s frequency The desired station...
Page 32: ... seconds for the text message to appear in that time the word TEXTwill flash in the Information Display when RT is selected The RT Indicator AB will illuminate when text data is being received and ready to be displayed The current time of day CT Note that it may take up to two minutes for the time to appear in that time the word TIMEwill flash in the information display when CT is selected The CTI...
Page 33: ...S data that matches the desired selec tion and acceptable signal strength for quality reception 4 While the PTY Indicator AD flashes in the display the tuner will make up to one complete scan of the entire FM band for the next station that matches the desired PTY type and has acceptable reception quality If no such station is found the display will read NONEfor some seconds and the tuner will retu...
Page 34: ...is turned off Turn On Volume Level As is the case with most audio video receivers when the AVR 3000 is turned on it will always return to the volume setting in effect when the unit was turned off However you may prefer to always have the AVR 3000 turn on at a specific setting regardless of what was last in use when the unit was turned off To change the default condition so that the same volume lev...
Page 35: ...s menu this is a permanent setting change and the time out entry will remain in effect until it is changed even when the unit is turned off If you wish to make other adjustments in the menu press the Buttons D until the on screen cursor is next to the desired setting or the RETURN TO MENU line and press the Set button F If you have no other adjust ments to make press the OSD Button L to exit the m...
Page 36: ...ransport function transmitted 6 Try all of the functions on the remote to make certain that the product operates properly Keep in mind that many manufacturers use a number of different combinations of codes so it is a good idea to make certain that not only does the Power control work but that the volume channel and transport controls work as they should If functions do not work properly you may n...
Page 37: ...not lit red and AVR functions shall be pro grammed 3 When all the steps have been entered press the Sleep button 9 to enter the commands The red light under the Input Selector 45 will blink and then turn off Example To program the Macro 1 M button so that it turns on the AVR 3000 TV and a Sat Receiver follow these steps Press the Macro 1 button M and Mute buttons at the same time and then release ...
Page 38: ...pears that only a few functions operate check to see if another code set will work with more buttons Depending on the brand and product type used the functions listed in the Function List tables may not correspond with the function the unit reacts on the command In these cases it s a good idea to edit the reaction of the unit into the corresponding line of the table or to set up a separate list Wh...
Page 39: ...ollow these steps 1 Press the Input Selector 4 for the device you wish to have the channel control associated with and the Mute button at the same time until the red light illuminates under the Input Selector 4 and the Program SPL Indicator 2 flashes amber 2 Press the Play button x The Program SPL Indicator 2 will stop flashing and stay amber 3 Press and release the AVR 5 or Input Selector button ...
Page 40: ... Left 27 Set Set Enter 28 fl Move Adjust Right Right 29 Digital Exit Digital Input Select Open Close 30 Move Adjust Down Down 31 Delay Prev Ch Delay Adjust Return Open Close 32 1 1 1 1 33 2 2 2 2 34 3 3 3 3 35 4 4 4 4 36 5 5 5 5 37 6 6 6 6 38 7 7 7 7 39 8 8 8 8 40 Tun M Tuner Mode Chapter Repeat 41 9 9 9 9 42 0 0 0 0 43 Memory Memory Audio Time CDR Display 44 Tune Up Tune Up 45 Direct Direct Tuner ...
Page 41: ...p Up Up 25 Speaker Menu Menu Menu Menu Menu 26 fi Left Left Left Left 27 Set Enter Enter Enter Enter 28 fl Right Right Right Right 29 Digital Exit Exit Exit Exit Exit 30 Down Down Down Down 31 Delay Prev Ch Prev Channel Prev Channel Prev Channel 32 1 1 1 1 1 33 2 2 2 2 2 34 3 3 3 3 3 35 4 4 4 4 4 36 5 5 5 5 5 37 6 6 6 6 6 38 7 7 7 7 7 39 8 8 8 8 8 40 Tun M 41 9 9 9 9 9 42 0 0 0 0 0 43 Memory 44 Tune...
Page 42: ...61 GOLDSTAR 022 GOODMANS 010 022 043 GORENJE 124 GRANADA 010 018 022 029 033 104 GRANADA UK 043 GRUNDIG 011 075 076 077 096 HANSEATIC 010 020 022 043 HIFIVOX 017 019 024 056 059 080 HITACHI 010 012 015 018 024 026 035 043 055 056 058 059 061 066 069 080 082 085 093 094 101 IMPERIAL 105 INTERFUNK 020 022 023 024 033 056 088 104 INTERVISION 111 113 114 115 116 117 118 119 121 ITT 040 046 092 100 ITT...
Page 43: ... 044 REDIFFUSION 029 082 REX 022 025 RFT 122 123 124 125 126 127 RTF 023 SABA 009 017 019 023 024 056 059 069 080 088 093 094 SALORA 018 058 SAMSUNG 022 068 SANYO 010 012 023 038 043 091 092 SBR 022 033 046 047 061 084 086 SCHNEIDER 022 023 025 033 047 048 060 078 086 097 SELECO 022 025 105 SHARP 010 043 SIEMENS 010 011 015 075 076 077 SINGER 023 088 105 SONY 006 010 016 038 043 062 064 065 091 10...
Page 44: ...RAAF 015 018 039 049 054 148 DUAL 044 090 148 155 DUMONT 015 039 054 148 155 DYNATECH 039 148 ELBE 036 148 ELTA 148 EMERSON 011 032 039 060 062 073 127 148 155 FERGUSON 001 005 044 083 085 090 094 100 104 108 122 130 131 135 138 FINLADIA 015 054 FINLUX 015 018 019 039 044 049 053 054 103 107 143 146 147 148 149 FISHER 015 019 032 FUJITSU 148 FUNAI 039 148 GARANADA UK 107 GBC UK 054 GOLDSTAR 036 05...
Page 45: ...32 073 127 148 155 OSAKI 039 055 148 155 OTTO VERSAND 054 098 147 155 156 157 158 PALLADIUM 148 PANASONIC 017 071 088 089 107 129 137 147 148 PATHE MARCONI 044 045 090 PHILIPS 006 041 043 046 049 050 054 065 079 082 091 109 145 146 155 PIONEER 047 054 113 145 PROLINE 039 148 QUELLE 011 042 044 048 054 055 098 107 109 127 RADIOLA 049 091 109 RCA 060 062 REALISTIC 015 019 039 042 049 050 147 148 REX...
Page 46: ...153 155 TRANSONIC 155 UHER 042 044 096 ULTRAVOX 155 UNITECH 042 UNIVERSUM 147 148 149 155 156 157 158 WATSON 155 WELTBLICK 155 YAMAHA 036 044 YOKO 042 098 148 155 ZANUSSI 044 045 090 ZENDER 090 Setup Code Table CBL Maker Brand Name Code Number 3digit List BT CABLE 007 CABLETIME 008 011 012 016 CLYDE CABLE VISION 017 DECSAT CANAL 010 FILMNET 018 019 020 FRANCE TELECOM 013 021 GEC 017 JERROLD 001 02...
Page 47: ...13 074 197 198 NAKAMICHI 199 200 201 229 NAIM 217 221 NEC 069 ONKYO 037 038 045 046 171 175 202 203 PANASONIC 015 075 109 119 158 183 204 PHILIPS 039 138 149 209 PIONEER 071 094 100 112 123 131 161 162 215 PRIMARE 059 PROTON 210 REALISTIC 058 093 095 104 105 108 164 166 REVOX 127 221 SAMSUNG 028 SANSUI 047 081 157 172 SANYO 033 068 082 095 168 SHARP 058 105 114 151 159 167 180 181 SHERWOOD 003 041...
Page 48: ... KOSMOS 380 LOEWE 475 LEMON 474 LORENZEN 461 462 463 464 465 MARANTZ 333 MASPRO 353 406 METZ 390 MINERVA 390 MITSUBISHI 390 MULTISTAR 380 NEC 330 336 346 373 NOKIA 367 NORSAT 346 OTTO VERSAND 390 PACE 348 353 363 364 367 424 PACE MSS SERIES 367 PANASONIC 331 424 PHILIPS 319 332 333 353 421 424 QUADRAL 466 467 468 469 470 471 472 473 QUELLE 390 RADIOLA 353 RADIX 347 SAMSUNG 380 427 432 SAT 427 SCHN...
Page 49: ...034 GE 003 004 GOLDSTAR LG 005 HARMAN KARDON 001 032 JVC 006 KENWOOD 007 MAGNAVOX 009 033 MARANTZ 033 MITSUBISHI 023 036 NAD 010 ONKYO 015 PANASONIC 024 025 034 035 PHILIPS 033 PIONEER 012 020 038 041 RUNCO 027 SAMSUNG 031 SANYO 013 SHARP 021 028 SONY 029 TECHNICS 026 THOMSON 003 004 042 TOSHIBA 033 YAMAHA 016 017 030 ...
Page 50: ...Power Make certain AC power cord is plugged Power Switch is pushed into a live outlet Check to see if outlet is switch controlled Display lights but no sound Intermittent input connections Make certain that all input and speaker or picture connections are secure Mute is on Press Mute button Volume control is down Turn up volume control Sound is heard but Front Panel Display brightness is turned of...
Page 51: ...p 500µV Distortion 1kHz 50 Mod 0 8 Selectivity 9kHz 30dB Video Section Video Format PAL NTSC Input Level Impedance 1Vp p 75 ohms Output Level Impedance 1Vp p 75 ohms Video Frequency Response 10Hz 8MHz 3dB General Power Requirement AC 220 240V 50Hz Power Consumption 72W idle 470W maximum Dimensions Max Width 440mm Height 167mm Depth 435mm Weight 14 0 kg Depth measurement includes knobs buttons and ...
Page 52: ...250 Crossways Park Drive Woodbury New York 11797 www harmankardon com Harman Consumer International 2 route de Tours 72500 Château du Loir France 2000 Harman Kardon Incorporated Part No J90200012400 ...