Hanna HALO 2 Instruction Manual Download Page 6

6

GENE

rAL

 O

PE

rA

Ti

ONS

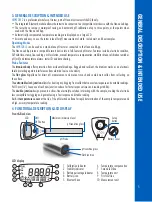
5.  GENERAL OPERATIONS

Turning the Tester On & Off

•  Turn the tester face down. Rotate the battery cover on the back of the tester counterclockwise and set it aside. Remove 

the battery insulation film.

•  Press the ON/OFF button to turn the tester on or off. Initialization screen displays all LCD segments, followed by the 

battery percentage. The tester enters measurement mode. Before the tester turns off, “

OFF


PWR

” is displayed briefly.

•  Press and hold the ON/OFF button to turn the tester off when connected to Bluetooth.

Battery Replacement

1.  Turn off the tester. Turn the tester face down and rotate the battery cover counterclockwise. 

2.  Set the battery cover aside. Press the metallic pin to push old battery out.

3.  Place the new battery with positive (+) sign facing out.

4.  Reset the date and time in setup, or connect to the Hanna Lab App to update it automatically.

5.  Align the mark on the cover with the open lock icon ( ) on the case. Rotate the cover 

clockwise until the mark on the cover aligns with the closed lock icon ( ).

Note:

 Only use specified battery type. Dispose of old battery in accordance with local regulations.

6.  SETUP

The Setup button is located inside the battery compartment. After Setup configuration, replace the cover.

Setup Menu Navigation

•  Press the Setup button to enter Setup mode and navigate menu items.

•  To exit Setup mode, press the Setup button after “

SEt


TIME

” option is displayed.

•  Press the ON/OFF button to configure menu item options.
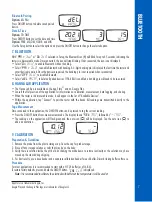
Temperature Unit 

Option:

 °C or °F

Press ON/OFF button to select desired 

temperature unit.

°C

T E M P


°F

TEMP

Auto-Off Interval

Option:

 8, 60 min., or “

----

” (disabled)

Press ON/OFF button to select desired interval.

To save battery life, after the selected auto-off

8

AOFF


60

AOFF


----

AOFF

interval has elapsed, the tester will automatically turn off. 
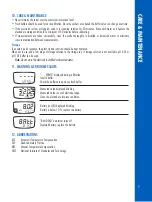
Calibration Points

Option:

 2P or 3P

Press ON/OFF button to select between up to 

two- or up to three-point calibration.

2P

CAL


3P

CAL

Buffer Set

Option:

 7.01 pH (Hanna) or 6.86 pH (NIST)

Press ON/OFF button to select the calibration 

buffer set (Hanna or NIST).

7.01

BUFF


6.86

BUFF

pH Resolution

Option:

 0.01 pH or 0.1 pH

Press the ON/OFF button to select resolution.

0.01

RES


0.1

RES

Bluetooth Wireless Mode

Option:

 On, PAIr, or OFF

Press ON/OFF button to select Bluetooth 

option at start-up.

&

On

BLU


&

PAIr

BLU


&

OFF

BLU

Metallic pin

Summary of Contents for HALO 2

Page 1: ...INSTRUCTION MANUAL Foodcare Wireless pH Tester for Beer with built in specialized electrode HI9810312...

Page 2: ...a Hanna Instruments product Please read this instruction manual carefully before using this instrument This manual will provide you with the necessary information for correct use of this instrument a...

Page 3: ...ffer Set 6 pH Resolution 6 Bluetooth Wireless Mode 6 Bluetooth Pairing 7 Date Time 7 7 Bluetooth 7 8 Hanna Lab Application 7 Tag a Measurement 7 9 Calibration 7 Preparation Guidelines 7 Procedure 7 St...

Page 4: ...ution pH 0 01 or 0 1 pH mV 0 1 or 1 mV Temperature 0 1 C 0 1 F Accuracy pH 0 05 pH Temperature 0 5 C 0 9 F Calibration Up to three points or four points Automatic buffer recognition with Standard buff...

Page 5: ...g against interferences from electrical noise or humidity The flat glass tip allows for direct pH measurement and prevents mash and cooled wort solids from collecting on the surface The extractable cl...

Page 6: ...d battery type Dispose of old battery in accordance with local regulations 6 SETUP The Setup button is located inside the battery compartment After Setup configuration replace the cover Setup Menu Nav...

Page 7: ...en the tester is in discoverable mode it will appear in the list of Available Devices Within the application tap Connect to pair the tester with the device All readings are transmitted directly to the...

Page 8: ...e in the second buffer rinse beaker then in the second calibration buffer Wait until the measurement is stored and the stability indicator disappears 7 After the second point has been stored CAL SAVE...

Page 9: ...should be kept hydrated When not in use add a few drops of storage solution to the storage cap If storage solution is not available pH 4 01 or pH 7 01 buffer can be used Note Do not store the electrod...

Page 10: ...RGA number from the Technical Service department and then send it with shipping costs prepaid When shipping any product make sure it is shipped back in compliance with shipping regulations thoroughly...

Page 11: ...vide reasonable protection against harmful interference when the equipment is operated in a commercial environment This equipment generates uses and can radiate radio frequency energy and if not insta...

Page 12: ...World Headquarters Hanna Instruments Inc Highland Industrial Park 584 Park East Drive Woonsocket RI 02895 USA www hannainst com MAN9810312 Printed in ROMANIA...

Reviews: