background image

CP4000 User Manual

Rev.1.3

www.hprt.com

7

4.2 Loading the Paper Cassette

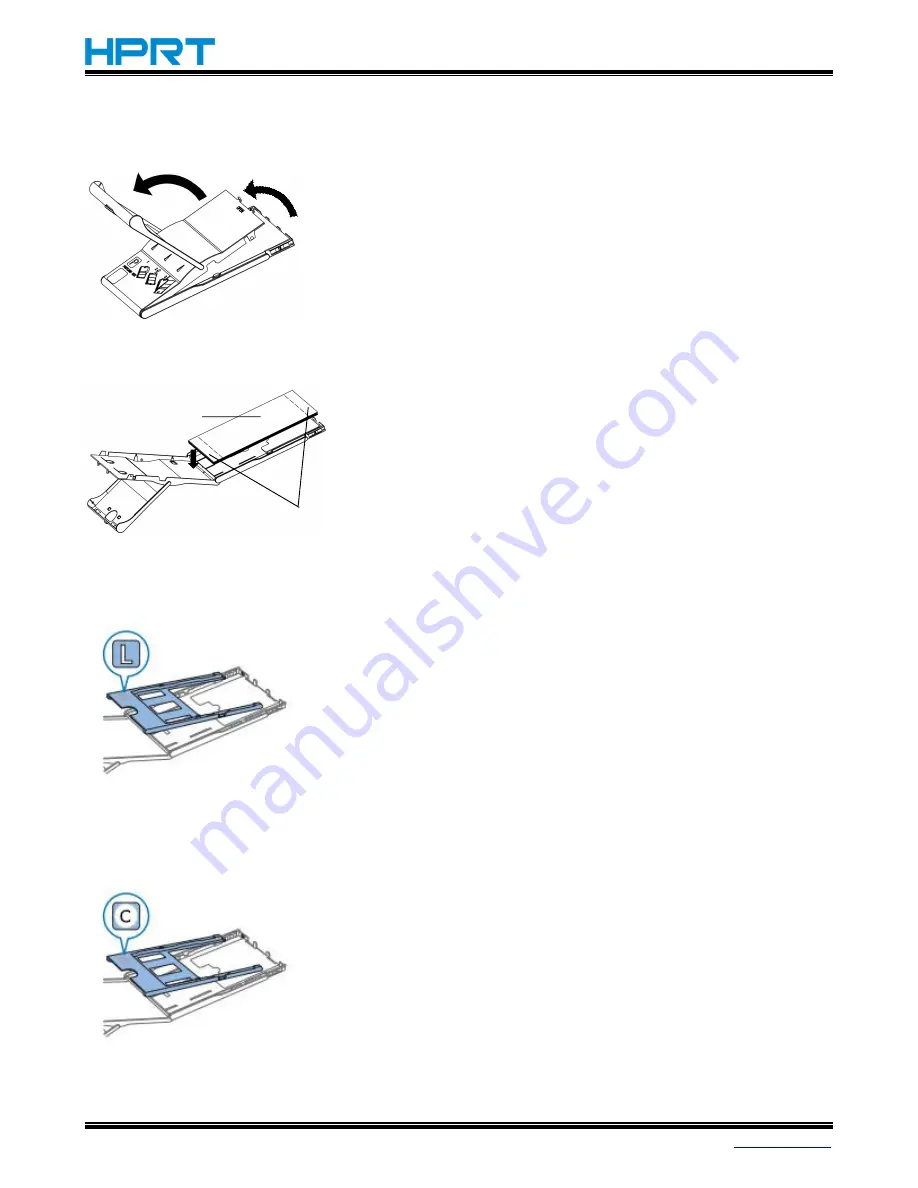
1. Open the covers.

There are two layers of covers. First open the outer

cover①, then the inner cover②.

2. Load the paper.

Remove the paper cassette paper from the bag , remove

protective sheets from the paper, and place all the paper

(18 sheets) into the paper cassette.

Placing more than 19 sheets of paper may damage the

printer or cause malfunction.

Load the paper into the paper cassette with the glossy

side up.

Do not touch the glossy side, except for the non-printable

area.

When using the paper cassette to print L-type paper

(89

×

119mm), it requires to place the L-type paper

cassette.

Note: When printing P-type paper, please remove L-type

paper cassette.

When using the paper cassette to print C-type paper

(54

×

86mm), it requires to place the C-type paper

cassette.

Note: When printing P-type paper, please remove C-type

paper cassette.

Glossy side

Non-Printable Area

Summary of Contents for CP4000

Page 1: ...Photo Printer CP4000 User Manual Xiamen Hanin Electronic Technology Co Ltd ADD 5F 8 Aide Airport Industrial Park Huli District Xiamen China WEB www hprt com ...

Page 2: ...ITIAL PREPARATIONS 6 4 1 Loading the Ink Cassette 6 4 2 Loading the Paper Cassette 7 4 3 Open the Printer 9 5 BASIC OPERATIONS 11 5 1 Button Descriptions 11 5 2 Home Menu 12 5 3 Language Setting 13 5 4 Selecting and Printing Images Setting Printed from Memory Card USB Flash Drive 14 5 5 Printing Images from Smartphones or Cameras 16 ...

Page 3: ...ly turn off the printer and remove the USB cable and or battery pack Then contact your dealer for advice Continued use of the printer could result in a fire Never attempt to repair the printer yourself Also do not disassemble or modify the product Doing so could lead to injury fire or electric shock Do not touch the tear bar There is a tear bar inside the paper outlet slot Neither put your hand in...

Page 4: ...right for this user manual and various other manuals is property of our company Any copying or conversion into electronic form and saving of this material without the express written permission is strictly prohibited Use of the information contained in this manual is not subject to any patent liability This manual has been prepared with utmost care and attention to detail but may contain certain e...

Page 5: ...s packaged with the following accessories If any of these accessories is broken or missing please contact the dealer where you purchased the printer Remark Purchase a Color Ink Paper Set separately CP4000 Printer Compact Power Adaptor Power Cord Paper Cassette User Manual ...

Page 6: ...paper set for CP4000 printer This printer cannot use ink paper or postcards for other series Accessory availability varies by region Color Ink Paper Set Product Name Paper Size Number of Possible Prints Color Ink Paper Set AP 36 Postcard Postcard Size 36 Color Ink Paper Set AP 54 Photo Paper 54 Color Ink Paper Set AP 108 Photo Paper 108 ...

Page 7: ...uired SD Memory Card miniSD Memory Card SDHC Memory Card miniSDHC Memory Card SDXC Memory Card microSD Memory Card USB Flash Drive microSDHC Memory Card microSDXC Memory Card Note The current file system only supports FAT32 exFAT NTFS is not supported The supported maximum capacity of FAT32 is 32GB ...

Page 8: ... cassette into the printer in the direction of the arrow on the cassette until it clicks into place 4 Close the ink cassette compartment cover Note Do not touch the ink sheet Avoid getting dust on the ink sheet Do not reuse the ink cassette Tips If the ink sheet is loose turn the sprocket gently to tighten it For the ink cassette which has a lock on the bottom press the lock to release it while yo...

Page 9: ...of paper may damage the printer or cause malfunction Load the paper into the paper cassette with the glossy side up Do not touch the glossy side except for the non printable area When using the paper cassette to print L type paper 89 119mm it requires to place the L type paper cassette Note When printing P type paper please remove L type paper cassette When using the paper cassette to print C type...

Page 10: ... Pay attention that one spring is attached in the center on the top of the card sized paper cassette Avoid touching or rubbing the glossy printing sided of the paper Do not handle the paper with wet hands and prevent the paper from attaching dust Dirt or moisture may cause banding or affection print quality or damage the printer 3 Close the inner cover Close the inner cover firmly until it clicks ...

Page 11: ...cord into CP4000 2 Connect the power cord 3 Open CP4000 Hold down the button until HPRT is displayed then release the button To turn off the power hold down the button again until the display screen changed The Home screen is displayed Power Adaptor Power Cord Vary by local or region ...

Page 12: ...le surface Do not place the printer on the uneven or slant surface Leave some space behind the paper cassette for paper out when printing 5 The screen is designed in flip structure which is convenient for user to better operate the printer At least 10cm At least 10cm More than the paper length ...

Page 13: ... current photo 3 All the other screens all represent moving the cursor To confirm Confirm the current setting or photo editing enter next item or return to last item after saving all the settings Home menu Stop current operation and directly return to the home menu without saving the settings Enlarge Reduce Enlarge Reduce the photo when previewing the photo Enlarge Reduce the cropping frame when c...

Page 14: ...nd print More Print Options Print in many ways e g print index or reprint the former images Puzzle Print Print the images from memory card or USB flash drive together with auto selected size ID Photo Print ID photos for passport or other documents Wi Fi Settings Set up Wi Fi connection Setup Set up printing or other printer operations ...

Page 15: ... 1 3 www hprt com 13 5 3 Language Setting 1 On the home menu press buttons to choose Settings 2 Choose Printer Setup to enter the printer setting screen 3 Choose Language then press OK button 4 Choose the language as needed ...

Page 16: ...n slowly release it The Select Print image selection screen is displayed The printed image format is JPG or BMP and the supported maximum capacity is 1000w pixels 2 Choose an image Press buttons to choose an image to print Press buttons to add or delete current selected images indicates number of printing images cancel the current selected image select the current selected image selected times of ...

Page 17: ...t printing as shown While printing the paper will pass in and out of the back of CP4000 several times Do not touch the paper until printing is finished and the print is ejected onto the paper cassette Do not pile up 19 or more prints in the ejection area on the paper cassette 5 Add more paper as needed If a message indicates that the paper has run out please remove the paper cassette without turni...

Page 18: ...access point to wireless connect with smartphone or camera and print While printing by Wi Fi remove memory card or USB Insert the paper cassette with paper and ink cassette Setting Wi Fi on CP4000 1 Select Wi Fi Settings and enter Wi Fi setting screen Note The format of Wi Fi name displayed on top right is DIRECT XX CP4000 fixed random fixed 2 Choose Connection Method and then press OK button 3 Ch...

Page 19: ...7 4 Choose On and then press OK button 5 Change the password The current password is displayed If you need to change the password use buttons and OK button to edit After editing move the cursor to Finish press OK button to complete the setting ...

Page 20: ...nd Android smartphones scan the following QR code to download APP http cp hprt com app 2 Open APP choose CP4000 The description below takes Album print as example for LOMO AR Photo and Credentials please follow the instruction of APP as needed The APP display may be different from the actual one please subject to the latest software version ...

Page 21: ...CP4000 User Manual Rev 1 3 www hprt com 19 3 Choose Album and select the image to print 4 Printing preview ...

Page 22: ...re 2 connection modes A Scan scanning the QR code to directly connect B Search For Printers connecting through LAN A Scan scanning the QR code to directly connect Choose Scan and it will show the scanning frame Hold down the Wi Fi button on the printer the printer will show the QR code Scan the QR code and the printer will start printing ...

Page 23: ... same access point input the password successfully connected e g The smartphone and printer both choose Prttech as access point Now the smartphone and printer are on the same Wi Fi network APP can find the printer and send images to print 6 Image is being printed The smartphone is sending the image to print and meanwhile the printer is receiving the image and ready to print During printing do not ...

Page 24: ...in CP4000 The access point must support IEEE 802 11b g connection Connecting the Printer to the Access Point Connection mode varies depending on whether the access point is compatible with WPS or not Access Point Compatible with WPS 1 Check the access point Make sure that the access point is on and can be for communication 2 Choose Wi Fi Settings and then press OK button to enter the Wi Fi setting...

Page 25: ... com 23 5 Choose WPS Connection and then press OK button 6 Choose PBC Method and then press OK button The screen will be displayed as shown on the left On the access point i e Router hold down the WPS connection button for a few seconds ...

Page 26: ...ss point and then press OK button 8 Set up the password as need and then press OK button 9 If you choose Enter Password press buttons to select a letter number or symbol as need and then press OK button After editing move the cursor to Finish and press OK button ...

Page 27: ...CP4000 User Manual Rev 1 3 www hprt com 25 10 Return to the Wi Fi setting screen choose Confirm Settings and then press OK button 11 Confirm the printer name and IPv4 address ...

Reviews: