HandyWave HandyPort HPS-110 User Manual Download Page 9


3.4.2.  Command List for Remote Device 

To change the configuration for a remote device via over-the-air, firstly you have to use a 

command  “O”  at the local device. The following are a procedure for changing configuration of 

remote device via over-the-air. 


Configure a remote device at the local device. 


Save changes at the local device. 


Make a wireless connection between the  local device and remote device 

(automatically). 


Send changes from the local device to the remote device (automatically). 


Apply changes at the remote device and reboot (automatically). 
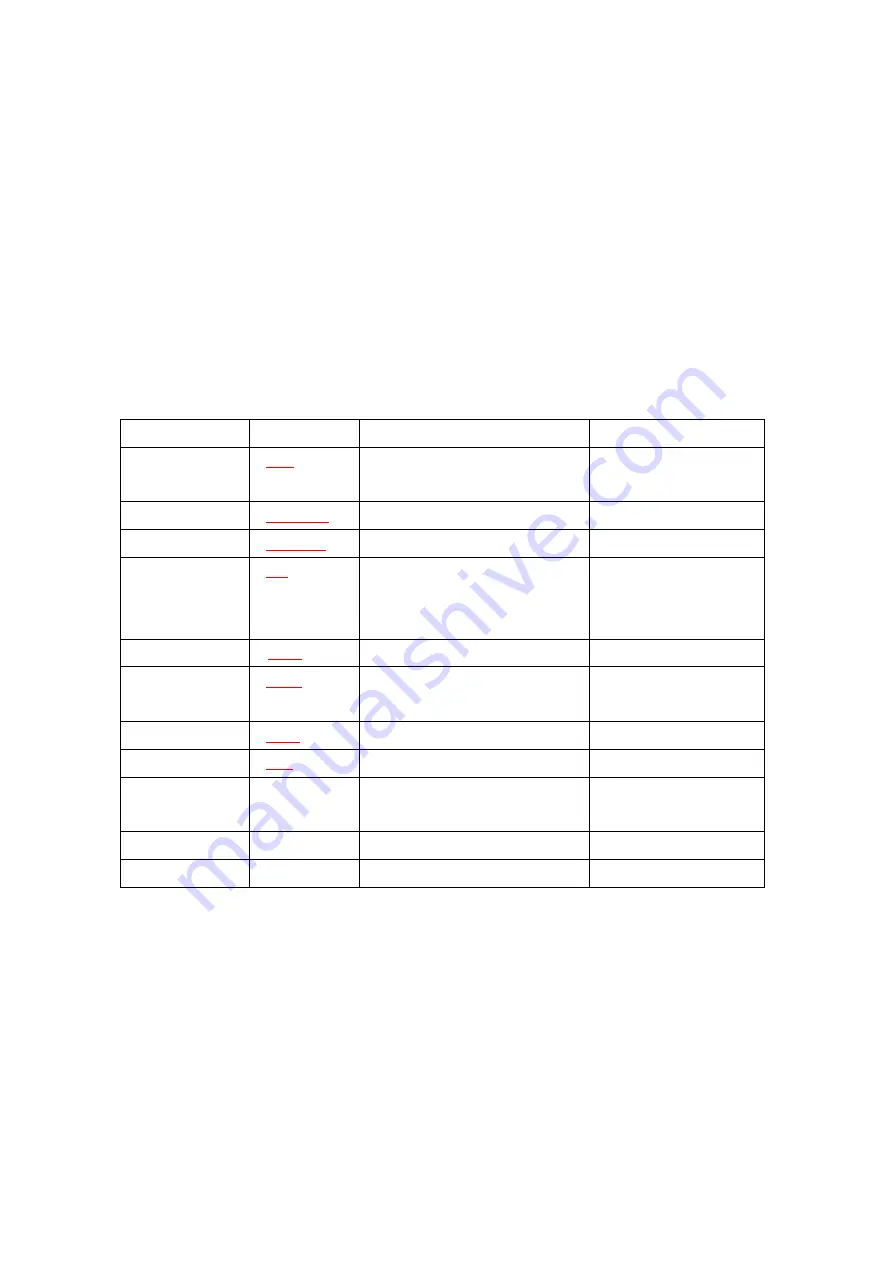
Item 

Syntax 

Description 

Remarks 

1. Connecting 

address 

A

Addr

<Enter> 

Set a connecting address for remote 

device. 


2. Baud rate 

B

Baud Rate


Change the baud rate for the remote. 


3. COM port 

C

COM Port


This is only valid in mode 2. 


4. PIN code 

E

PIN

<Enter>


Authentication Off: Type <Enter> 

Authentication On: Type  up to 11 

characters 

Paired adapters should have 

a same PIN code.


5. Connection mode 

M

Mode


Set a connection mode for remote. 


6. Friendly name 

N

Name

<Enter> 

Set a friendly name up to 11 characters 

for remote. 


7. Parity Bit 

P

Parity


Set the parity bit. 

0: None, 1: Odd 2: Even 

8. Stop Bit 

S

Stop


Set the stop bit. 

0: 1 Stop, 1: 2 Stop 

9 View 

Display configuration information for 

remote 


10. Exit 

X


Save changes and return to main menu. 


11. Usage 

?


Print the usage. 


Remarks1: 

To configure a remote device via over-the-air, a local device must be able to 

make a connection to the remote device. 

Remarks2: 

You can change a PIN code for the remote and local device as follows: 

Change a PIN for remote at the local -> Apply it. -> Change a PIN for local and apply it.


Remarks3: 

Once you change a connecting address, and connection mode for the remote, 

the local device won’t be able to make a connection to the remote device.


Summary of Contents for HandyPort HPS-110

Page 1: ...HPS 110 HandyPort Serial Wireless Solutions in your Hand User s Manual ...

Page 2: ...ISPLAY STATUS 6 2 5 RESET BUTTON 6 2 5 1 Enter Configuration Mode 6 2 5 2 Exit Configuration Mode 6 2 5 3 Re connection 6 3 USAGE 7 3 1 HARDWARE INSTALLATION 7 3 2 HYPER TERMINAL SETTINGS 7 3 3 CONFIGURATION 7 3 3 1 Start Configuration 7 3 3 2 Usage Printing 7 3 3 3 After Configuration 7 3 4 COMMAND SET 8 3 4 1 Command List for Local Device 8 3 4 2 Command List for Remote Device 9 ...

Page 3: ...andheld computers mobile phones and other HandyPort Serial The HandyPort Serial is a suitable component in new products as well as in existing products 1 1 Features No need of external host and software Easy of installation and use Supports configuration of the local device Supports configuration of the remote device via Over the Air Easy of maintenance Supports up to 100 meter Line of Sight 1 2 P...

Page 4: ...onnection Point to Point Signal TxD RxD GND RS 232 Interface 2 5mm Wire to Board Connector Angle Type 4 Pin Male Frequency 2 400 2 4835GHz Tx Power Max 20 Typical 16dBm Rx Sensitivity 84dBm Antenna Interface SMA Female Antenna Gain Max 2dBi Power Supply 3 3 16VDC Current Consumption Max 110mA Operation Temperature 20 75 C Size 36 5mm W x 69mm D x 12mm H ...

Page 5: ...le RST Reset Button GND Signal Ground RXD RS 232 Received Data TXD RS 232 Transmitted Data VCC System Power 2 2 2 RS 232 Signals Pin Number Notation Direction Description 1 VCC Input Vcc 3 3V 16V 2 TxD Output RS 232 Transmitted Data 3 RxD Input RS 232 Received Data 4 GND N A Signal Ground ...

Page 6: ...nnect a wireless connection 2 5 1 Enter Configuration Mode When the LNK LED is OFF push the RST button When the LNK LED is ON you have to push the RST button twice to enter the configuration mode If you enter the configuration mode successfully LNK LED will be flashing every second And HPS 110 COM port will be stored the factory settings 2 5 2 Exit Configuration Mode You can have two options to ex...

Page 7: ...a COM port of PC And Power it on Step 2 Open a Hyper Terminal and set it up Step 3 Push the RST button on HPS 110 If you enter the configuration mode successfully LNK LED will be flashing every second Step 4 Hit the Enter key 5 second later Step 5 Change the configuration of HPS 110 with commands if necessary 3 3 2 Usage Printing If you are in the configuration mode type key You will see the usage...

Page 8: ...ation Off Type Enter Authentication On Type up to 11 characters Paired adapters should have a same PIN code 5 Connection mode Mmode Set a connection mode 0 1 1 Mode 1 WAIT Mode 2 REGISTER and CONNECT Mode 6 Friendly name Nname Enter Set a friendly name up to 11 characters 7 Command for the remote O Enter configuration mode for the remote 8 Parity Bit Pparity Set the parity bit 0 None 1 Odd 2 Even ...

Page 9: ...ode 2 4 PIN code EPIN Enter Authentication Off Type Enter Authentication On Type up to 11 characters Paired adapters should have a same PIN code 5 Connection mode MMode Set a connection mode for remote 6 Friendly name NName Enter Set a friendly name up to 11 characters for remote 7 Parity Bit PParity Set the parity bit 0 None 1 Odd 2 Even 8 Stop Bit SStop Set the stop bit 0 1 Stop 1 2 Stop 9 View ...

Reviews: