background image

Page 6 

Introduction to Your Visor Handheld

Each handheld must have a unique name

After you complete the upgrade process described above, you have 
two handhelds with the same name. This is an undesirable situation. 
Each handheld must have a unique name in order to prevent 
unexpected results during HotSync operations and other 
complications.

We strongly recommend that you perform a hard reset on your old    
handheld. See “Performing a hard reset” in Appendix A for details.

A hard reset not only erases all data from the old handheld; it also   
erases the name and makes that handheld a clean slate, ready to 
receive a new name. The next time you perform a HotSync operation 
with this old handheld, you are asked to give it a name. Be sure to give 
it a unique name.

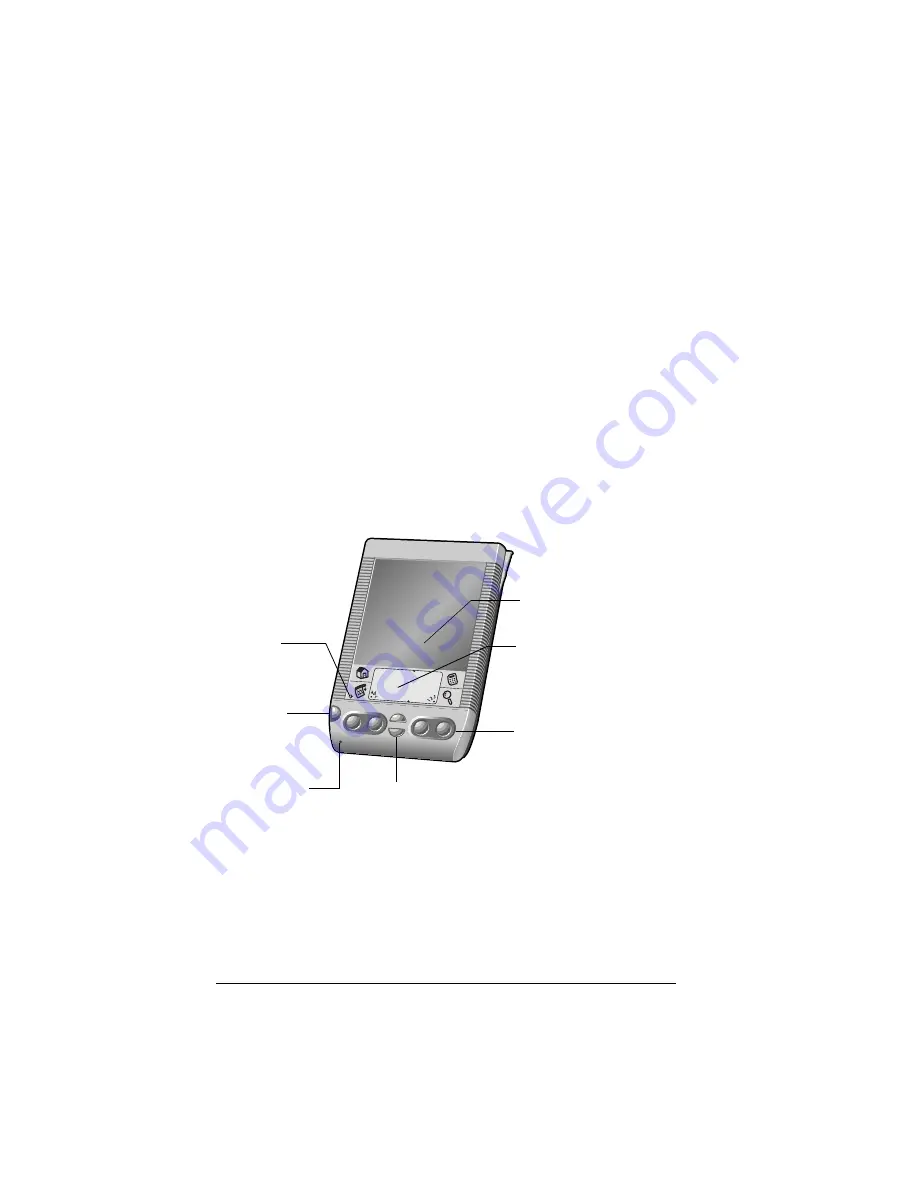
Visor components

Locating front panel controls

Visor 
handheld 
screen

Displays the applications and information stored in 
your Visor handheld. It is touch-sensitive and 
responds to the stylus.

Graffiti

®


writing 
area

The area where you write letters and numbers using 
the Graffiti

®

 alphabet. See Chapter 2 to learn how to 

write Graffiti characters. 

Screen

Graffiti writing area

Application buttons

Scroll buttons

Power button, 
Backlight 
control

Contrast 
control

Microphone

Summary of Contents for Visor Visor Deluxe Handheld

Page 1: ...Visor Handheld User Guide...

Page 2: ...ing from the use of this handbook Handspring Inc and its suppliers assume no responsibility for any loss or claims by third parties which may arise through the use of this software Handspring Inc and...

Page 3: ...1 Connecting the cradle 22 Using your handheld with Microsoft Outlook Windows only 23 Using your handheld with another PIM 23 Installing a Springboard module 24 Chapter 2 Entering Data in Your Visor H...

Page 4: ...deleting a password 45 Locking your handheld 45 Recovering from a forgotten password 46 Chapter 4 Overview of Basic Applications Date Book 48 Date Book Plus 49 Address Book 50 To Do List 51 Memo Pad 5...

Page 5: ...king in Week View with Text 93 Working in Year View 94 Working in List View 95 Working with floating events 95 Working with To Do List items 97 Using the Daily Journal 98 Using templates 99 Using snoo...

Page 6: ...ansferring your data to Microsoft Excel 143 Expense menus 147 Chapter 7 Communicating Using Your Handheld Managing desktop E Mail away from your desk 149 Setting up Mail on the desktop 150 Synchronizi...

Page 7: ...preferences 192 HotSync buttons preferences 194 Digitizer preferences 194 Formats preferences 194 Country default 195 Time date week start and numbers formats 195 General preferences 196 Auto off dela...

Page 8: ...m Expense Report About mapping tables 235 Customizing existing sample templates 236 Determining the layout of the Expense Report 237 Labels 237 Sections 238 Analyzing your custom Expense Report 239 Pr...

Page 9: ...come with it It walks you through Locating all the parts of your handheld Viewing and entering data Using your handheld with your computer Personalizing your handheld with your own preference settings...

Page 10: ...Page 2...

Page 11: ...in Date Book so you can view them by the day week or month you can even set an alarm to remind you of important meetings Keep all your contact names addresses phone numbers and other details in Addres...

Page 12: ...r CD ROM drive you can also download the Palm Desktop software from http www handspring com or order 3 5 diskettes from Handspring Mouse USB port for USB cradle Serial port for serial cradle Macintosh...

Page 13: ...to the folder that stores Palm Desktop software copy your username folder and store the copy outside the Palm Desktop software folder 3 Follow the installation instructions in Installing Palm Desktop...

Page 14: ...m the old handheld it also erases the name and makes that handheld a clean slate ready to receive a new name The next time you perform a HotSync operation with this old handheld you are asked to give...

Page 15: ...Contrast Control Displays the contrast control screen where you can adjust the appearance of the screen for the clearest screen display Depending on the lighting conditions or temperature of the envi...

Page 16: ...the backlight Press and hold the power button for about two seconds The backlight also turns off automatically after a period of inactivity with the Auto off feature See General preferences in Chapte...

Page 17: ...from other Palm Computing platform devices See Beaming information in Chapter 7 for more information Reset button Under normal use you should not have to use the reset button See Appendix A for infor...

Page 18: ...held into the battery compartment Note A diagram in the interior of the battery compartment shows and ends of the batteries When correctly installed the clips in the battery compartment secure the bat...

Page 19: ...tap an element on the screen the handheld can detect exactly which task you want to perform Important Always use the point of the stylus for tapping or making strokes on the handheld screen Never use...

Page 20: ...tor and to find text anywhere in your data abc With the cursor in an input field tap the dot to activate the alphabetic keyboard 123 With the cursor in an input field tap the dot to activate the numer...

Page 21: ...for you to open applications the Applications Launcher displays the current time battery level and application category Next previous arrows Tap the up and down arrows to display the previous and next...

Page 22: ...tions Launcher scrolls to the first application with a name that begins with that letter You can also assign application icons to different categories See Categorizing applications in Chapter 3 Using...

Page 23: ...on the application Also the menus and menu commands vary depending on which part of the application you re using For example in Memo Pad the menus are different for the Memo List screen and the Memo...

Page 24: ...onds so you must write the command letter immediately to choose the menu command Displaying online tips Many of the dialog boxes that appear on your handheld contain an online Tips icon in the upper r...

Page 25: ...not enter Graffiti characters while using the onscreen keyboard Graffiti writing Your Visor handheld includes Graffiti writing software as the primary system for entering text and numbers With Graffit...

Page 26: ...practicing Graffiti writing This section explains how to open Memo Pad and use it to practice Graffiti writing To open Memo Pad 1 Press the Memo Pad application button 2 Tap New Note A blinking cursor...

Page 27: ...r handheld with your computer See Exchanging and updating data HotSync operations in Chapter 5 for more information Importing data If you already have data in a database on your computer you can impor...

Page 28: ...Tap the Applications icon 2 Tap the Preferences icon 3 Tap the category pick list in the upper right corner of the screen 4 Tap the Preferences category you want to view The following procedures for...

Page 29: ...you make on your Visor handheld or Palm Desktop software appear in both places after you synchronize With Palm Desktop software you can do the following Work with your Visor handheld applications on...

Page 30: ...or earlier you need a serial cradle to connect to your computer You can purchase a serial cradle from http www handspring com To connect the cradle 1 Plug the cable from the Visor handheld cradle int...

Page 31: ...scanning software 2 Insert the Palm Desktop software CD ROM into the computer s CD ROM drive 3 When the menu screen appears click the Install Organizer Software for Your PC button to begin the install...

Page 32: ...a Springboard module Springboard expansion modules enable you to extend the functions of your handheld To install a Springboard module simply remove the slot protector and insert the module in the Spr...

Page 33: ...ti characters Most people find they can enter text quickly and accurately with only minutes of practice Graffiti writing includes any character you can type on a standard keyboard The Graffiti strokes...

Page 34: ...ite Graffiti letters 1 Tap the screen where you want your text to go Note You need to tap above the Graffiti writing area and must see a blinking cursor before you write the text 2 Use the tables on t...

Page 35: ...in the Graffiti writing area If you do not make Graffiti strokes in the Graffiti writing area your handheld does not recognize them as text characters Graffiti tips When using Graffiti writing keep th...

Page 36: ...Page 28 Entering Data in Your Visor Handheld The Graffiti alphabet Letter Strokes Letter Strokes A N B O C P D Q E R F S G T H U I V J W K X L Y M Z Space Back Space Carriage Return Period tap twice...

Page 37: ...ter Use the Caps Shift stroke Tip When Caps Shift is active an up arrow symbol appears in the lower right corner of the handheld screen If you accidentally activate Caps Shift backspace will cancel it...

Page 38: ...with a single tap on the Graffiti writing area When you make this tap you activate Punctuation Shift and a dot appears to show it is active The next stroke you make with the stylus creates a punctuat...

Page 39: ...raffiti writing area of your handheld When the Symbol Shift is active a slanted shift symbol appears in the lower right corner of the screen The next stroke that you make creates the symbol or extende...

Page 40: ...r For example the following diagram shows the strokes required to draw an accented e Accent strokes Using these accent strokes you can write the following accented letters Additional non English chara...

Page 41: ...ortCuts and you can also create your own Each ShortCut can represent up to 45 characters For example you might create a ShortCut for your name or for the header of a memo See ShortCuts preferences in...

Page 42: ...d 2 Tap any record or tap New 3 Tap abc to open the alphabetic keyboard or tap 123 to open the numeric keyboard 4 Tap the characters to enter text and numbers Note The onscreen keyboard also includes...

Page 43: ...ompatible with the Palm Computing platform you can transfer the data to your Visor handheld without having to key it in manually Save the data in one of the file formats listed below import it into Pa...

Page 44: ...now otherwise the records are imported into the Unfiled category 4 From the File menu choose Import 5 Select the file you want to import 6 Click Open 7 To import data into the correct Palm Desktop fie...

Page 45: ...ations installed on your handheld appear in the Applications Launcher See Opening applications in Chapter 1 for details Switching between applications When working in any application tap the Applicati...

Page 46: ...Done To display applications by category 1 Tap the Applications icon 2 Do one of the following Tap the Applications icon repeatedly to cycle through all your categories Tap the pick list in the upper...

Page 47: ...pplications icon 2 Tap the Menu icon 3 Tap Options and then tap Preferences 4 Tap the Remember Last Category check box to select it 5 Tap OK Choosing preferences You can set options that affect an ent...

Page 48: ...sor handheld during a HotSync operation There are a variety of third party applications available for your Visor handheld To learn more about these applications go to the web site http www handspring...

Page 49: ...an also access the Install Tool dialog by selecting Install Tool from the Palm Desktop program group or by double clicking any file with a PRC file extension 4 In the User drop down list select the na...

Page 50: ...ions to install 8 Click Done 9 Perform a HotSync operation to install the application s you selected in step 6 See Other ways to delete records in Chapter 5 for details Installing games The CD ROM als...

Page 51: ...tions icon 2 Tap the Menu icon 3 Tap App and then tap Delete 4 Tap the application that you want to remove 5 Tap Delete 6 Tap Yes 7 Tap Done Removing Palm Desktop software If you no longer want to use...

Page 52: ...with or without a password Without a password private records are hidden until you set the Security application to show them With a password you must enter the password to view the private entries See...

Page 53: ...new password and tap OK To delete the password tap Delete Locking your handheld You can also lock your handheld so that you need to enter your password to operate it Important If you lock your handhe...

Page 54: ...hen enter the password Recovering from a forgotten password If you did not activate the Off Lock feature and you forget your password you can delete the password from your handheld Deleting a forgotte...

Page 55: ...of Basic Applications This chapter briefly describes each application and how to open it Your Visor handheld computer includes these basic applications Date Book Date Book Plus Address Book To Do List...

Page 56: ...onthly calendar to quickly spot days where you have morning lunch or afternoon appointments Set an alarm to sound prior to the scheduled activity Create reminders for events that are based on a partic...

Page 57: ...intments for one or two weeks complete with descriptions of each event Display a calendar of an entire year Display a list of your appointments in List View Create unscheduled events that float from o...

Page 58: ...me Define which phone number appears in the Address List for each Address Book entry Attach a note to each Address Book entry in which you can enter additional information about the entry Assign Addre...

Page 59: ...tems to categories so that you can organize and view them in logical groups Sort your To Do List items either by due date priority level or category Attach notes to individual To Do List items for a d...

Page 60: ...ynchronize using Palm Desktop software and HotSync technology Assign memos to categories so that you can organize and view them in logical groups Write down phone numbers and other types of informatio...

Page 61: ...ulations In Calculator you can do the following Perform basic calculations Store and retrieve values Display the last series of calculations which is useful for confirming a series of chain calculatio...

Page 62: ...yTime you can do the following Select a home city as a point of reference Display the day and time in four other cities simultaneously Add a definition for any city that isn t in the default list Disp...

Page 63: ...pense items to categories so that you can organize and view them in logical groups Keep track of vendors companies and people involved with each particular expense Log miles traveled for a particular...

Page 64: ...Page 56 Overview of Basic Applications...

Page 65: ...Date Book event Address Book entry To Do List item Memo Pad memo or Expense item Creating records You can use the following procedure to create a new record in Date Book Address Book To Do List Memo P...

Page 66: ...tached to your computer see Chapter 2 Edit menu The Edit menu is available with any screen where you enter or edit text In general commands available in the Edit menu apply to text that you select in...

Page 67: ...handheld You can paste the text that you copy into another area of the current application or into a different application Paste Inserts the text that you cut or copied at the selected point in a reco...

Page 68: ...archive file in Palm Desktop software be sure that the check box is checked If you don t want to save a copy tap the check box to remove the check 4 Tap OK If you choose to save a copy of the selected...

Page 69: ...ailable in Address Book or Memo Pad so delete outdated records from these applications To purge records 1 Open the application 2 Tap the Menu icon 3 Tap Record and then tap Purge A confirmation dialog...

Page 70: ...ze your data you need to enter user information on both the handheld and Palm Desktop software After you enter this information and synchronize the HotSync Manager recognizes your handheld and doesn t...

Page 71: ...on on the cradle Important The first time you perform a HotSync operation you must enter a user name in the New User dialog box and click OK Every handheld should have a unique name To prevent loss of...

Page 72: ...s such as All and Unfiled and user defined categories such as Business and Personal You cannot modify the system defined categories but you can rename and delete the user defined categories In additio...

Page 73: ...egories 5 Select the category for the record 6 Tap OK To display a category of records 1 Tap the category pick list in the upper right corner of the List screen 2 Select the category you want to view...

Page 74: ...category 1 Tap the category pick list in the upper right corner of the screen 2 Tap Edit Categories 3 Tap New 4 Enter the name of the new category and then tap OK 5 Tap OK You can assign any of your...

Page 75: ...want to rename and then tap Rename 4 Enter the new name for the category and then tap OK 5 Tap OK Tip You can group the records in two or more categories into one category by giving the categories the...

Page 76: ...add these names to a list of attendees associated with an Expense record Looking up Address Book records When working with Address Book the scroll buttons on the front panel of the handheld makes it e...

Page 77: ...he Find icon Tip If you select text in an application before you tap Find the selected text automatically appears in the Find dialog box 2 Enter the text that you want to find Find is not case sensiti...

Page 78: ...in Date Book To Do List or Memo Pad 2 Tap the Menu icon 3 Tap Options and then tap Phone Lookup 4 Begin to spell the last name of the name you want to find The list scrolls to the first record in the...

Page 79: ...its associated information If you have more than one name that begins with Wi the Phone Lookup screen appears and highlights the first record that begins with Wi For selected text Drag to highlight t...

Page 80: ...up screen displays all the names in your Address Book that have data in the Company field 5 Select the name you want to add and then tap Add The name appears in the Attendees screen 6 Repeat steps 4 a...

Page 81: ...by pick list and select an option 4 Tap OK To sort records in Address Book and Memo Pad 1 Open the application to display the List screen 2 Tap the Menu icon 3 Tap Options and then tap Preferences 4 D...

Page 82: ...private records You can hide records that you mark as private If you define a password you must enter it to display private records To hide private records 1 Tap the Applications icon 2 Tap Security 3...

Page 83: ...pter 5 Page 75 4 Enter your password and then tap Show To make a record private 1 Display the entry that you want to make private 2 Tap Details 3 Tap the Private check box to select it 4 Tap OK Tap Sh...

Page 84: ...you can attach a note with directions to the location To attach a note to a record 1 Display the entry to which you want to add a note 2 In Address Book only Tap Edit 3 Tap Details 4 Tap Note 5 Enter...

Page 85: ...sier to read You can choose a different font style for each application To change the font style 1 Open an application 2 Tap the Menu icon 3 Tap Options and then tap Font 4 Tap the font style you want...

Page 86: ...Page 78 Common Tasks...

Page 87: ...Specific Tasks This chapter is organized by application and gives instructions on how to do tasks that are specific to each of the following applications Date Book Date Book Plus Address Book To Do Li...

Page 88: ...es it easy to find such conflicts See Spotting event conflicts later in this chapter You can also schedule events in your Date Book that occur on a particular date but have no specific start or end ti...

Page 89: ...n the number side of the Graffiti writing area 4 Tap the time columns on the right side of the Set Time dialog to set the Start Time 5 Tap the End Time box and then tap the time columns to set the End...

Page 90: ...ld to move forward or backward one day at a time Tap Go To at the bottom of the screen to open the Go to Date dialog box Select a date by tapping a year month and day in the calendar Tip In the Go to...

Page 91: ...w untimed event by making sure no event is selected and then writing letters in the Graffiti writing area 4 Enter a description of the event 5 Tap a blank area on the screen to deselect the untimed ev...

Page 92: ...ys before an event The default Alarm setting is 5 minutes before the time of the event but you can change this to any number of minutes hours or days When you set an alarm this icon appears to the far...

Page 93: ...you turn on your handheld and tap OK to dismiss it Scheduling repeating or continuous events The Repeat function lets you schedule events that recur at regular intervals or extend over a period of con...

Page 94: ...intain the duration of the repeating event If you change the repeat interval e g daily to weekly of a repeating event past occurrences prior to the day on which you change the setting are not changed...

Page 95: ...lay the next view To display the current time Tap the date in the date bar to display the current time After a few seconds the date reappears Working in Week View Week View shows the calendar of your...

Page 96: ...at appears at the top of the Week View to move directly to that day without selecting an event The Week View shows the time span defined by the Start Time and End Time in the Date Book Preferences set...

Page 97: ...lector and select a different month Use the scroll buttons on the front panel of your handheld to move between months Press the upper half of the button to display the previous month the lower half to...

Page 98: ...ate Book menus are shown here for your reference and Date Book features that are not explained elsewhere in this guide are described here See Using menus in Chapter 1 for information about choosing me...

Page 99: ...Day View Controls how times appear in the Day View When Compress Day View is off all time slots display When it is on start and end times display for each event but blank time slots toward the bottom...

Page 100: ...ets an alarm for each new event The silent alarm for untimed events is defined by minutes days or hours before midnight of the date of the event Alarm Sound Sets the tone of the alarm Remind Me Define...

Page 101: ...s an entire week with a description of each scheduled event This view can display one or two weeks at a time and can include To Do items that are due on the dates shown Tips for using Week View with T...

Page 102: ...heduled on that day A plus sign indicates multiple events are scheduled on that day Tap the scroll arrows in the upper right corner to move forward or backward a year You can also use the scroll butto...

Page 103: ...ight corner to move forward or backward a week You can also use the scroll buttons on the front panel of your handheld Tap Go to open the date selector and select a different week or a specific date T...

Page 104: ...event complete Tap the circle to the right or left of the event Tips for using floating events To prioritize floating events enter a number followed by a space or dash as the first few characters of...

Page 105: ...e Tap the check box next to the item Tips for using To Do List items When you create a To Do List item in Date Book Plus the priority and category are based on the settings in the Create Options dialo...

Page 106: ...start and end times for consulting or other work or keeping a record of how you spend your time at the office To create a Daily Journal entry 1 Tap the Day View button 2 Tap New and select Daily Journ...

Page 107: ...or events that recur on different days and times To create a template 1 Select the event you want to save as a template 2 Tap the Menu icon 3 Tap Record and then tap Create Template To schedule a tem...

Page 108: ...ss the Date Book button on the front of your handheld By default this is the standard Date Book application If you prefer you can select Date Book Plus as your default application To select the defaul...

Page 109: ...Item Creates a copy of the selected event and opens the Details dialog box for the new event UnDelete from Archive Restores the last event you deleted from Date Book Plus provided it was stored in th...

Page 110: ...the default duration for new events Week Start Defines the first day of the week This setting overrides the System Preferences setting for all Date Book Plus views Initial View Defines the view that...

Page 111: ...o minimize scrolling Show PM Label Displays a p after PM times Hide End Times Removes all time bars and end times from the display Scroll Before Day Move Determines whether the front panel scroll butt...

Page 112: ...its before it stops The choices are Once Twice 3 Times 5 Times 10 Times and 100 Times Repeat Alarm Defines how many times the alarm repeats when it is not acknowledged The choices are Once Twice 3 Tim...

Page 113: ...st items Show Undated Items Shows all To Do List items that have not been assigned a due date Show Dated Items Shows all To Do List items that have been assigned a due date Days before Due Date Define...

Page 114: ...oices are Top Bottom and Hide Week Start Defines the first day of the week for Week View with Text Wordwrap Single Entry Wraps text in cells that contain a single event to display as much text as will...

Page 115: ...vents that you assigned to a date but did not assign to a specific time Show Daily Repeating Events Displays events that repeat each day Include Week Numbers in Title Displays week numbers in the titl...

Page 116: ...ntimed Events Removes untimed events from the Year View display Hide Zero Duration Events Removes events without a duration from the Year View display Hide Events Removes events that are shorter than...

Page 117: ...lay The choices are All Not Complete Complete and None If you choose either Not Complete or Complete you also have the following choices Dated Undated Dated only and Undated only Filter by Text Displa...

Page 118: ...re also has data import capabilities that enable you to load database files into Address Book on your handheld See Importing data in Chapter 2 and Palm Desktop online Help for more information To crea...

Page 119: ...ing information tap Done Tip To create an entry that always appears at the top of the Address List begin the Last name or Company field with a symbol as in If Found Call This entry can contain contact...

Page 120: ...sociate with an entry To open the Address Entry Details dialog box 1 Tap the entry whose details you want to change 2 Tap Edit 3 Tap Details 4 Select any of the following settings Show in List Select...

Page 121: ...The Record and Options menus differ depending on whether you re displaying the Address List screen or the Address View screen Record menus Options menus Preferences Remember last category Determines h...

Page 122: ...s These custom fields appear at the end of the Address Edit screen Rename them to identify the kind of information you enter in them The names you give the custom fields appear in all entries About Ad...

Page 123: ...rea automatically creates a new item Setting priority The priority setting for items lets you arrange the tasks in your To Do List according to their importance or urgency The default setting for the...

Page 124: ...em to indicate that you ve completed it You can set the To Do List to record the date that you complete the To Do List item and you can choose to show or hide completed items See To Do Show Options la...

Page 125: ...x tap No Date to open the Due Date pick list 2 Tap the date that you want to assign the item 3 Tap OK Tip If you turn on the Show Due Dates option in the To Do Show options dialog you can tap directly...

Page 126: ...m Items that no longer appear on the list because you turn off this setting have not been deleted They are still in the memory of your handheld Purge completed items to remove them from memory Show On...

Page 127: ...r 1 for information about choosing menu commands Record menu Options menu Show Due Dates Displays the due dates associated with items in the To Do List and displays an exclamation mark next to items t...

Page 128: ...a new memo 1 Press the Memo Pad application button on the front of your handheld to display the Memo List 2 Tap New Tip In the Memo List screen you can also begin writing in the Graffiti writing area...

Page 129: ...the memo 3 Tap Done Memo Pad menus Memo Pad menus are shown here for your reference and Memo Pad features that are not explained elsewhere in this guide are described here See Using menus in Chapter...

Page 130: ...es to the top first line of the memo Go to Bottom of Page Moves to the bottom last line of the memo Preferences Displays the Memo Preferences dialog box where you define the sort order for memos About...

Page 131: ...ced as the mode 5 Tap OK Using the Basic Calculator buttons The Basic Calculator includes the following buttons Clears the last number you entered Use this button if you make a mistake while entering...

Page 132: ...ns and then tap Recent Calculations 3 After you finish reviewing the calculations tap OK Using the Advanced Calculator mode The Advanced Calculator screen consists of three regions Each region perform...

Page 133: ...er Enters an exponent symbol in the calculation Opens the Constants dialog box where you can select a constant to include in the calculation Opens the Store in which memory dialog box where you can se...

Page 134: ...angent of the current number Calculates the hyperbolic sine of the current number Calculates the hyperbolic cosine of the current number Calculates the hyperbolic tangent of the current number Calcula...

Page 135: ...er as the total number of payments over the life of the loan Stores the current number as the annual percentage rate of interest Stores the current number as the number of payments per year Stores the...

Page 136: ...this button enter the result number tap this button enter the starting number and then tap the equal sign button Shifts the value to the left and fills the new places with zeros Enters D in a hexadec...

Page 137: ...n view edit delete and clear values in the statistics memory list Displays the number of values in the statistics memory list Calculates the factorial of any integral from 0 to 170 Generates a random...

Page 138: ...t of measure it converts the value to degrees Fahrenheit Indicates the current value is entered in degrees Celsius When you tap this button after tapping another unit of measure it converts the value...

Page 139: ...e value to square inches Indicates the current value is entered in square feet When you tap this button after tapping another unit of measure it converts the value to square feet Indicates the current...

Page 140: ...fter tapping another unit of measure it converts the value to fluid ounces Indicates the current value is entered in cups When you tap this button after tapping another unit of measure it converts the...

Page 141: ...then tap Import 10 Tap the pick list and select the view you modified 11 Tap Import 12 Tap Replace to change an existing definition or tap Add to create an additional definition 13 Tap OK and then ta...

Page 142: ...rogram menu About Calculator Shows version information for Calculator Export Opens the Export dialog box where you can select a view definition to export to Memo Pad Import Opens the Import dialog box...

Page 143: ...y and time in your home city When you use CityTime for the first time or when your travel or move to another city make sure you set your home city location Setting your home city location ensures that...

Page 144: ...use the Edit Cities command to add a new city to the list See the next section Adding cities for details 2 Tap the remaining pick lists and select the other three cities you want to display Tip You c...

Page 145: ...Help Displays online help for the CityTime screens Change Location Opens the Change Location dialog box where you can select the city to which you are moving or travelling Changing the location update...

Page 146: ...Applications icon 2 Tap the Expense icon 3 Tap New Tip You can also create a new Expense item by writing on the number side of the Graffiti writing area while in the Expense List screen The first num...

Page 147: ...pense item Initially Expense items appear with the date you enter them You can use Expense to change the date associated with any Expense item To change the date of an Expense item 1 Tap the Expense i...

Page 148: ...e Prepaid to place your expense in the appropriate company paid cell of your printed expense report spreadsheet See Transferring your data to Microsoft Excel later in this chapter for more information...

Page 149: ...m currency symbol If the currency you want to use is not in the list of countries you can create your own custom country and currency symbol To define a custom currency symbol 1 Tap the Menu icon 2 Ta...

Page 150: ...Expense item select the symbol in the Receipt Details dialog box associated with that item Show Options Show Options define the sort order and other settings that relate to your Expense items To open...

Page 151: ...Connecting the cradle in Chapter 1 for more information Creating or printing an expense report Palm Desktop software makes it quick and easy to view and print your Expense data in a Microsoft Excel s...

Page 152: ...a Microsoft Excel spreadsheet contain ing your expense data Your data appears in Microsoft Excel spreadsheet form You can enter information make formatting changes and save and print the file in the...

Page 153: ...Page 145 If you want to streamline or customize your expense reports you can change these templates For example you can add your company name to a template See Appendix C for information on changing...

Page 154: ...vious procedure 2 Click Options 3 Enter name department and other information as necessary for your expense report 4 Click the Templates menu then select an expense template Note If you want to create...

Page 155: ...ord menu Options menu Preferences Use automatic fill Lets you select an expense type by writing the first letter of an expense type in the Graffiti writing area For example if you write the letter T i...

Page 156: ...Page 148 Application Specific Tasks...

Page 157: ...Managing desktop E Mail away from your desk Mail lets you manage the e mail that you send and receive through the E Mail application on your desktop computer You can read reply to compose and delete e...

Page 158: ...lications when you set up Mail For information on using Mail with a Macintosh visit the web site http www handspring com If your desktop E Mail application does not appear on the list you may still be...

Page 159: ...ktop overwrites handheld Replaces the mail on your handheld with the mail in your desktop E Mail application You should use this option only if for some reason the two inboxes get out of sync This set...

Page 160: ...OK Synchronizing Mail with your E Mail application After you enable and configure Mail you need to perform a HotSync operation to synchronize Mail with your desktop E Mail application For a complete e...

Page 161: ...ect for all your e mail items To display full header information 1 Open an e mail item 2 Tap the Complete Header icon Tip To redisplay the abbreviated header tap the Abbreviated Header icon Creating e...

Page 162: ...ication For example network users sending an e mail item to a user on the same network do not need to add Internet information such as mycorp com 3 To send a copy of this e mail item to additional rec...

Page 163: ...it onscreen 2 Tap Reply 3 Select whom you want to receive the reply Sender only All recipients or someone who didn t see the original e mail item Forward 4 Select whether you want to include original...

Page 164: ...you enter identify a unique listing from your Address Book your handheld completes the address for you If not the Lookup dialog box appears and lists all records that contain information in an E mail...

Page 165: ...te The Priority and BCC settings are valid only for the current e mail item and must be set for each item you create Priority Flags an e mail item as High Normal or Low priority BCC Creates a blind ca...

Page 166: ...ist and select the priority you want 3 Tap OK Tip Your handheld can flag e mail items with a specific priority only if your desktop E Mail application supports this feature Sending a blind carbon copy...

Page 167: ...y other text you want to include By defining such information as a signature you save yourself the trouble of having to enter it every time you create an e mail item Adding a signature to your message...

Page 168: ...e screen tap Details 2 Select the Confirm Delivery check box to select it 3 Tap OK Storing e mail to be sent later When you send e mail from your handheld it actually stores the e mail in the Outbox f...

Page 169: ...o add additional information before sending it Your handheld stores such e mail items in the Draft folder until you are ready to edit them again Note When you re creating or editing an e mail item you...

Page 170: ...p Send to move the item to your Outbox folder Filing e mail Your handheld can store e mail you receive or create in the Filed folder The contents of this folder do not automatically synchronize with y...

Page 171: ...elete 3 If you selected the Preferences option to confirm deletion tap Yes Removing e mail from the Deleted folder You can reverse the deletion of an e mail item by removing it from the Deleted folder...

Page 172: ...anage the way the Message List displays information Folders Your handheld provides folders for categorizing your mail The Message List displays the e mail items in the folder you select To select a fo...

Page 173: ...ty e mail items always appear first no matter how you sort the list To sort the Message List 1 In the Message List tap Show 2 Tap the Sort by pick list and select one of the following options 3 Tap OK...

Page 174: ...e settings for the HotSync operation To open the HotSync Options dialog box 1 Tap the Menu icon 2 Tap Options and then tap HotSync Options 3 Tap the Settings for pick list and select Local HotSync or...

Page 175: ...etrieving items that contain specific information in their header fields To create a special filter you must decide whether you want to ignore or retrieve certain e mail items Then based on that decis...

Page 176: ...ify To define whether to ignore or receive e mail Tap the pick list in the center of the HotSync Options dialog box and select one of the following settings Ignore Messages Containing Tells your handh...

Page 177: ...from John Smith jsmith aol com or Jack Jones jjones aol com concerning the Apollo Project You would create the following filter strings In the To field jsmith aol com jjones aol com In the Subj field...

Page 178: ...screen for that header field For more information about header field Notes screens see Creating e mail items earlier in this chapter 4 Tap Done to return to the HotSync Options dialog box 5 Tap OK Hig...

Page 179: ...ers By truncating long messages you reduce the time it takes to synchronize your desktop E Mail and Mail as well as the amount of storage space e mail uses on your handheld Note Truncation is separate...

Page 180: ...pter 1 for information about choosing menu commands Message menus The Message menu varies depending on whether you are viewing an e mail item creating an e mail item or viewing the Message List Option...

Page 181: ...s card containing information you want to exchange with business contacts An application installed in RAM memory To select a business card 1 Create an Address Book record that contains the information...

Page 182: ...otected and cannot be beamed These are listed with a lock icon next to them 5 Tap Beam 6 When the Beam Status dialog box appears point the IR port directly at the IR port of the receiving handheld 7 W...

Page 183: ...ddress Book application button for about two seconds to beam your business card You can set the full screen pen stroke to beam the current entry See Pen preferences in Chapter 9 for more information Y...

Page 184: ...Page 176 Communicating Using Your Handheld...

Page 185: ...ndirectly with a modem or network This chapter describes how to select HotSync options and perform a HotSync operation via a modem or network See Other ways to delete records in Chapter 5 for informat...

Page 186: ...s available Adds HotSync Manager to the Startup folder and constantly monitors the communication port for synchronization requests from your handheld With this option the HotSync Manager synchronizes...

Page 187: ...information 7 Click OK Serial Port Identifies the port that Palm Desktop software uses to communicate with the optional serial cradle This selection should match the number of the port to which you c...

Page 188: ...onizing a particular type of file because you don t use it In addition to the conduits for Date Book Address Book To Do List Memo Pad and Expense Palm Desktop software includes System and Install cond...

Page 189: ...ext HotSync operation Thereafter the HotSync Actions revert to their default settings To use a new setting on an ongoing basis select the Set As Default box Thereafter whatever you selected as the def...

Page 190: ...se with your modem Preparing your computer There are a few steps you must perform to prepare your computer for a modem HotSync operation Be sure to perform these steps before you leave your office so...

Page 191: ...e rate first and adjust downward if you experience problems This setting allows Palm Desktop software and your handheld to find and use the fastest speed Modem Identifies the modem type or manufacture...

Page 192: ...ed enter a dial prefix such as 9 to access an outside line and then tap the Dial Prefix check box Tip You can enter a comma in the field to introduce a pause in the dialing sequence Each comma equals...

Page 193: ...modem accessory To change the Conduit Setup for a modem HotSync operation 1 Tap the Applications icon 2 Tap the HotSync icon 3 Tap the Menu icon 4 Tap Options and then tap Conduit Setup 5 Tap the che...

Page 194: ...HotSync operation by dialing in to a network or by using a cradle that is connected to any computer on your LAN or WAN provided that the computer connected to the cradle also has the Network HotSync s...

Page 195: ...u on both your primary computer and the computer you want to use 3 From the HotSync Manager menu choose Setup 4 Click the Network tab and make sure your user name has a check mark next to it If the ch...

Page 196: ...les you to import Address Book and Memo Pad information onto your handheld from a separate external file such as a company phone list HotSync Manager stores the data in a separate category on your Pal...

Page 197: ...a user name The User Profile feature is designed only for the first time HotSync operation before you assign a User ID to a particular handheld To create a user profile 1 Open Palm Desktop software 2...

Page 198: ...the cradle 2 Press the HotSync button on the cradle 3 Click Profiles 4 Select the profile that you want to load on the handheld and click OK 5 Click Yes to transfer all the profile data to the handhel...

Page 199: ...he auto shut off interval the Beam Receive feature and the system alarm and game sounds Formats Set the country default and the formats for dates times calendar and numbers Modem Configure your handhe...

Page 200: ...not have to change to a different screen or application If you assign a different application to a button you can still access the original application using the Applications Launcher To change the Bu...

Page 201: ...eyboard Opens the onscreen keyboard for entering text characters Graffiti Help Opens a series of screens that show the complete Graffiti character set Turn Off Lock Turns off and locks the handheld Yo...

Page 202: ...he button you want to assign 3 Tap the application that you want to assign to each button The default setting for each button is the HotSync setting which means the cradle and optional Springboard mod...

Page 203: ...country default 1 Tap the country name pick list 2 Tap the setting you want to use Time date week start and numbers formats The Time setting defines the format for the time of day The time format tha...

Page 204: ...feature that turns off the power and backlight after a period of inactivity This feature helps conserve battery power in case you forget to turn off your handheld If you find that your handheld shuts...

Page 205: ...ap the System Sound pick list and select the sound level Note When you turn off the System Sounds you also turn off the chime tones associated with the HotSync operation 2 Tap the Alarm Sound pick lis...

Page 206: ...elect the Rotary setting only if you are certain that your telephone service does not support TouchTone dialing 2 Tap the Speed pick list and select the maximum speed for your modem Note This is the s...

Page 207: ...preferences earlier in this chapter for a complete explanation on how to configure modem parameters After you configure both the Network and Modem Preferences you can establish a PPP Point to Point P...

Page 208: ...dentifies the name you use when you log into your Internet Service Provider or your dial in server Although this field can contain multiple lines of text only two lines appear onscreen To enter a user...

Page 209: ...in this field and asks you to enter a password during the login procedure If you enter a password your handheld displays the word Assigned in this field and does not prompt you to enter a password dur...

Page 210: ...tance services However because MCI works differently MCI customers need to put the calling card number in the Phone field and the phone number in the Use calling card field To enter your server phone...

Page 211: ...fore logging into your ISP or dial in server To disable Call Waiting 1 Tap the Disable call waiting check box to select it 2 Enter the code to disable Call Waiting on the Disable call waiting line Not...

Page 212: ...mber you need to add commas at the beginning to compensate for this delay Each comma delays transmission of your calling card number for two seconds To use a calling card 1 Tap the Use calling card ch...

Page 213: ...vice Connection Progress messages press the bottom scroll button To close a connection Tap Disconnect to terminate the connection between your handheld and your service Creating additional service tem...

Page 214: ...ervice field 2 Tap Details 3 Tap the Connection type pick list and select one of the following connection types Note If you are not sure try PPP if that doesn t work ask your Internet Service Provider...

Page 215: ...o not require that you enter a DNS If you are not sure leave the DNS field blank To enter a primary and secondary DNS 1 Tap the Query DNS check box to deselect it 2 Tap the space to the left of the fi...

Page 216: ...is permanently assigned you need to get that information from your System Administrator If you are not sure select Automatic To identify dynamic IP addressing Tap the IP Address check box to select it...

Page 217: ...ASCII and literal characters in your login script See Appendix D for more information To create a login script 1 Tap Script 2 Tap the End pick list 3 Tap the command you want from the Command list If...

Page 218: ...ID field of the Network Preferences screen Send Password Transmits the password entered in the Password field of the Network Preferences screen If you did not enter a password this command prompts you...

Page 219: ...procedure the connection fails An easy way to do this is to display the expanded Service Connection Progress messages Expanded Service Connection Progress messages describe the current stage of the lo...

Page 220: ...ber If your ISP or dial in server requires a DNS number and you did not enter that information in the Network Preferences screen it will appear that you successfully logged into your network When you...

Page 221: ...apter 1 for more information To enter the Owner preferences Enter the text that you want to associate with your handheld in the Owner Preferences screen If you enter more text than can fit on one scre...

Page 222: ...f your handheld applications and are backed up on your computer when you perform a HotSync operation To create a ShortCut 1 Tap New 2 On the ShortCut name line enter the letters you want to use to act...

Page 223: ...To edit a ShortCut 1 Tap the ShortCut you want to edit 2 Tap Edit 3 Make the changes you want and tap OK Deleting a ShortCut If you no longer need a ShortCut you can delete it from the list of ShortC...

Page 224: ...Page 216 Setting Preferences for Your Handheld...

Page 225: ...erproof and should not be exposed to rain or moisture Under extreme conditions water may enter the circuitry through the front panel buttons In general treat your handheld as you would a pocket calcul...

Page 226: ...ood quality batteries of the same type Use only alkaline batteries with your handheld When you remove the batteries the built in backup power of your handheld maintains memory data for a period of up...

Page 227: ...ming a soft reset A soft reset tells your handheld to stop what it s doing and start over again All records and entries stored in your handheld are retained with a soft reset After a soft reset the We...

Page 228: ...ease the power button 4 When a message appears on the handheld screen warning that you are about to erase all the data stored on your handheld do one of the following Press the top scroll button on th...

Page 229: ...sktop overwrites handheld Note Changing the HotSync setting from the default affects only the next HotSync operation Thereafter the HotSync Actions revert to their default settings 7 Click OK 8 Repeat...

Page 230: ...Page 222 Maintaining Your Handheld...

Page 231: ...party applications If you are having a problem with a third party application please contact the developer or publisher of that software Software installation problems Operating problems Problem Solu...

Page 232: ...ays to delete records in Chapter 5 You may need to perform a HotSync operation to recover the memory Delete unused memos and records If necessary you can save these records See Edit menu in Chapter 5...

Page 233: ...nize hand writing input with the stylus you need to use Graffiti writing See Using Graffiti writing to enter data in Chapter 2 Make the Graffiti character strokes in the Graffiti writing area not on t...

Page 234: ...hether Show Only Due Items is selected I am having problems listing memos the way I want to see them If you cannot manually arrange the order of the memos in the List screen check the Memo Preferences...

Page 235: ...nected securely Make sure you installed the software that came with your handheld You must install this software even if you upgraded from a Palm organizer Make sure you are using the correct type of...

Page 236: ...n between the cradle and the port on your computer Make sure you installed the software that came with your handheld You must install this software even if you upgraded from a Palm organizer Click the...

Page 237: ...nnected to the outgoing phone line Make sure Modem is checked in the HotSync Manager menu Make sure the modem you are using with your handheld has an on off switch Your handheld cannot wake up a modem...

Page 238: ...y attached to your modem Make sure the dialing instruction dials the correct phone number If you need to dial an outside line prefix make sure you selected the Dial Prefix option on your handheld and...

Page 239: ...d computers based on the Palm Computing platform may be different Move your handheld closer to the receiving device Perform a soft reset See Performing a soft reset in Appendix A for more information...

Page 240: ...ollowing procedure restores your private entries and lets you access them 1 Use the Palm Desktop software and the cradle to synchronize your data 2 Tap Forgotten Password in Security to remove the pas...

Page 241: ...r message or state you are experiencing The steps you take to reproduce the problem The version of handheld software you are using and available memory To find version and memory information 1 Tap the...

Page 242: ...Page 234 Troubleshooting Tips...

Page 243: ...adsheet Each Expense item stored in your handheld represents a group of related data You can link the following data to an expense item Category Payment Currency Date Vendor Expense Type City Amount A...

Page 244: ...rosoft Excel 3 Make any changes that you want to the names or other information in the sample template Important Do not insert rows or columns in the sample template Doing so changes the way your Expe...

Page 245: ...later in this appendix Read all of the sections of this appendix before making changes to the Maptable xls file Determining the layout of the Expense Report This section describes the layout consider...

Page 246: ...tions for the data mapping To create additional Sections with different mapping you create corresponding additional lines to the mapping table file named Maptable xls This procedure is explained later...

Page 247: ...identify the data Sections A Section is an area of data with common row and column formatting A yellow highlighter marking pen can make it easy to see the Sections as you work with programming the ma...

Page 248: ...opy of this file before you make your modifications 2 Mapping a new template Scroll to where you find the name of the original template that you chose for your modifications The name of the template w...

Page 249: ...mplate You may add or delete rows as necessary so that the total number of rows corresponds to the number of Sections in your custom Expense Report To clear all of the existing settings in a row click...

Page 250: ...ation for the day e g Sun Mon Tue In the Day cell enter the row or column number where all the day information will be placed If the dates are in a row enter the row number If the dates are in a colum...

Page 251: ...emplate Expense type labels must all appear in the same column 13 Enter the row or column numbers for the expense types that appear in the Section These settings appear in the aqua columns 20 48 For t...

Page 252: ...an fill in data for the header on your expense report Use this section to specify the row and column on your template where this information will be mapped Because header data is not related to any pa...

Page 253: ...cation Trips Shows the number of Expense application categories and lists each one followed by an end statement Currency Shows how many currencies were used for the Expense data and lists the countrie...

Page 254: ...Page 246 Creating a Custom Expense Report...

Page 255: ...M is converted to a carriage return If char is a value between a and z then the character sequence is translated to a single byte value between 1 and 26 If char is any other value then the character s...

Page 256: ...cter defines that the next character is transmitted as a literal character and is not subject to any special processing ordinarily associated with that character Examples Includes a caret as part of t...

Page 257: ...m the date of original purchase from Handspring Handspring warrants the media containing software against failure during the warran ty period No updates are provided Handspring does not provide any wa...

Page 258: ...CLOSE THAT THE ALLEGED DE FECT OR MALFUNCTION IN THE PRODUCT DOES NOT EXIST OR WAS CAUSED BY CUSTOMER S OR ANY THIRD PERSON S MISUSE NEGLECT IMPROPER IN STALLATION OR TESTING UNAUTHORIZED ATTEMPTS TO...

Page 259: ...warranties are not allowed to be excluded in their entire ty they will be limited to the duration of the applicable written warranty This warranty gives you specific legal rights which may vary depen...

Page 260: ...applications software licensed to you by third parties that is included on the same media as Handspring s Software Other Software if the Other Software provides that the use of the Other Software is...

Page 261: ...d You may terminate it at any time by destroying the Software and documentation to gether with all copies and merged portions in any form It will also terminate immedi ately if you fail to comply with...

Page 262: ...if you distribute copies of the library whether gratis or for a fee you must give the recipients all the rights that we gave you You must make sure that they too receive or can get the source code If...

Page 263: ...only works together with the library Note that it is possible for a library to be covered by the ordinary General Public License rather than by this special one Terms and Conditions for Copying Distri...

Page 264: ...ional if the application does not supply it the square root function must still compute square roots These requirements apply to the modified work as a whole If identifiable sections of that work are...

Page 265: ...length then the use of the object file is unrestricted regardless of whether it is legally a derivative work Executables containing this object code plus portions of the Library will still fall under...

Page 266: ...may not copy modify sublicense link with or distribute the Library except as expressly provided under this License Any attempt otherwise to copy modify sublicense link with or distribute the Library i...

Page 267: ...cense 13 The Free Software Foundation may publish revised and or new versions of the Library General Public License from time to time Such new versions will be similar in spirit to the present version...

Page 268: ...of warranty and each file should have at least the copyright line and a pointer to where the full notice is found One line to give the library s name and an idea of what it does Copyright C year name...

Page 269: ...r television reception which can be determined by turning the equipment off and on the user is encouraged to try to correct the interference by one or more of the following measures Reorient or reloca...

Page 270: ...he following developers whose contributions were an integral part of the Handspring product C E Steuart Dewar Pimlico Software Inc www gorilla haven org pimlico Darren Beck Code City www codecity com...

Page 271: ...yboard 12 17 Anniversaries See Repeating events Application buttons 7 13 48 50 51 52 175 192 Applications Address Book 50 beaming 173 174 Calculator 53 categories 37 38 CityTime 54 Date Book 48 Expens...

Page 272: ...4 displaying 65 113 226 folders for e mail 164 merging 67 renaming 67 using in Applications Launcher 38 cc Mail 150 Chain calculations 124 Characters Graffiti 25 Check boxes 12 CityTime adding cities...

Page 273: ...ts Journal 98 Data entry See Entering data transfer See HotSync transmitting to other handhelds See Beaming information Date Book adding Address Book data to records 70 71 alarm 84 archive files dba 3...

Page 274: ...4 225 Display contrast brightness control 7 DNS Domain Naming System 207 Docking station See Cradle Double booked events 89 Draft e mail 161 Dragging memos into other applications 52 stylus to activat...

Page 275: ...d 17 Giraffe game for practicing 42 how to write characters 26 menu commands 15 moving the cursor 33 numbers 29 online Help 59 192 problems using 225 punctuation marks 30 ShortCuts for entering data 3...

Page 276: ...p software See HotSync List Date Book Plus view 95 List in Applications Launcher 38 Locking handheld with a password 45 46 193 213 records See Security Login scripts 209 247 Looking up Address Book da...

Page 277: ...113 choosing 15 command equivalents Graffiti writing 15 Date Book 90 100 Edit menu 58 59 Expense 147 Mail 172 Memo Pad 121 134 137 menu bar 12 14 Network Preferences 211 To Do List 119 Microsoft Exce...

Page 278: ...e Lookup 70 71 Phone numbers selecting for Address List 112 selecting types 111 Phone settings for ISP or dial in server 202 204 Pick lists 12 PIM personal information manager using HotSync Manager wi...

Page 279: ...Book 60 scheduling 85 Replying to e mail 155 Rescheduling events 84 Resetting handheld hard reset 220 location of reset button 9 219 soft reset 219 Retrieving e mail See Filters for e mail S Saving da...

Page 280: ...1 225 Task See To Do List TCP IP 199 211 TDA To Do List archive file 35 Technical Support 233 Templates for Date Book Plus 99 for expense reports 144 Text copying 59 cutting 59 entry See Entering data...

Page 281: ...tions 59 Uninstalling Desktop software 43 Unresponsive handheld 224 Unsent e mail editing 160 Untimed events 80 83 85 Updating data See HotSync Upgrading Desktop software 5 USB connector 9 HotSync ope...

Page 282: ......

Reviews: