


45
Setting Up
8'
16'
5
1
/
3
'
16'
8'
4'
2
2
/
3
'
2'
1
3
/
5
'
1
1
/
3
'
1'
5
1
/
3
'
16'
8'
4'
2
2
/
3
'
2'
1
3
/
5
'
1
1
/
3
'
1'
5
1
/
3
'
16'
8'
4'
2
2
/
3
'
2'
1
3
/
5
'
1
1
/
3
'
1'
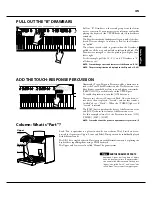
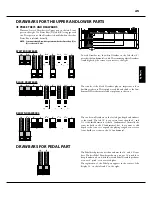
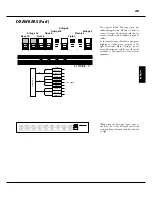
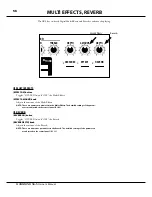
DRAWBARS FOR THE UPPER AND LOWER PARTS
In each Drawbar set, the white Drawbar on the left side (8´)
provides the fundamental sound.
Th
e remaining white Drawbars
sound higher by the octave as you move to the right.
BLACK DRAWBARS
BROWN DRAWBARS
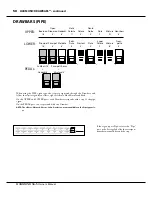
DRAWBARS FOR PEDAL PART
Th
e sounds of the black Drawbars play an important role in
building rich tones.
Th
eir pitches are
fi
fth and third to the fun-
damental.
Th
ese harmonics add complexity to the tone.
Th
e two brown Drawbars on the far left give depth and richness
to the sound.
Th
e left 16´ is one octave lower than the 8´, and
5
⅓
´ is the third harmonic of the 16´ fundamental. Normally, the
tones are built on the 8’ fundamental, but, if you want to add
depth to the tone or to expand the playing range by one octave
lower, build your tones on the 16´ fundamental.
Th
e Pedalboard plays the bass line and uses the 16´ and 8´ Draw-
bars.
Th
e
fi
rst Pedal Drawbar produces a tone at 16´ pitch for a
deep foundation bass, while the second Pedal Drawbar produces
a tone at 8´ pitch, or one octave higher.
Th
e registration of the Pedal part appears in the center of the
display. 16´ on the left and 8´ on the right.
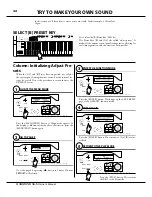
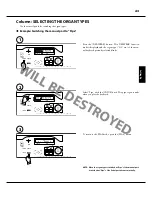
PRESET KEYS AND DRAWBARS
Th
ere are 2 sets of Drawbars for Upper part on the left, Lower
part on the right. Use Preset Keys [A
] and [B] to engage each
one.
Th
e operation of the Drawbars is disabled when the other
Preset Key is selected, basically.
NOTE: You can activate Drawbar operation whether Preset Key [C] to
[A] is selected (P. 80).
WHITE DRAWBARS
Summary of Contents for XK-5
Page 5: ...5 Introduction INTRODUCTION...
Page 14: ...1 Owner s Manual 14...
Page 15: ...15 HOOK UP...
Page 25: ...25 POWER ON AND PLAY...
Page 39: ...39 SETTING UP...
Page 63: ...63 USING THE CONTROL PANEL...
Page 73: ...73 SETTING THE PARAMETERS...
Page 101: ...101 Parameters WILL BE DESTROYED...
Page 114: ...1 Owner s Manual 114...
Page 115: ...115 MIDI USB...
Page 130: ...1 Owner s Manual 130...
Page 131: ...131 SAVE THE SETUP...
Page 144: ...1 Owner s Manual 144...
Page 145: ...145 FREQUENTLY ASKED QUESTIONS...
Page 147: ...147 APPENDIX...
Page 160: ...1 Owner s Manual 160...
Page 162: ...1 Owner s Manual 162...
Page 163: ...163 Appendix...
Page 168: ...1 Owner s Manual 168...
Page 170: ...Printed in Japan SUZUKI MUSICAL INST MFG CO LTD Hamamatsu Japan 00457 40195 V1 00 151006...