background image

14

d

Bedienungsanleitung

15

g

Operating Instruction

6. Operation & Maintenance

If the bracket is crooked after installation, the TV element can be adjusted

by +/- 5°. The adjusting screw is located under the plastic cap (labelled Levelmount).

Always adjust the bracket with the help of a second person. To adjust the tilt and movement 

side to side, loosen the knurled screw slightly, set the desired tilt/pivoting range and retighten 

the screw securely.
Check that the bracket is secure and safe to use at regular intervals (at least every three 

months). Only clean with water or standard household cleaners.
--------------------------------------------------------------------------------------------------

TV-Relax
7. Note on Instructions

Keep the instructions for the complete service life of the product and pass them on to 

subsequent users or owners
--------------------------------------------------------------------------------------------------

8. Package contents

See page 6-7
While you are unpacking, ensure that the set is complete and that there is no visible damage 

(crimped cables, damaged insulation, etc.). Keep the packaging and inlay for transport at a 

later time.  
--------------------------------------------------------------------------------------------------

9. Positioning and installation

Secure the LED tubes using the mounting clips and the applied tape. The tubes have many 

uses, and are particularly useful for atmospheric, indirect back ground lighting in conjunction 

with fl at panel displays.

Connect the tubes via the plugs, using the extension cable if necessary.  Insert the fi rst tube 

into the socket of the control box. The opposite end does not need to be inserted anywhere.

Connect the control box to the power supply unit and then plug the power supply unit into a 

power outlet. The control box has a magnetic back, with which you can, for example, hang 

the box on a metal wall bracket.

Read through and follow the safety notes carefully before using the device for the fi rst time.
--------------------------------------------------------------------------------------------------

3. Parts List

See page 3.
While you are unpacking, ensure that the set is complete and that there is no visible damage 

(crimped cables, damaged insulation, etc.). Keep the packaging and inlay for transport at a 

later time.  
--------------------------------------------------------------------------------------------------

4. Warning and Safety Instructions

For proper mounting, please have this bracket fi tted by a qualifi ed technician. Please check 

that the assembly set for completeness before installing the bracket and ensure that none 

of the parts are faulty or damaged. Use the bracket for the intended purpose only. Before 

installing the bracket, ensure that the wall on which the television is to be mounted is 

suitable for the weight and make sure that no electrical wires, water, gas or other lines are 

located around the installation location. Please note in particular that the provided wall 

anchors are suitable only for concrete and brick walls. If the wall on which the television is 

to be mounted is made of other materials, you should buy appropriate installation material 

from a specialised dealer. Also observe the necessary safety clearance around the TV set 

(depends on the model).

The bracket may not be mounted above locations where persons might linger. Once you have 

mounted the bracket and the fl at panel display, check that they are suffi ciently secure and 

safe to use. You should repeat this check at regular intervals (at least every three months). 

If the bracket is damaged, remove the TV and do not continue to use the bracket. Mount the 

TV and the bracket only with the help of a second person. Adjust the bracket only with the 

help of a second person. Ensure that electrical cables are not crushed or damaged during 

installation and adjustment. Do not place loads on the bracket that are heavier than the 

load bearing capacity specifi ed and do not exceed the specifi ed maximum size. Ensure that 

the bracket is loaded symmetrically. During adjustment, ensure that the bracket is loaded 

symmetrically and that the maximum weight is not exceeded.

Hama GmbH & Co. KG does not accept warranty claims for improperly installed brackets or 

any resulting damage.
--------------------------------------------------------------------------------------------------

5. Installation

Observe the warning and safety instructions.

Follow the illustrated instructions on pages 4-5 for installation.  
--------------------------------------------------------------------------------------------------

00096007bda.indd   Abs1:14-Abs1:15

00096007bda.indd   Abs1:14-Abs1:15

08.12.2009   13:28:17 Uhr

08.12.2009   13:28:17 Uhr

All manuals and user guides at all-guides.com

Summary of Contents for 00096007

Page 1: ...d brands are trademarks of the corresponding companies Errors and omissions excepted and subject to technical changes Our general terms of delivery and payment are applied H O M E E N T E R T A I N M E N T 00096007 LCD LED Wandhalterung Hintergrundbeleuchtung Wall Bracket backlight All manuals and user guides at all guides com ...

Page 2: ...all guides com ...

Page 3: ...İçindekiler r Cuprins S 8 12 S 13 17 S 18 22 S 23 27 S 28 32 S 33 37 S 38 42 S 43 47 S 48 52 S 53 57 S 58 62 S 63 67 S 68 72 S 73 77 S 78 82 S 83 87 S 88 92 A M4x12 x4 D M5x12 x4 P M6 x4 T Ø 10 x4 B M4x20 x4 C M4x30 x4 E M5x20 x4 F M5x30 x4 G M6x12 x4 H M6x24 x4 I M6x35 x4 Q M8 x4 R Ø 14 x4 S M6x76 x4 U x2 V M5x10 x4 W M5 x4 K M8x16 x4 L M8x25 x4 M M8x40 x4 N M4 x4 O M5 x8 X 12mm x1 All manuals an...

Page 4: ...4 5 A 3a D G K N O P 3b C E F H B I L M R N O P 4 5 6 7 U V O W Gerade Rückseite Flat back Abgerundete Rückseite Curved back Q Q 1 2 T S All manuals and user guides at all guides com ...

Page 5: ...6 7 22 9 cm 81 3 cm 1 x 1 x 1 x 4 x 8 x 4 x All manuals and user guides at all guides com ...

Page 6: ...tieren Verstellen des Halters nur zu zweit Bei der Montage und beim Verstellen darauf achten dass keine elektrischen Leitungen gequetscht oder beschädigt werden Die Halterung nicht schwerer als die angegebene maximale Tragkraft belasten und die angegebene maximale Diagonale nicht überschreiten Achten Sie darauf die Halterung nicht asymmetrisch zu belasten Beim Verstellen darauf achten dass die Hal...

Page 7: ... werden Reparaturen dürfen nur von autorisiertem Fachpersonal durchgeführt werden Maximal dürfen Röhren mit einem Verbrauch von 16 W angeschlossen werden Auf keinen Fall Rückwand des TV Gerätes beschädigen Belüftungsschlitze nicht überkleben 6 Bedienung Wartung Sollte die Halterung nach der Montage schief sein kann das TV Element nachträglich um 5 ausgeglichen werden Die Verstellschraube befindet s...

Page 8: ...all guides com ...

Page 9: ...enance TV Relax 7 Note on instructions 8 Package contents 9 Positioning and installation 10 Operation optional remote control 11 Safety instructions 12 Technical specifications 13 Contact Wall Bracket 1 Note on Instructions Keep the instructions for the complete service life of the product and pass them on to subsequent users or owners 2 Intended Use and Specifications The bracket is used for wall m...

Page 10: ...kaging and inlay for transport at a later time 4 Warning and Safety Instructions For proper mounting please have this bracket fitted by a qualified technician Please check that the assembly set for completeness before installing the bracket and ensure that none of the parts are faulty or damaged Use the bracket for the intended purpose only Before installing the bracket ensure that the wall on which...

Page 11: ...connect the lighting when it is still in the packaging Use the lighting only in enclosed dry spaces The LEDs cannot be replaced Do not connect the lighting with other types of lighting systems Ensure that the mains power supply is 100 240V 59 60Hz Route the cables so that no one will walk on or trip over them and so that they are not damaged by objects lying on top of them Do not allow objects suc...

Page 12: ...t Lors de l installation et de l ajustage du support veillez à n endommager ni coincer aucune conduite électrique Ne dépassez pas la charge maximale du support ni la diagonale maximale indiquées au point 2 Faites attention à ne pas charger le support de façon asymétrique Lors de l ajustage veillez à répartir la charge de façon symétrique sur le support et à ne pas dépasser la charge maximale La so...

Page 13: ...s tension faites effectuer les réparations uniquement par du personnel qualifié autorisé Raccordez uniquement des tubes d une consommation maximale de 16 W Veillez impérativement à ne pas endommager la face arrière de votre téléviseur Ne recouvrez pas les orifices d aération 6 Maniement entretien Il est possible d ajuster ultérieurement l élément TV de 5 dans le cas où la fixation n est pas droite à ...

Page 14: ...all guides com ...

Page 15: ...x 7 Notas sobre las instrucciones 8 Contenido del paquete 9 Ubicación e instalación 10 Manejo opcional mando a distancia 11 Instrucciones de seguridad 12 Datos técnicos 13 Contacto Soporte de pared 1 Notas sobre las instrucciones Conserve estas instrucciones durante toda la vida útil del producto y entrégueselas al usuario o propietario posterior 2 Campo de aplicación y especificaciones El soporte ...

Page 16: ...rde el embalaje con sus piezas interiores para un posible transporte posterior 4 Indicaciones de aviso y de seguridad Recurra a personal especializado con la formación adecuada para el montaje de este soporte Compruebe antes de proceder a la instalación del soporte que el juego de montaje está completo y que ninguna de las piezas está dañada o presenta defectos Emplee el soporte exclusivamente par...

Page 17: ...cables de modo que no se puedan pisar o tropezar con ellos y que no se vean deteriorados por objetos colocados encima de ellos En la carcasa no debe entrar ningún objeto como grapas ya que se podría provocar un cortocircuito Evite todo contacto con líquidos Para la limpieza utilice sólo un paño seco Para separar completamente de la tensión eléctrica se debe extraer el enchufe de red de la toma de ...

Page 18: ...sche leidingen ingekneld of beschadigd raken Belast de houder niet met meer dan de maximaal aangegeven belasting en overschrijd de maximale diagonaal niet Zorg ervoor dat de houder niet asymmetrisch belast wordt Let er bij het verstellen op dat de houder niet asymmetrisch belast wordt en daarbij het maximale gewicht overschreden wordt De firma HAMA GmbH Co KG is niet aansprakelijk voor ondeskundig ...

Page 19: ...e koppelen moet de voedingsstekker uit het stopcontact getrokken worden Reparaties mogen alleen uitgevoerd worden door geautoriseerd vakpersoneel Er mogen buizen met een verbruik van max 16 W aangesloten worden Nooit de achterkant van het tv toestel beschadigen Ventilatiesleuven niet afplakken 6 Bediening onderhoud Als de houder na de montage scheef zit kan het tv element achteraf 5 bijgesteld wor...

Page 20: ...all guides com ...

Page 21: ...lax 7 Indicazioni relative alle istruzioni 8 Contenuto della confezione 9 Posizionamento e installazione 10 Comando opzionale telecomando 11 Indicazioni di sicurezza 12 Dati tecnici 13 Contatti Supporto da parete 1 Indicazioni relative alle istruzioni Conservare queste istruzioni per tutta la durata del prodotto e consegnarle all utente o al proprietario successivo 2 Campo di applicazione e specifi...

Page 22: ...e siano contenuti tutti i componenti del set e assicurarsi che non presentino danni esterni cavi piegati isolamento danneggiato ecc Conservare la confezione originale completa per i trasporti futuri 4 Indicazioni di avvertimento e sicurezza Per il corretto montaggio del supporto rivolgersi a personale specializzato Prima di procedere al montaggio verificare il contenuto completo della confezione e ...

Page 23: ...inazione finché questo è nella confezione Utilizzare il sistema di illuminazione esclusivamente in ambienti chiusi e asciutti I LED non possono essere sostituiti Non collegare il sistema di illuminazione insieme con altri sistemi di illuminazione diversi Assicurarsi che la tensione di rete locale sia di 100 240V 59 60Hz Disporre i cavi in modo che non vengano calpestati che non si possa inciampare ...

Page 24: ...ίγματος προσέξτε ώστε τα ηλεκτρικά καλώδια να μην υποστούν φθορά ή σύνθλιψη Η επιβάρυνση του στηρίγματος με φορτία που ξεπερνούν τη μέγιστη αναφερόμενη αντοχή φορτίου καθώς και η υπέρβαση της μέγιστης διαγωνίου δεν επιτρέπονται Προσέξτε ώστε το στήριγμα να μην επιβαρυνθεί με ασύμμετρο τρόπο Κατά την μετατόπιση φροντίστε ώστε το στήριγμα να μην επιβαρυνθεί με ασύμμετρο τρόπο προκαλώντας υπέρβαση το...

Page 25: ...λυχνίες με κατανάλωση έως το πολύ 16 W Σε καμία περίπτωση μην προκαλείτε ζημιές στο πίσω μέρος της τηλεόρασης Μην επικολλάτε τις σχισμές αερισμού 6 Χειρισμός και συντήρηση Αν μετά τη συναρμολόγηση το στήριγμα είναι λοξό μπορείτε να ευθυγραμμίσετε το στοιχείο τηλεόρασης κατά 5 Η βίδα ρύθμισης είναι κάτω από το πλαστικό κάλυμμα ετικέτα ευθυγράμμισης Η μετατόπιση του στηρίγματος πρέπει να γίνεται πάν...

Page 26: ...all guides com ...

Page 27: ... Montering 6 Hantering service TV Relax 7 Information om beskrivningen 8 Förpackningsinnehåll 9 Placering och installation 10 Styrning alternativt med fjärrstyrning 11 Säkerhetsanvisningar 12 Tekniska data 13 Kontakt Väggfäste 1 Information om beskrivningen Spara beskrivningen så länge produkten används och låt den följa med till efterföljande användare eller ägare 2 Användningsområde och specifika...

Page 28: ...ring etc Spara förpackningen med packmaterialet för transporter längre fram 4 Varnings och säkerhetsanvisningar Kontakta utbildad fackpersonal för monteringen av fästet Kontrollera att monteringssetet är komplett och inte innehåller några felaktiga eller skadade delar innan du monterar fästet Använd bara fästet till det som det är avsett för Innan monteringsarbetet utförs är det mycket viktigt att...

Page 29: ...11 Säkerhetsanvisningar Anslut inte belysningen så länge den ligger i förpackningen Använd bara belysningen i torra och slutna utrymmen LED lamporna kan inte bytas ut Koppla inte ihop belysningen med andra sorters belysningssystem Försäkra dig om att nätspänningen är 100 240V 59 60Hz Dra kablarna på sådant sätt att man inte trampar eller snubblar på dem och inte riskerar skador på grund av föremål...

Page 30: ...itaan aina kaksi samoin telineen säätämiseen Varmista telinettä asentaessasi ja säätäessäsi ettei sähköjohtoja joudu puristuksiin tai vaurioidu Älä kuormita telinettä enempää kuin ilmoitetulla maksimikuormalla äläkä ylitä ilmoitettua kuvaruudun maksimihalkaisijaa Varo kuormittamasta telinettä epäsymmetrisesti Varmista telinettä säätäessäsi ettei telineen kuormituksesta tule epäsymmetristä eikä ilm...

Page 31: ...tettava pistorasiasta korjaustöitä saa tehdä vain valtuutettu ammattihenkilöstö Putket saa kytkeä enintään 16 W n kulutusliitäntään Älä missään tapauksessa vahingoita TV n takaseinää Älä peitä tuuletusaukkoja teipillä 6 Käyttö ja huolto Jos teline on asennuksen jälkeen vino TV elementtiä voi jälkikäteen suoristaa 5 Säätöruuvi on muovisuojuksen alla Levelmount painatus Telineen säätämiseen tarvitaa...

Page 32: ...all guides com ...

Page 33: ...Relax 7 Uwagi dotyczące użytkowania produktu 8 Zawartość opakowania 9 Dobór odpowiedniego miejsca i instalacja 10 Obsługa opcjonalnie obsługa za pomocą pilota 11 Środki ostrożności 12 Dane techniczne 13 Kontakt Uchwyt ścienny 1 Uwagi wstępne Zachowaj instrukcję może się jeszcze przydać Korzystając z uchwytu instrukcję należy mieć cały czas pod ręką 2 Zastosowanie i specyfikacja Uchwyt przeznaczony ...

Page 34: ...tkimi środkami ostrożności 3 Lista elementów Patrz strona 3 Po rozpakowaniu skontrolować zestaw pod względem kompletności wszystkich elementów Każdy należy dokładnie skontrolować czy nie posiada widocznych uszkodzeń załamane kable uszkodzona izolacja itp Zachować opakowanie 4 Środki ostrożności Montaż uchwytu powinni przeprowadzić wykwalifikowani fachowcy Przed montażem uchwytu należy skontrolować ...

Page 35: ...ą klawiszy UP i DOWN 11 Środki ostrożności Nie podłączać oświetlenia jeżeli znajduje się jeszcze w opakowaniu Podświetlenia używać tylko w suchych zamkniętych pomieszczeniach Nie ma możliwości wymiany kontrolek LED Podświetlenia nie podłączać do innych systemów oświetleniowych Upewnić się że zasilanie w sieci wynosi 100 240V 59 60Hz Przewody należy umieścić tak aby nie stanowiły zagrożenia dla osó...

Page 36: ...rte a tv készüléket és a tartót szerelje le és a kijavításig ne használja A tartót csak akkor szerelje fel a falra ha a tv készüléket már rászerelte A falra szerelésnél legfőképpen arra ügyeljen hogy a kiválasztott falban ne legyen elektromos vezeték vagy ha van akkor ne sérüljön meg a fali furatok elkészítésekor Ne terhelje a szerelvényt a max teherbíró képességnél nagyobb tömegű készülékkel Ügye...

Page 37: ...ítani akarja a világító rendszert húzza ki a fali konnektorból a hálózati dugaszt Az esetleg előforduló hibákat csak szakemberrel javíttassa Az alkalmazott csövek max fogyasztása 16 W lehet Ahhoz hogy semmi esetre sem érje károsodás a tv készülék hátoldalát Ne takarja le a szellőző nyílásokat 6 Használat szerviz A tartó szerelése során a szerelvény 5 kal eltérhet a kívánt elfordulási szögtől amely...

Page 38: ...all guides com ...

Page 39: ...ílů 4 Výstražná upozornění a bezpečnostní pokyny 5 Instalace 6 Obsluha a servis TV Relax 7 Pokyny k obsluze 8 Obsah balení 9 Umístění a instalace 10 Ovládání na výběr dálkové ovládání 11 Bezepečnostní pokyny 12 Technická data 13 Kontakt Držák 1 Pokyny pro použití Pro dosažení dlouhé životnosti výrobku dodržujte pokyny pro používání 2 Oblast použití a specifikace Držák slouží pro upevnění ploché TV ...

Page 40: ... 3 Seznam dílů Viz strana 3 Set po rozbalení zkontrolujte zda je kompletní a zda neobsahuje poškozené nebo vadné díly zlomené kabely poškozená izolace atd Obal nebo krabici uschovejte pro případný pozdější transport 4 Výstražná upoz ornění a bezpečnostní pokyny Při montáži nástěnného držáku se obraťte prosím na odborného pracovníka Přesvědčte se zda je montážní set kompletní a zda neobsahuje vadné...

Page 41: ...ostní pokyny Osvětlení nezapojujte pokud je stále uloženo v krabici Osvětlení používejte pouze v suchých uzavřených prostorách LED nelze vyměnit Osvětlení nezapojujte s osvětlovacími systémy jiných druhů Ujistěte se zda je síťové napětí 100 240V 59 60Hz Uložte kabeláž tak abyste o ni nezakopli nevstupovali na ni a aby ji neporušily okolní předměty Dbejte na to aby se do pláště osvětlení nedostaly ...

Page 42: ...e demontujte vždy vo dvoch Držiak nezaťažujte viac než je jeho predpísaná nosnosť a neprekračujte uvedenú uhlopriečku TV Dbajte na to aby ste držiak nezaťažili nerovnomerne a aby nebola prekročená maximálna hmotnosť Firma Hama Slovakia s r o nenesie zodpovednosť za škody vzniknuté neodbornou manipuláciou a inštaláciou 5 Inštalácia Dodržujte bezpečnostné pokyny Nasledujte vyobrazené pokyny k inštal...

Page 43: ...čku Pre úplné odpojenie zo siete musí byť vytiahnutá sieťová vidlica zo zásuvky Opravu zverte len kvalifikovanému odborníkovi alebo servisu Zapojeny mohú byť trubice zo spotrebou od 16W V žiadnom prípade sa nesmie poškodiť zadná strana TV zariadenia Neprelepujte vetrací otvor 6 Obsluha a servis V prípade že by bol držiak po montáži šikmo možno TV zariadenie samozrejme o 5 natočiť Nastavovacie skrut...

Page 44: ...all guides com ...

Page 45: ... relativas ao manual 8 Conteúdo da embalagem 9 Posicionamento e instalação 10 Utilização opcional telecomando 11 Indicações de segurança 12 Dados técnicos 13 Contacto Suporte de parede 1 Indicações relativas ao manual Guarde o manual durante todo o tempo de vida útil do produto e entregue o a futuros utilizadores ou proprietários 2 Área de aplicação e especificações O suporte destina se à fixação na...

Page 46: ...rados isolamentos danificados etc Guarde a embalagem juntamente com as protecções interiores para um transporte posterior 4 Avisos e Indicações de segurança Entre em contacto com técnicos especializados para efectuar a montagem deste suporte Antes da instalação do suporte verifique se o kit de montagem está completo e certifique se de que não há peças incompletas ou danificadas Utilize o suporte apena...

Page 47: ...s lâmpadas enquanto ainda se encontrarem na embalagem utilize a iluminação apenas em espaços secos e fechados os LED não podem ser substituídos não ligue a iluminação juntamente com outros tipos de sistemas de iluminação certifique se de que a tensão de rede é de 100 240V 59 60Hz coloque o cabo de modo que ninguém possa pisá lo ou tropeçar nele e que não possa ficar danificado por objectos colocados ...

Page 48: ...ью второго человека При монтаже и настройке следите за тем чтобы не зажать и не повредить электропроводку Соблюдайте максимально допустимую нагрузку держателя и допустимую диагональ экрана Во время регулировки удостоверьтесь что нагрузка на держатель распределена равномерно и максимальный вес не превышен Компания Hama GmbH Co KG не несет ответственности за ненадлежащую установку держателя а также ...

Page 49: ...стью отключить питание выньте вилку из розетки электросети Ремонт разрешается производить только квалифицированному персоналу Разрешается подключать трубки с потребляемой мощностью до 16 Вт не повредите заднюю панель телевизора не блокируйте вентиляционные отверстия 6 Эксплуатация и обслуживание Если после монтажа держатель окажется сдвинутым можно подкорректировать узел приемника на 5 Установочны...

Page 50: ...all guides com ...

Page 51: ...i 3 Parça listesi 4 İkaz ve güvenlik uyarıları 5 Kurulum 6 Kullanım ve bakım TV Relax 7 Kılavuzla ilgili uyarılar 8 Paketin içindekiler 9 Yerleştirme ve kurulum 10 Kullanım opsiyonel uzaktan kumanda 11 Emniyet uyarıları 12 Teknik Bilgiler 13 Temas Duvar Bağlantısı 1 Kılavuzla ilgili uyarılar Bu kılavuzu ürünün tüm kullanım ömrü esnasında saklayın ve cihazla birlikte cihazın yeni sahibine verin 2 U...

Page 52: ...arçaları ileride taşımak için saklayın 4 İkaz ve güvenlik uyarıları Bu duvar bağlantısının montajını bu konuda eğitim görmüş ustalara yaptırınız Montaj öncesi montaj setinin eksiksiz olduğunu kontrol edin ve içerisinde hatalı veya hasarlı parça olmadığından emin olun Duvar bağlantısını sadece amacına uygun olarak kullanınız Montaj öncesi duvarın bu ağırlığı taşıyabilecek kapasitede olduğunu kontro...

Page 53: ...kuru ve kapalı odalarda kullanın LED lerin değiştirilmesi mümkün değildir aydınlatmayı başka tip aydınlatma sistemlerine bağlayarak kullanmayın şebeke geriliminin 100 240V 59 60Hz olduğundan emin olun kabloları üzerine basılamayacak veya tökezlenmeyecek ve üzerindeki nesnelere zarar vermeyecek şekilde döşeyin muhafaza içine ataşman vb cisimler girmemelidir kısa devreye sebep olabilirler sıvılara k...

Page 54: ...glare fiţi atenţi să nu deterioraţi fire electrice Nu încărcaţi suportul peste forţa portantă maximă și nu depășiţi diagonala prescrisă Suportul nu se încarcă asimetric La reglare urmăriţi să nu încărcaţi suportul asimetric și să nu depășiţi forţa portantă maximă Firma HAMA GmbH Co nu preia nici o garanţie în cazul instalării neprofesionale a suportului și a daunelor rezultate din aceasta 5 Instalar...

Page 55: ...ate numai de personal de specialitate autorizat Este permisă maxim racordarea tuburilor cu un consum de 16 W În niciun caz nu deterioraþi peretele posterior al aparatului TV Nu lipiþi nimic peste fantele de aerisire 6 Deservire și întreţinere Dacă suportul nu este drept după montare elementul TV poate fi echilibrat ulterior cu 5 Şurubul de reglare se află sub capacul de plastic inscripţia Levelmount...

Page 56: ...all guides com ...
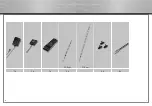
Page 57: ... Tensiune 16 V Putere 1 5W Tuburi 81 3 cm Tensiune 16 V Putere 3W Telecomanda Necesită 3x baterii 1 5V AAA nu sunt cuprinse în accesoriile livrate 13 Contact Dacă aveţi întrebări adresaţi vă comerciantului dvs sau la Hama consultaţie privind produsul Tel 49 0 9091 502 115 Fax 49 0 9091 502 272 E mail produktberatung hama de All manuals and user guides at all guides com ...
Reviews: