background image

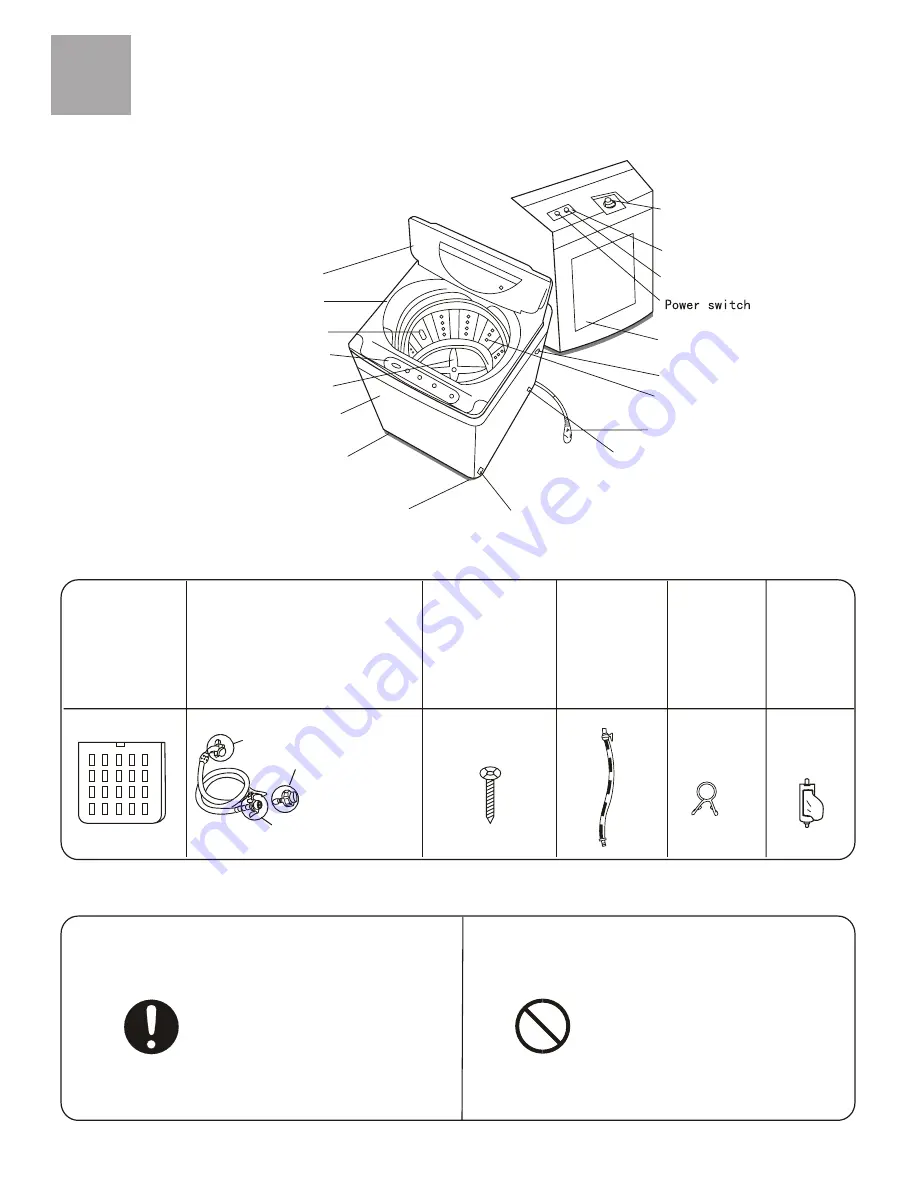
Names of the part s

Before using

Before using

Before using

Before using

Meaning and description of the symbols

Accessories

      Contents marked with
that symbol are related 
t o   t h e  s a f e t y   o f   t h e
product and the personal 
safety of the users. Failure
t o   c o m p l y   w i t h  t h e
instruction could cause
damage of the machine 
o r   i n j u r e   t h e  p e r s o n a l  
s a f e t y   o f   t h e  u s e r .

Warning

mark

Top lid

Control panel

Lint filter(Installed by user)

Control panel film

Pulsator

Cabinet

Base frame

Adjustable foot 
seam

Adjustable foot

Inner drain hose

Power line

Inner tub

Cabinet handle

Back cover

Water level Switch

Control panel film

Water valve

Bottom plate

 (1 piece)

The end connecting to

the washing machine

The end connecting to

the water inlet hose jointer

Jointer connecting
the water inlet hose
to the water faucet

Water inlet hose

(2 pieces)

Water inlet 

hose jointer

(2 pieces)

Tapping screw

ST4x 16

(1 pieces)

Drain hose
(1 pieces)

Hose clamp
(1 pieces)

Lint filter
(1 piece)

      Contents marked with 
that symbol are actions
f o r b i d d e n   t o  p e r f o r m .  
F a i l u r e   t o  c o m p l y   w i t h
t h e   i n s t r u c t i o n  c o u l d  
result in damage of the 
m a c h i n e   o r  i n j u r e   t h e
personal safety of the user.

Forbidding

mark

Summary of Contents for HWM33-200

Page 1: ...lity for those risks occurred from not obeying this manual Specifications the back cover Picking list Contents Before using Using process Trouble shooting Answers to questions 16 7 8 9 10 14 14 15 Preparation before washing Put in the laundries Add the detergent and softener Use the operation buttons Close the top lid Finish washing Disposal after washing nd Names of the parts The 2 cover Safety p...

Page 2: ...able foot seam Adjustable foot Inner drain hose Power line Inner tub Cabinet handle Back cover Water level Switch Control panel film Water valve Bottom plate 1 piece The end connecting to the washing machine The end connecting to the water inlet hose jointer Jointer connecting the water inlet hose to the water faucet Water inlet hose 2 pieces Water inlet hose jointer 2 pieces Tapping screw ST4x 16...

Page 3: ...t put wet laundries on the control panel coating Do not use water with temperature higher than 50 inside the tub Do not wash water proof laundries like the raincoat bike covers down textiles etc to avoid abnormal vibrations in spinning and damaging the laundries Do not bend stretch twist bind the power cord by force or reform it Do not press or clamp it with heavy items If the power cord and power...

Page 4: ...or children shall not use the machine without care Safety precautions Before using Before using Before using Before using Please check if the water faucet is open and if the connection of the water inlet pipe is proper It is suggested to use foamless washing powder To prevent the lint in the tub from blocking the cascade outlet and influencing the cascade effect please keep the lint filter in good...

Page 5: ...able leg 1 To twist the adjustable leg please first lift up the leg side slightly loosen the adjustable nut and then twist the leg 2 After adjustment fasten the nut Loosen Fasten High Low Adjustable nut Adjustable leg Insert the bottomof the lintfilter marked with down side into the filter frame then push the upper part ofthe filter in marked with up side See to Figure Install the lint filter Inst...

Page 6: ...t the front end of the hose slantingly 4 If extra drain hose is needed please make separate purchase The inner diameter of the extra hose shall not less than 30mm and the length shall not exceed 1 5m If the extra hose is too long cut it either at A or at B point Usage of the drain hose The drain hose shall drain smoothly Install the outer drain hose Connect the outer drain hose to the inner drain ...

Page 7: ...enly See to Figure 4 About 4mm after twisting Remark Before installation the threading is 4mm above the upper surface of the nut After installation the threading is 2mm above the upper surface of the nut About above 2mm after twisting Water inlet hose jointer Screw knife Screw Bushing Nameplate Screw nut Water inlet hose Figure 1 Figure 4 Figure 2 Figure 5 Figure 3 Figure 6 Slider Lock level Befor...

Page 8: ...rand the waterfaucet and the installation of the waterinlet hoseis firm so as to avoid droppingowing to improperinstallation 1 Push down the slider Plug the water inlet hose into the jointer 2 Hang the lock lever onto the jointer Release the slider till a click sound is heard Lock level Slider The water inlet hose jointer Slider Locking level 1 Close the water faucet 2 Press the lock lever and pus...

Page 9: ...dries may cause noise For t h e s a k e o f discretion please put the laundries with buttons into other laundries The quantity of the laundries shall not be too large Stretch and loosen the laundries before putting them in the tub A Check if the laundries are applicable for washing with machine b Divide the laundries that are not colorfast from other laundries c Put the laundries difficult to abso...

Page 10: ... of the cloth will influence the actual washing capacity It is feasible to put in suitable amount of laundries and the laundries can be tumbled normally in washing for one cycle Please do not select high water level for laundries less than 2 0kg to avoid splashing blending coat about 800g Shirt Jacket Single bed sheet Socking Underpants Undershirt Pajamas Blanket cotton about 900g cotton about 300...

Page 11: ...dd the washing powder Run for 30 seconds to dissolve it completely 3 Put in the laundries Select suitable water level The instant dissolving of the washing powder 1 Prepare warm water of 30 and a container 2 Add the powder into the container while stirring to fully dissolve it The powder is more likely to pollute the laundries than the detergent Therefore please use it with suitable quantity It is...

Page 12: ...dicator Flash indicating the running mode On indicating the mode about to run Flash rapidly indicating abnormal situation 4 Use the operation buttons Using process Using process Using process Using process Push it to select one or more programs from WASH RINSE and SPIN SELECT button ...

Page 13: ...len textiles or underwear Jeans Washing the large and heavy stained laundries PROGRAM button The following fourprograms are availablefor your option Program Remarks Push theOn Off button to switch onthe power If the washingmachine is idlefor 10 minutes it will auto matically switch off the power POWER ON OFF High Middle Low WATER LEVEL WATER LEVEL Push the On Off button toswitch on thepower When t...

Page 14: ...rtain period is required before spin starting Separate the laundries that are not colorfast from other laundries in washing Attention b Steps of using the operation buttons and description of each step POWER ON OFF High Middle Low WATER LEVEL 1 Push the POWER button to switch on the power Reset ...

Page 15: ...About 3 About 12 Spray once 1 5 minutes Rinse twice 2 minutes every time Spray twice 2 minutes every time Spin minute About 5 About 3 About 2 3 About 3 About 45 About 22 About 30 About 45 Total time minute Total time including the normal water inlet time and drain time Spin time the time from intermittent running to finishing The washing finishing time may be influenced by the water inlet pressure...

Page 16: ...ing aftermanual washing When the laundriesneed only spinning after manualwashing first drain thenspin Push the SELECT button for 5 times and it will resume the initial mode It will circulate in that sequence 4 Switch the WATER LEVEL button to select suitable water level 5 Push the START PAUSE button 5 Close the top lid 6 The washing is finished It beeps toindicate the finishing of washing The powe...

Page 17: ...pen the top lid for some time about 1 hour then close the top lid The filter screenis likely tobe blocked byforeign materials and influencewater inlet Pleaseclean it with brush frequently Using process Using process Using process Figure 1 Figure 3 Figure 2 The lint filtermust be usedduring washing It must becleaned in timeafter each using 1 Takeoff the lint filter Put hand atthe indicated positon ...

Page 18: ... the screwof the waterinlet hose jointer twisted awry Close the toplid Clean the foreignmaterial Push the start buttonagain Reorder the laundries Close the toplid Set the washingmachine horizontally and then open andclose the toplid once Adjust the machineto be even Remove the foreignmaterials Reorder the laundriesand close thetop lid Fasten the screwof the jointerproperly Please use itwhen there ...

Page 19: ...ment bag Storage position Inside the inner tub Between the upper cushion of the washing machine package and the upper seal of the package carton 1 piece 1 piece 1 piece 1 pieces 1 set Inside the document bag Fuzzy logic automatic washing machine Outer drain hose 1 pieces Inside the inner tub Inside the inner tub Drain hose clamp 1 pieces 1 piece ...

Page 20: ...eight Dimensions mm XQB60 C 220 240V 50Hz 6 0kg 415W 315W About 33kg L 540 W 540 H 875 Water level Water quantity about Water inlet pressure Specifications Specifications Rated washing spinning capacity 50L High 42L Middle 34L Low About 150L the highest water level normal program 0 03MPa 0 78MPa ...

Reviews: