


6LE002000Ab
HTG457H
z
USB to RJ45 Ethernet interface
a
Adaptateur USB vers Ethernet RJ45
e
USB-/RJ45-Ethernet-Schnittstelle
m
Adapter RJ45 Ethernet - USB
t
Interface USB / Ethernet RJ45
r
USB a la interfaz Ethernet RJ45
i
USB naar RJ45 Ethernet-interface
s
USB till RJ45 Ethernet-gränssnitt
http://hgr.io/r/htg457h
Connection / Raccordement / Anschluss / Podłączenie / Ligações / Conexión /
Aansluiting / Förbindelse
Z
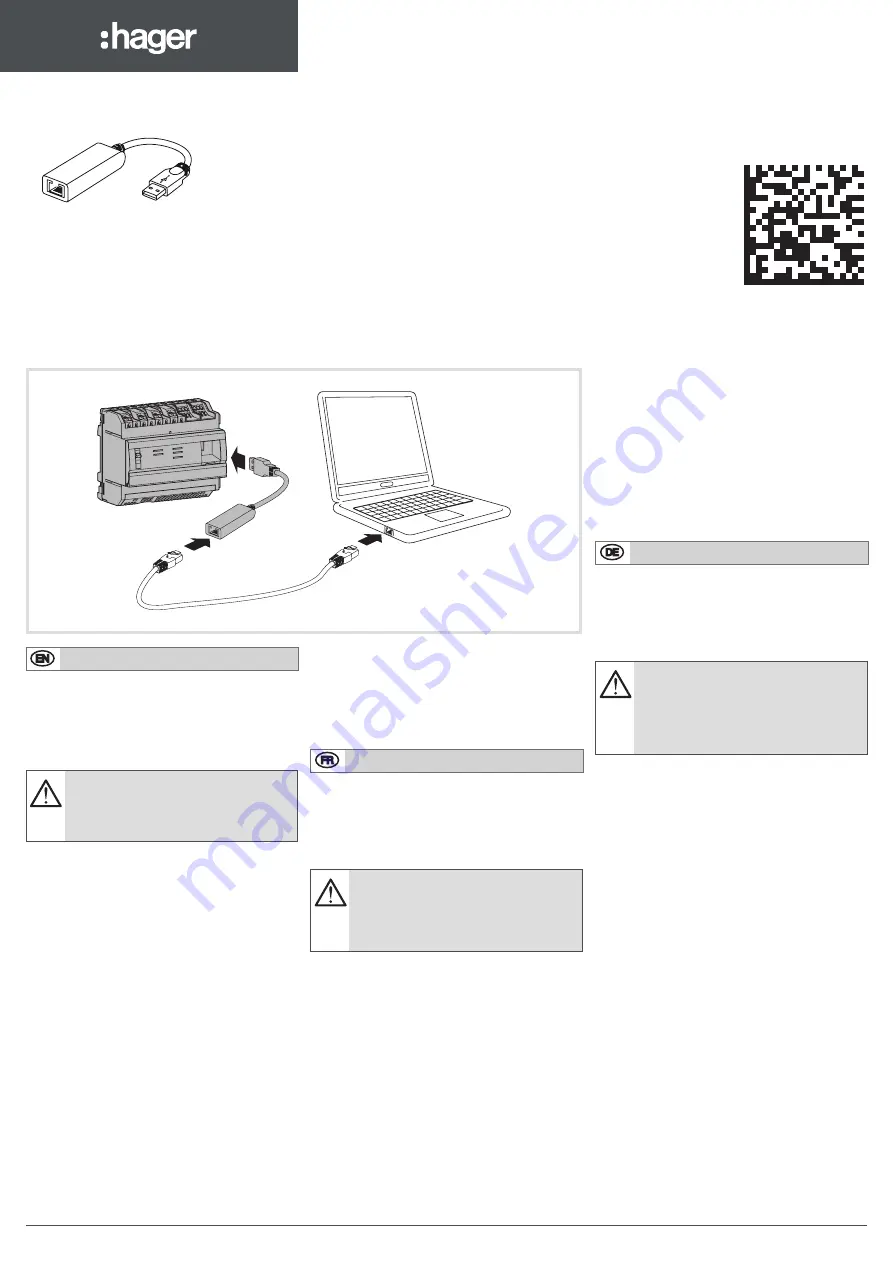
The HTG457H is an USB to RJ45 Ethernet interface,
especially suitable for the connection with the multienergy
data logger & server HTG410H / HTG411H. It allows
direct connection on the front panel, avoiding any
dismantling of box or cabinet.
Implementation
Ensure that the Ethernet network installation is
not connected on the port “Setup - Ethernet1”,
but on the Port “Ethernet 2”. Note: In “Setup
ON” mode, the HTG410H activates its DHCP
server on “Setup - Ethernet 1” port.
1. Turn switch “Setup” in “ON” position on HTG140H /
HTG411H.
2. Execute a reset for HTG410H / HTG411H by switching
off the power supply and on again.
3. Wait until the “Power” LED is uninterrupted green.
4. Connect the accessory on the USB port located on
front of HTG410H / HTG411H.
5. Connect the Ethernet port of the HTG457H to the
Ethernet port of the computer with an Ethernet cable
(crossed / uncrossed).
6. Set the TCP/IP connection on the computer :
Example for Windows 7 Professional:
- Open “Network and Sharing Center”.
- Click on “Change adapter settings”.
- Click on “Local Area connection”.
- Click on “Properties”.
- Select “Internet Protocol Version 4 (TCP/IPv4)” and click
on “Properties”.
- On “General” tab, make sure “Obtain an IP address
automatically” and “Obtain DNS server address
automatically” are checked. Otherwise, write down your
current settings before making any changes, and check
the 2 boxes.
- Click on “OK” to close window “Internet Protocol
Version 4 (TCP/IPv4) Properties”.
- Click on “Close” to close window “Local Area
Connection Properties”.
7. Activate the Web browser on the computer.
8. Enter
https://192.168.2.1
as the url and connect you to
the product HTG410H / HTG411H as usual.
ces 2 cases.
- Fermer la fenêtre "Propriétés de Protocole Internet
version 4 (TCP / IPv4)" en cliquant sur "OK".
- Fermer la fenêtre "Propriétés de Connexion au réseau
local" en cliquant sur "OK".
7. Lancer le navigateur internet sur l’ordinateur.
8. Saisir comme url
https://192.168.2.1
et connectez-
vous au produit HTG410H / HTG411H comme
habituellement.
Déconnexion totale
1. Sortir du mode SETUP en mettant le sélecteur "Setup"
en position "OFF".
2. Débrancher l’accessoire du port USB.
3. Redémarrer le HTG410H / HTG411H en coupant son
alimentation, puis le remettre sous tension.
4. Le cas échéant, rétablir les paramètres TCP / IPv4 de
l’ordinateur - ceux notés avant modification.
E
Der HTG457H ist eine USB-/RJ45-Ethernet-Schnittstelle,
die besonders gut geeignet ist eine Verbindung
zum Energiemonitoringserver HTG410H / HTG411H
aufzubauen.Sie erlaubt eine direkte Verbindung an der
Vorderseite ohne Demontage der Verteilerfeldhaube.
Implementierung
Stellen Sie sicher, dass nur am „Ethernet 2“-
Port jedoch NICHT am „Setup-Ethernet 1“-Port
ein Ethernet Netzwerk angeschlossen ist.
Hinweis: Ist der Setup-Modus aktiviert (Setup
ON) stellt der HTG410H / HTG411H einen
DHCP-Server am „Setup – Ethernet 1“-Port zur
Verfügung.
1. Bringen Sie den Schalter „Setup“ am HTG410H /
HTG411H in die „ON“-Position.
2. Führen Sie einen Neustart des HTG410H / HTG411H
durch indem Sie die Spannungsversorgung aus- und
wieder einschalten.
3. Warten Sie ab, bis die „Power“-LED konstant grün
leuchtet.
4. Schließen Sie das Zubehör am frontseitigen USB-
Anschluss des HTG410H / HTG411H an.
5. Verbinden Sie den Ethernet-Anschluss des HTG457H
und den Ethernet-Anschluss Ihres PC´s mit einem
Ethernet-Kabel (überkreuzte oder gerade).
6. Richten Sie Ihre TCP/IP-Verbindung am PC ein:
Beispiel für Windows 7 Professional:
- Öffnen Sie das „Netzwerk- und Freigabecenter“
- Klicken Sie auf „Adaptereinstellungen ändern“
- Klicken Sie auf „LAN-Verbindung“
- Klicken Sie auf „Einstellungen“
- Wählen Sie „Internetprotokoll Version 4 (TCP/IPv4)“ und
klicken Sie auf „Einstellungen“
- Stellen Sie sicher, dass im Register „Allgemein“ die
Einstellung „IP-Adresse automatisch beziehen“ und
„DNS-Server automatisch beziehen“ ausgewählt
ist. Falls dies nicht der Fall ist, notieren Sie sich die
aktuellen Einstellungen und wechseln dann auf die
genannte Konfiguration.
- Klicken Sie auf „OK“ um das Fenster „Eigenschaften
von Internetprotokoll Version 4 (TCP/IPv4)“ zu schließen.
- Klicken Sie auf „OK“ um das Fenster „Eigenschaften
von LAN-Verbindung“ zu schließen
7. Webbrowser am PC starten.
8. Geben Sie
https://192.168.2.1
in die Adressleiste ein
und verbinden Sie sich wie üblich mit dem HTG410H /
HTG411H.
Gesamtabschaltung
1. Verlassen Sie den Setup-Modus indem Sie den
Schalter „Setup“ in die „OFF“-Position bringen
2. Entfernent Sie das Zubehör vom USB-Port.
3. Starten Sie den HTG410H / HTG411H neu, indem Sie
Total disconnection
1. Exit SETUP mode by selecting “Setup” switch in “OFF”
position.
2. Disconnect the accessory on USB port.
3. Restart HTG410H / HTG411H by switching off the
power supply and on again.
4. If applicable, reset the TCP / IPv4 settings on the
computer - those recorded before modification.
A
Le HTG457H est un adaptateur USB vers Ethernet RJ45,
spécialement adapté au raccordement du serveur de
données multi-énergies HTG410H / HTG411H.Il permet
un raccordement direct en face avant, évitant tout
démontage de coffret ou d’armoire.
Mise en œuvre
S’assurer que le réseau Ethernet de l’installation
ne soit pas raccordé au port "Setup -
Ethernet1", mais bien au port "Ethernet 2".
Nota : En mode "Setup ON", le HTG410H /
HTG411H active son serveur DHCP sur le port
"Setup - Ethernet 1".
1. Mettre le sélecteur "Setup" du produit HTG410H /
HTG411H en position "ON".
2. Redémarrer le HTG410H / HTG411H en coupant son
alimentation, puis le remettre sous tension.
3. Attendre que la Led "Power" soit au vert fixe.
4. Raccorder l’accessoire au port USB situé en face avant
du HTG410H / HTG411H.
5. Raccorder avec un câble (croisé ou non) Ethernet,
le port Ethernet de l’accessoire au port Ethernet de
l’ordinateur.
6. Paramétrer le lien TCP / IP sur l’ordinateur :
Exemple pour Windows 7 Professionnel :
- Ouvrir le "Centre Réseau et partage".
- Cliquer sur "Modifier les paramètres de la carte".
- Cliquer sur "Connexion au réseau local".
- Cliquer sur "Propriétés".
- Sélectionner "Protocole Internet version 4 (TCP / IPv4)"
et cliquer sur "Propriétés".
- Sur l’onglet "Général", s’assurer que "Obtenir une
adresse IP automatiquement" et "Obtenir les adresses
DNS automatiquement" soient cochés. Sinon, notez vos
paramètres actuels avant toute modification, et cochez
6LE002000Ab
1