background image


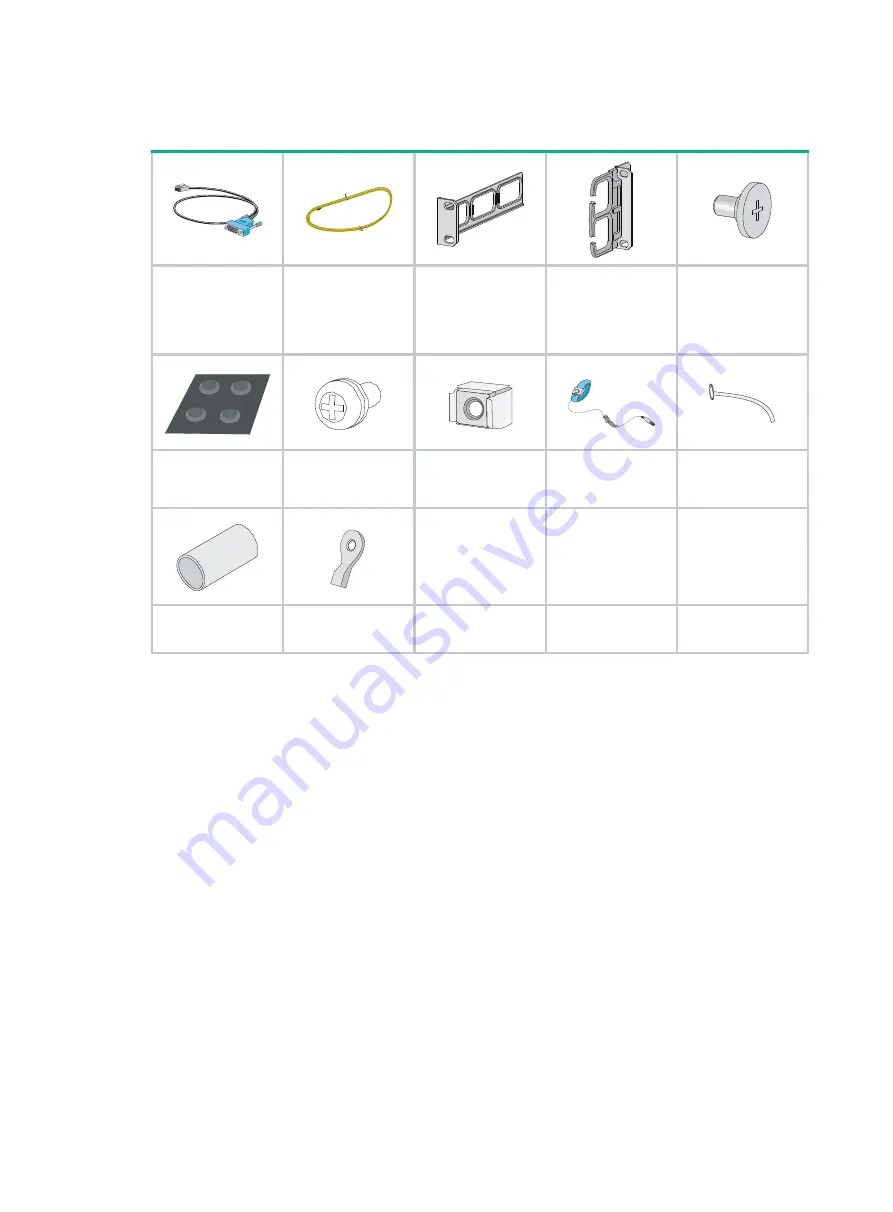
Accessories 


Console cable 

(supplied with 

router) 

3 m (9.84 ft) 

grounding cable 

(supplied with 

router) 

Rear mounting 

bracket (supplied 

with router) 

Front mounting 

bracket and cable 

management 

bracket (supplied 

with router) 

Load-bearing 

screw (supplied 

with router) 


Rubber feet 

(supplied with 

router) 

M6 screw 

(user-supplied) 

Cage nuts 

(user-supplied) 

ESD wrist strap 

(user-supplied) 

Cable tie 

(user-supplied) 


Insulation sheath

(user-supplied) 

Ring terminal 

(user-supplied) 


Summary of Contents for SR6602-X1

Page 1: ...H3C SR6602 X Routers Installation Guide New H3C Technologies Co Ltd http www h3c com hk Document version 6PW105 20170323...

Page 2: ...her trademarks that may be mentioned in this manual are the property of their respective owners Notice The information in this document is subject to change without notice Every effort has been made i...

Page 3: ...nts arguments that you replace with actual values Square brackets enclose syntax choices keywords or arguments that are optional x y Braces enclose a set of required syntax choices separated by vertic...

Page 4: ...topology icons Convention Description Represents a generic network device such as a router switch or firewall Represents a routing capable device such as a router or Layer 3 switch Represents a generi...

Page 5: ...cumentation To access the most up to date H3C product documentation go to the H3C website at http www h3c com hk To obtain information about installation configuration and maintenance click http www h...

Page 6: ...he grounding cable 11 Installing a power module 12 Installing a FIP module 13 Installing a HIM 13 Installing a MIM 14 Installing a CF card 15 Connecting the power cord 16 Connecting an AC power cord 1...

Page 7: ...uter 47 Displaying the operational statistics of the router 47 Displaying the detailed information about a module 48 Displaying the electrical label information of a module 49 Displaying the CPU usage...

Page 8: ...pplication file missing errors 69 Appendix A Chassis views and technical specifications 70 Chassis views 70 Dimensions and weights 71 Storage media 72 Power consumption 72 Power modules specifications...

Page 9: ...iv Numbering interfaces 90 Example 91 Index 92...

Page 10: ...ervice the router Keep accessories installation tools and documentation safe Avoid bodily injury Do not touch any power plug when it is connected Clean up the packaging materials after installation to...

Page 11: ...luate the floor loading as compared to the actual weight of the router and its accessories such as rack and power modules and make sure the floor can support the weight of the rack and the router chas...

Page 12: ...ostatic adsorption can cause communication failure Table 4 Dust concentration limit in the equipment room Substance Concentration limit particles cu m Dust particles 3 x 10 4 No visible dust on desk i...

Page 13: ...well grounded Maintain the humidity and temperature at a proper level in the equipment room For more information see Temperature and humidity Always wear an ESD wrist strap and ESD cloth when touchin...

Page 14: ...use a single phase three wire power receptacle with protection earth PE to filter interference from the power grid Keep the switch far away from radio transmitting stations radar stations and high fre...

Page 15: ...that has a conductor cross section area of a minimum of 16 sq mm 0 02 sq in leave more space between the front rack posts and the front door as appropriate Power supply Perform the following steps to...

Page 16: ...lied with router Front mounting bracket and cable management bracket supplied with router Load bearing screw supplied with router Rubber feet supplied with router M6 screw user supplied Cage nuts user...

Page 17: ...u have read Preparing for installation carefully and the installation site meets all the requirements Prepare a 19 inch rack Make sure the rack is sturdy and securely grounded Make sure there is suffi...

Page 18: ...this section To install the router in a rack 1 Mark the positions of cage nuts on the front rack posts by using a front mounting bracket and mark the positions of cage nuts on the rear rack posts by u...

Page 19: ...ter Installing the ring terminal No ring terminal is supplied with the grounding cable You must install one yourself Move the rear mounting brackets upwards along the rack posts until they make close...

Page 20: ...nal with a crimper 4 Cover the joint with the insulation covering and heat the insulation covering with a blow dryer to completely cover the metal part Figure 9 Installing the ring terminal Connecting...

Page 21: ...stall the power module to slot PWR1 go to step 2 To install the power module to slot PWR2 use a Phillips screwdriver to remove the filler panel from the slot first Keep the filler panel safe for futur...

Page 22: ...l safe for future use 3 Use even pressure to gently push the FIP module into the slot along the slide rails until positioning pins on the backplane are seated in the positioning holes and then push th...

Page 23: ...e levers inward 4 Use a Phillips screwdriver to fasten the captive screws on the HIM Figure 12 Installing a HIM Installing a MIM NOTE Install the MIM in the lower slot on the FIP module To install a M...

Page 24: ...pen the CF card cover 2 Press the ejector button next to the CF card slot Insert the CF card into the slot and make sure it does not project from the slot Figure 15 Insert the CF card 3 Close the CF c...

Page 25: ...other end of the power cord to the AC power outlet Figure 17 Connecting an AC power cord to the router Connecting a DC power cord 1 Correctly orient the plug at one end of the cable with the power rec...

Page 26: ...17 Figure 19 Tighten the screws 3 Connect the two wires at the other end of the power cord to a DC power source...

Page 27: ...UX port of the router and DB 25 and DB 9 male connectors at the other end for connecting to the serial port of the modem Figure 20 AUX cable Connecting the AUX cable 1 Plug the DB 9 or DB 25 male conn...

Page 28: ...two times than that of category 5 enhanced cables thus featuring a higher transmission performance Therefore category 6 cables are suitable for applications requiring a transmission speed of more than...

Page 29: ...s otherwise the communication quality may be affected Making an Ethernet cable 1 Cut the cable to a proper length with the crimping pliers 2 Strip off an appropriate length of the cable sheath The len...

Page 30: ...ipped with RJ 45 connectors 2 Check the status LED of the Ethernet ports For more information about the LED status see Appendix B LEDs Connecting a fiber cable Transceiver module overview When you use...

Page 31: ...meters 62 5 micrometers or greater Dispersion Less dispersion Allows greater dispersion and therefore signal loss exists Light source and transmission distance Users lasers as the light source often w...

Page 32: ...bending along the acute side of mechanical parts the fiber must wear jackets or cushions Insert and remove a plug with care Never exert a fierce force to the fiber or plug otherwise the plug may be da...

Page 33: ...T1 cable overview E1 cable You can use an 8E1 interface cable to connect to MIM 8E1 75 MIM 8E1 75 F modules Figure 28 8E1 splitter cable NOTE The coaxial connector and 75 ohm E1 adapter cable are opt...

Page 34: ...ble D15 D68 BNC CAUTION When connecting the interface cable pay attention to the mark on the interface to avoid wrong insertion which may damage the interface module or even the router If you do not n...

Page 35: ...terface on the remote device is 120 ohms you must use an impedance converter to adapt the impedance Figure 32 Connecting an impedance converter Connecting a T1 cable 1 Connect the D68 connector of the...

Page 36: ...tor at the input end of the E3 T3 cables to protect them against lightning strikes more efficiently when they are routed outdoors Connecting a CE3 CT3 cable 1 Connect the SMB connector of an E3 T3 cab...

Page 37: ...cable Connecting a serial port cable Overview You can use a serial port cable to connect to the MIM 2SAE MIM 4SAE MIM 8SAE module Select a serial port cable according to the link type Figure 36 V 24 D...

Page 38: ...29 Figure 38 V 35 DTE cable Figure 39 V 35 DCE cable Figure 40 X 21 DTE cable Figure 41 X 21 DCE cable Figure 42 RS449 DTE cable A A Pos 28 Pos 1 X1 W X2 B B A Pos 1 Pos 15 A W B Pos 28 X1 Pos 1 B X2...

Page 39: ...able of correct type 2 Plug the D28 end of the synchronous serial interface cable into the D28 interface of the SAE interface module 3 If the WAN uses DDN line connect the cable to the port of the CSU...

Page 40: ...paration Before you log in to your router prepare an 8 core shielded cable with a crimped RJ 45 connector at one end and a DB 9 male connector at the other end and a PC with the operating system Windo...

Page 41: ...erTerminal 1 Select Start All Programs Accessories Communications HyperTerminal The Connection Description dialog box appears 2 Enter the name of the new connection in the Name field and click OK Figu...

Page 42: ...by the HyperTerminal connection 4 Set Bits per second to 9600 Data bits to 8 Parity to None Stop bits to 1 and Flow control to None and click OK Figure 49 Setting the serial port parameters 5 Select F...

Page 43: ...34 Figure 50 HyperTerminal window 6 On the Settings tab set the emulation to VT100 and click OK Figure 51 Setting terminal emulation in aaa Properties dialog box...

Page 44: ...er on the router and you can see the following information System is starting Press Ctrl D to access BASIC BOOTWARE MENU Press Ctrl T to start memory test Booting Normal Extend BootWare H3C SR66 Route...

Page 45: ...the router through the AUX port 1 After powering on the router connect the console cable to the console port and follow these steps to configure the AUX port Step Command 1 Enter system view system v...

Page 46: ...ion user interface con 0 user interface aux 0 user interface vty 0 4 Configuring basic settings To configure basic settings for the router Step Command Remarks 1 Set the current time and date clock da...

Page 47: ...e tag tag value description description text By default the preference of a static route is 60 tag is 0 and no description is configured Do not specify the permanent keyword together with the bfd or t...

Page 48: ...side facing upward or place them in antistatic bags Replacing a power module The replacement procedure of an AC power module is the same as a DC power module This section takes an AC power module as...

Page 49: ...install a new FIP module in the slot install a blank panel To install a new FIP module see Installing a FIP module NOTE To replace a FIP module when the router is running perform the remove slot slot...

Page 50: ...t blade screwdriver to completely loosen the captive screws of the MIM to be removed 2 Holding the handle of the MIM gently pull the MIM out of slot along the slide rails Figure 55 Pulling the MIM out...

Page 51: ...ure 57 Pull the CF card 3 To install a new MIM see Installing a CF card NOTE To protect the CF card place it into an antistatic bag Replacing a transceiver module WARNING Do not stare into the optical...

Page 52: ...iver module see Connecting a fiber cable Figure 58 Removing a transceiver module Figure 59 Transceiver module golden finger Replacing a fan tray WARNING Rotating fan blades can cause serious injury or...

Page 53: ...e supported Put the removed fan tray in an anti static bag Replacing a memory module CAUTION Keep the tamper proof seal on a mounting screw on the chassis cover intact and if you want to open the chas...

Page 54: ...ram The router needs to maintain a large routing table or support other highly memory consuming operations An existing memory module is damaged Replacing a memory module Opening the chassis cover CAUT...

Page 55: ...63 Opening the chassis cover Replacing a memory module CAUTION Align the polarization notch of the memory module with the key in the connector when you insert a memory module Figure 64 Replacing a mem...

Page 56: ...emory 8M bytes Flash Memory 128K bytes NVRAM PCB Version Ver A Basic Logic Version 1 0 Extend Logic Version 1 0 Basic BootWare Version 1 00 Extend BootWare Version 1 00 FIXED PORT CON Hardware Ver A D...

Page 57: ...ostic information The output is too much and omitted here Sysname display diagnostic information Save or display diagnostic information Y save N display Y N n running CPU usage information Current CPU...

Page 58: ...tion data or archive information which includes the module name serial number MAC address and vendor name Sysname display device manuinfo Slot 0 DEVICE_NAME SR6602 X2 DEVICE_SERIAL_NUMBER NONE MAC_ADD...

Page 59: ...ule in slot 0 1 in last 5 seconds Average CPU usage in the last five seconds after the router boots the router calculates and records the average usage at the interval of five seconds 1 in last 1 minu...

Page 60: ...d is operating properly Size M Storage capacity of the CF card Displaying the operational status of the built in fan Use the display fan command to display the operational status of the built in fan S...

Page 61: ...enable either port the other port is automatically disabled You can select to activate a port as needed Configuration prerequisites Use the display interface interface type interface number command to...

Page 62: ...ace The Maximum Transmit Unit is 1500 Internet Address is 66 1 1 1 24 Primary IP Packet Frame Type PKTFMT_ETHNT_2 Hardware Address 000f e200 0004 IPv6 Packet Frame Type PKTFMT_ETHNT_2 Hardware Address...

Page 63: ...information To identify transceiver modules you can use the following command to view the key parameters of the transceiver modules including transceiver module type connector type central wavelength...

Page 64: ...n maintain the current status of the router facilitating fault location To solve system faults Step Command Remarks 1 Enter system view system view N A 2 Optional Specify the system fault solving meth...

Page 65: ...ding and maintaining the startup configuration file or configuration file for the router you need to reboot the router To reboot a router use one of the following methods Use the reboot command to reb...

Page 66: ...te One minute before the rebooting time the router prompts REBOOT IN ONE MINUTE and reboots in one minute If you are performing file operations when the router is to be rebooted the system does not ex...

Page 67: ...x B LEDs To troubleshoot the problem contact your local sales agent RUN LED fast flashes Five minutes after the router is powered on if the RUN LED still fast flashes at 8 Hz it indicates that the sys...

Page 68: ...system log immediately Flashing fast at 8 Hz The system is seriously faulty An immediate action is needed RUN green Off No power is input or the router is faulty Flashes at 1 Hz The router is operatin...

Page 69: ...CHANGES TO FAILURE Trap 1 3 6 1 4 1 25506 8 35 12 1 6 hh3cfanfailure fan ID is 1 Dec 9 09 57 12 560 2011 H3C DEVM 3 FAN_ABSENT Fan 1 is absent The output indicates that the fan tray is not in position...

Page 70: ...configuration terminal displays boot information when the router is powered on If the setup is incorrect the configuration terminal displays nothing or garbled text No terminal display If the configur...

Page 71: ...ge level password loss depends on the state of password recovery capability see Figure 65 Password recovery capability controls console user access to the device configuration and SDRAM from BootWare...

Page 72: ...alidating Press Ctrl B to enter extended boot menu 2 Press Ctrl B within three seconds after the Press Ctrl B to enter extended boot menu prompt message appears BootWare password Not required Please p...

Page 73: ...After the configuration skipping flag is set successfully the following message appears Flag Set Success 2 When the EXTEND BOOTWARE menu appears again enter 0 to reboot the router The router starts u...

Page 74: ...tion 0 Reboot Ctrl Z Access EXTEND ASSISTANT MENU Ctrl C Display Copyright Ctrl F Format File System Enter your choice 0 9 8 The router deletes the user privilege level password configuration commands...

Page 75: ...ent mode is no password recovery The configuration files will be deleted and the system will start up with factory defaults Are you sure to continue Y N Y Setting Done 3 When the EXTEND BOOTWARE menu...

Page 76: ...LED of the router is red Dec 7 11 17 01 436 2011 H3C DRVMSG 3 TEMP_ALARM CPU temperature is greater than alarm upper limit in slot 0 index is 0 To view the high temperature threshold and critical tem...

Page 77: ...rom remote TFTP server please wait File not found To solve this problem type the correct file name 3 The configuration of the network port is incorrect Can t connect to the remote host To solve this p...

Page 78: ...e input BootWare password If you select 1 on the main BootWare menu the system displays the following information Starting to get the main application file flash main bin The main application file doe...

Page 79: ...d product which includes the SR6602 X1 and SR6602 X2 Chassis views Figure 66 SR6602 X1 front view 1 1000 Mbps Ethernet port 2 CF card slot CF CARD 3 CF card LED 4 Status LED 5 USB port 6 Reset button...

Page 80: ...le port CONSOLE 10 Management Ethernet port MANAGEMENT 11 FIP slot slot 1 Figure 68 SR6602 X1 X2 rear view 1 Power module slots PWR1 PWR2 2 Grounding screw 3 Grounding sign 4 Fan tray Dimensions and w...

Page 81: ...ystem power consumption SR6602 X1 160 W SR6602 X2 160 W Card power consumption FIP 10 10 8 W to 32 16 W FIP 20 10 36 W to 54 6 W Fan tray power consumption 21 23 W to 43 43 W Interface module power co...

Page 82: ...5 Power switch Table 27 AC power module specifications Item Specification Model PSR300 12A Rated voltage range 100 VAC to 240 VAC 50 Hz or 60 Hz Maximum input current 4 A Maximum power 300 W DC power...

Page 83: ...specifications Figure 71 Fan tray 1 Handle Table 29 Fan tray specifications Item Specification Model RT FANF Automatic speed adjustment Supported Fool proof design Supported Hot swapping Supported No...

Page 84: ...program AUX port Table 32 AUX port specifications Item Specification Connector RJ 45 Standard compliant Asynchronous EIA TIA 232 Baud rate 9600 bps default to 115200 bps Services Connects the serial p...

Page 85: ...100 Mbps half full duplex 1000 Mbps full duplex NOTE The media dependent interface MDI standard is typically used on the Ethernet port of network adapters The media dependent interface crossover MDI...

Page 86: ...0 1550 nm LC 9 125 m single mode optical fiber 155 Mbps 80 km 49 71 miles SFP GE SX MM850 A 850 nm LC 62 5 125 m multi mode optical fiber 1250 Mbps 0 55 km 0 34 miles SFP GE LX SM1310 A 1310 nm LC 9 1...

Page 87: ...rate LAN PHY 10 3125 Gbps WAN PHY 9 95328 Gbps Table 38 Transceiver modules for the SFP ports Model Central wavelength Connector type Fiber type Max transmission distance SFP XG SX MM850 A 850 nm LC...

Page 88: ...References for FIP operations Operation Reference Install and remove the FIP See Installing a FIP module and Replacing a FIP module Install and remove MIMs See Installing a MIM and Replacing a MIM Con...

Page 89: ...ee Connecting an Ethernet cable Connect optical fibers See Connecting a fiber cable Technical specifications Item Specification HIM 2 HIMs supported MIM 2 MIMs supported Hot swapping Supported Interfa...

Page 90: ...a non H3C CF card red green PWR1 Off The power module is not in position Steady green The power module is supplying power properly Steady red No power is input or the power module is faulty when PWR2...

Page 91: ...link is present Steady yellow A 10 100 Mbps link is present ACT Off No data is being received or transmitted Flashing yellow Data is being received or transmitted yellow green SFP0 through SFP3 Off No...

Page 92: ...s not in position Steady green The fan tray is working properly Steady red The fan tray is faulty red ALM Off The system is operating properly and there is no alarm Steady red A fault has occurred In...

Page 93: ...1000 Mbps link is present Flashing green Data is being received or transmitted at 1000 Mbps Steady yellow A 10 100 Mbps link is present Flashing yellow Data is being received or transmitted at 10 100...

Page 94: ...blem Steady green The power input is normal green Off No power is output or the power module has an output problem Steady green The power output is normal Figure 79 DC power module LED Table 45 DC pow...

Page 95: ...y bent plugged and unplugged the curvature radius should be at least 10 times the cable s outer diameter The curvature radius of a high speed cable for example SFP cable should be at least five times...

Page 96: ...r tips When you route cables through sharp sheet metal penetration points or along sharp edges of mechanical parts use bushings or take any other action to protect the cables from being cut or abraded...

Page 97: ...r come in contact with sharp edges or heated areas Use high temperature cables near heat sources Securely fasten cables and take adequate measures to prevent loose connections Figure 83 Securely faste...

Page 98: ...metal parts of the crimped cold pressed terminal blocks such as circuit breaker cannot protrude beyond the blocks Cable routing example Cables on an SR6602 X router can be routed as shown in Figure 84...

Page 99: ...t on the SR6602 X2 NOTE In Figure 85 through Figure 86 the blue numbers represent slot numbers of the SR6602 X routers Available slots for FIP 10 FIP 20 Card SR6602 X1 SR6602 X2 FIP 10 Slot 1 Slot 1 F...

Page 100: ...the interface on the HIM MIM For each type of interface the sequence number Z starts from 0 on the HIM MIM Example A MIM 2GBE module is installed on the FIP 10 in slot 1 GigabitEthernet interfaces on...

Page 101: ...ray specifications 74 FIP LEDs 84 FIP module failure 59 FIP 10 79 FIP 20 80 Flexible interface platform modules 78 G General cabling requirements 86 Grounding the router 10 H HIM MIM failures 61 HIM M...

Page 102: ...recommendations 1 Safety recommendations 39 Saving the current configuration of the router 55 Slot arrangement 90 Software upgrade failures 68 Solving system faults 55 Storage media 72 U Unpacking the...

Reviews: