background image


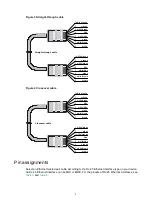
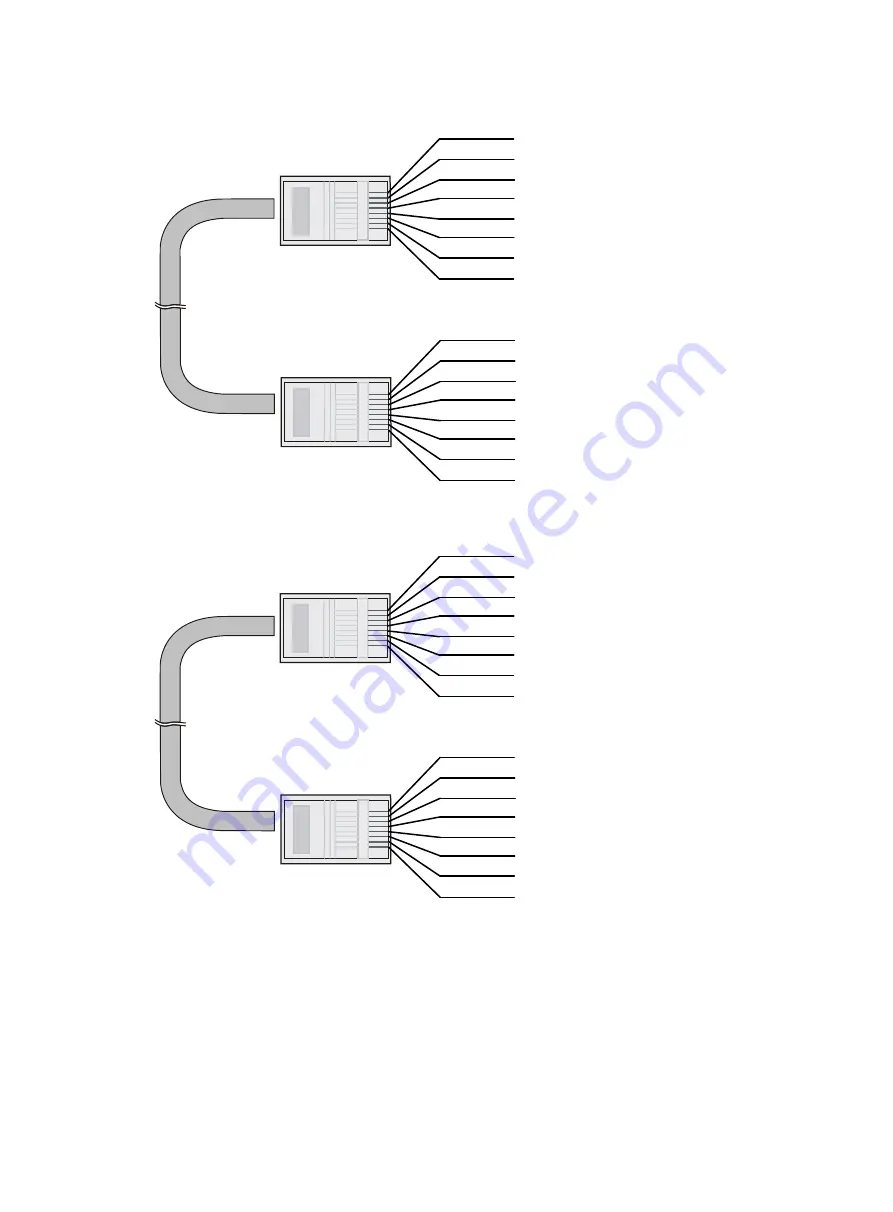
Figure 3 Straight-through cable 


Figure 4 Crossover cable 


Pin assignments 

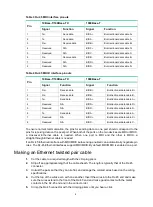
Select an Ethernet twisted pair cable according to the RJ-45 Ethernet interface type on your device. 
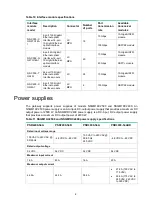
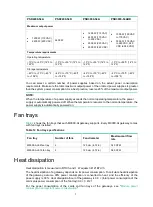
An RJ-45 Ethernet interface can be MDI or MDIX. For the pinouts of RJ-45 Ethernet interfaces, see 

Table 3

 an

Table 4

. 

Straight-through cable

white/orange

orange

white/green

blue

white/blue

green

white/brown

brown

1

2

3

4

5

6

7

8

white/orange

orange

white/green

blue

white/blue

green

white/brown

brown

1

2

3

4

5

6

7

8

Crossover cable

white/orange

orange

white/green

green

white/orange

orange

white/green

blue

white/blue

green

white/brown

brown

1

2

3

4

5

6

7

8

blue

white/blue

white/brown

brown

1

2

3

4

5

6

7

8

Summary of Contents for SecPath M9000-AI-E8

Page 1: ...H3C SecPath M9000 AI E8 E16 Multi Service Security Gateway Series Installation Guide New H3C Technologies Co Ltd http www h3c com hk Document version 6W105 20220319...

Page 2: ...e property of their respective owners Notice The information in this document is subject to change without notice Every effort has been made in the preparation of this document to ensure accuracy of t...

Page 3: ...ntation feedback Audience This documentation is intended for Network planners Field technical support and servicing engineers Network administrators working with the M9000 AI security gateway series C...

Page 4: ...iption WARNING An alert that calls attention to important information that if not understood or followed can result in personal injury CAUTION An alert that calls attention to important information th...

Page 5: ...curity module such as a firewall load balancing NetStream SSL VPN IPS or ACG module Examples provided in this document Examples in this document might use devices that differ from your device in hardw...

Page 6: ...i Contents Chassis views 1 M9000 AI E8 1 M9000 AI E16 2...

Page 7: ...upervisor engine modules SEMs interface switch modules interface modules AI security engine modules service modules switching fabric modules fan trays and power supplies M9000 AI E8 Figure 1 Front vie...

Page 8: ...No power supplies are provided with the gateway Purchase power supplies yourself Determine the number of power supplies based on the system power consumption Fan tray section No fan trays are provided...

Page 9: ...tallation of service modules or interface modules Switching fabric module section No switching fabric modules are provided with the gateway Purchase switching fabric modules yourself Only slots 10 and...

Page 10: ...tly install an AI security engine module on the slot of the gateway Install a service module on the slot of the interface switch module Install an interface module on the slot of the interface switch...

Page 11: ...tions 1 Electricity safety 1 Handling safety 1 ESD prevention 1 Laser safety 2 Examining the installation site 2 Weight support 2 Space 2 Cooling 3 Power 4 Lightning protection 5 Temperature 5 Humidit...

Page 12: ...ngrounded power extension cables missing safety grounds and wet floors Locate the emergency power off switch in the room before installation so you can quickly shut power off when an electrical accide...

Page 13: ...sure the floor can support the total weight of the rack chassis and accessories Additionally the floor loading plan must also consider system expansion such as adding more modules For more information...

Page 14: ...e screw of the fan tray at the chassis rear Figure 1 Rack dimensions Cooling The gateway uses front to rear airflow for heat dissipation Plan the installation site for the gateway based on its airflow...

Page 15: ...t voltage is stable and within the acceptable range allowed by the gateway Enough batteries are available to ensure uninterrupted device operation in the event of a power failure For the power supply...

Page 16: ...to a high temperature environment dry the chassis before powering it on to avoid short circuits If the temperature in the equipment room is too high too low or changes dramatically the device reliabi...

Page 17: ...ents as shown in Table 5 Table 5 Harmful gas limits in an equipment room Gas Max mg m 3 SO2 1 0 H2S 0 5 NH3 3 0 Cl2 0 3 NO2 1 0 EMI Electromagnetic interference EMI might be coupled from the source to...

Page 18: ...ies Pre installation checklist Table 6 Pre installation checklist Item Requirements Result Installation site Load bearing The floor or ground at the installation site can support the sum of the weight...

Page 19: ...rotective earthing systems of the communication power supplies use the same earthing conductor set with the protective earthing system of the communication devices Temperature 0 C to 45 C 32 F to 113...

Page 20: ...gateway 10 Installing cable management brackets for an M9000 AI E16 gateway 10 Installing modules 12 Installing supervisor engine modules 12 Installing switching fabric modules 15 Installing interfac...

Page 21: ...ateway and no debris exists inside or around the rack The mounting position of the gateway on the rack has been identified As a best practice install the gateway at the bottom of the rack The total he...

Page 22: ...Yes Ground the gateway Check before and after power on Operating correctly End Power off the gateway Troubleshoot the gateway Install modules Rack mount the gateway Connect signal cables Install fan t...

Page 23: ...rail model Adjustment range Occupied space M9000 AI E8 87 4 kg 192 68 lb LSVM1BSR10 630 to 900 mm 24 80 to 35 43 in 1 RU M9000 AI E16 187 2 kg 412 70 lb LSXM1BSR 630 to 900 mm 24 80 to 35 43 in 1 RU R...

Page 24: ...actice remove all fan trays from the chassis before rack mounting the gateway To remove a fan tray 1 Wear an ESD wrist strap and make sure it is reliably grounded 2 Loosen the captive screws by using...

Page 25: ...ny attempt to carry the gateway by this part might cause equipment damage or even bodily injury After you place the gateway on the slide rails do not leave go of your hands immediately because this mi...

Page 26: ...ith the front of the rack 4 Use multiple people at least four people as a best practice to lift the gateway by holding the chassis handles 5 Place the gateway on the slide rails from front of the rack...

Page 27: ...first install the air filter doors and then install an air filter and a top hood on the M9000 AI E16 gateway Only the M9000 AI E16 gateway supports air filters and top hoods To install an air filter a...

Page 28: ...8 Figure 8 Installing a top hood 3 Position the air filter over the top hood and then push the air filter until it is seated into the top hood Figure 9 Installing an air filter...

Page 29: ...in or lightning rod To ground the gateway 1 Unpack the grounding cable 2 Remove the grounding screws from the grounding holes at the rear of the chassis 3 Use grounding screws to attach the two hole g...

Page 30: ...rackets after you mount the gateway in the rack The gateway comes with three types of cable management brackets LA LB RB and RA and two types of cable guides LA and RA Figure 11 Cable management brack...

Page 31: ...ket with the lettering facing upward and then position the cable management bracket on the mounting bracket 3 Align the captive screws on the cable management bracket with the holes in the mounting br...

Page 32: ...hen you install two SEMs for the gateway For the standby SEM to operate correctly make sure the active and standby SEMs are the same model If you install two SEMs for the gateway you can hot swap the...

Page 33: ...e SEM steadily into the slot along the guide rails 4 Rotate the handle downward Make sure the SEM makes close contact with the backplane 5 Fasten the captive screws on the SEM Figure 14 Installing a S...

Page 34: ...ily into the slot along the guide rails 4 Fully open the ejector levers of the SEM 5 Continue to push the SEM by its front panel until the ejector levers make close contact with the slot edges 6 Close...

Page 35: ...ric modules for 1 1 redundancy When you install a switching fabric module avoid damaging the connectors on it Installing a switching fabric module for an M9000 AI E8 gateway 1 Face the rear panel of t...

Page 36: ...nnector side of the switching fabric module Figure 18 Removing the protection box 2 Remove the filler panel from the target switching fabric module slot Keep the removed filler panel secure for future...

Page 37: ...module on an interface switch module 1 Wear an ESD wrist strap and make sure the wrist strap is reliably grounded 2 Remove the filler panel from the target slot Put your forefinger and thumb into the...

Page 38: ...To install an interface switch module 1 Wear an ESD wrist strap and make sure the wrist strap is reliably grounded 2 Remove the filler panel from the target interface switch module slot service modul...

Page 39: ...As a best practice install six fan trays for the gateway To install a fan tray in a slot in the upper row orient the fan tray with the LED at the bottom To install a fan tray in a slot in the lower ro...

Page 40: ...y Make sure N M is not larger than the total number of power supply slots N is the number of DC power supplies Provide a circuit breaker or fuse for power input of each DC power supply Make sure each...

Page 41: ...the power supply along the guide rails into the slot until the latch locks the power supply in place Figure 23 Installing a power supply M9000 AI E16 gateway Connecting a DC power cord WARNING Before...

Page 42: ...000 54AHD AC power supplies are available for the gateway Table 3 Table 4 and Table 5 describe the specifications of PSR2400 54A PSR3000 54A and PSR3000 54AHD AC power supplies respectively Table 3 PS...

Page 43: ...supply configuration based on the power input mode Make sure the total output power of the power supplies is greater than the system power consumption with a 20 power surplus as a best practice As a...

Page 44: ...gure 25 Removing a filler panel M9000 AI E16 gateway 2 Correctly orient the power supply 3 Align the power supply with the power supply slot Then slide the power supply along the guide rails into the...

Page 45: ...pplies based on the system power consumption and the HVDC power supply configuration based on the power input mode As a best practice configure N N dual power sources HVDC power supply redundancy Make...

Page 46: ...module and fiber cable 1 Wear an ESD wrist strap and make sure the wrist strap is reliably grounded 2 Remove the dust plug from the target fiber port 3 Pull the bail latch on the transceiver module u...

Page 47: ...ector Figure 29 Installing a transceiver module and fiber cable with MPO fiber connector Optional Installing air filter doors The M9000 AI gateway supports air filter doors For more information about...

Page 48: ...ding cable are securely connected No switch or fuse is installed on the grounding cable The power cords are connected reliably and no short circuit has occurred in power input and output Power cords g...

Page 49: ...les installed on the gateway to indicate their operating status For more information about LEDs see Appendix C LEDs Is the ground resistance value acceptable Is the input voltage normal Power on the g...

Page 50: ...methods 1 Logging in from the Web interface 1 Logging in from the console port 1 Setting up the configuration environment 1 Setting terminal parameters 2 Verifying the configuration 2 Logging in throu...

Page 51: ...as follows Username admin Password admin Management Ethernet port and its IP address The management Ethernet interface is M GigabitEthernet 0 0 0 and its IP address is 192 168 0 1 24 To log in to the...

Page 52: ...ting gateway first disconnect the gateway end Figure 1 Setting up the configuration environment M9000 AI E8 Setting terminal parameters To configure and manage the gateway through the console port you...

Page 53: ...t function 3 Enter VTY user line view and configure the authentication mode user role and common properties By default the authentication mode is scheme the username is admin and the password is admin...

Page 54: ...ting methods 1 Configuration terminal issues 1 No terminal display 1 Garbled terminal display 2 Power supply failure 2 Fan tray failure 3 SEM failure 4 Switching fabric module failure 4 Interface swit...

Page 55: ...the CLI you can use the related commands to display hardware information locate hardware failures and examine statistics for exceptions If any configuration error is found re configure the gateway or...

Page 56: ...t or output status LED is off or not steady green the power supply is faulty Solution To resolve the issue 1 If the input status LED is off the power supply has transitioned to self protection state E...

Page 57: ...ate a fan tray failure M9000 AI E8 gateway The FAN OK LED on the SEM is off and the FAN FAIL LED is on If the fan trays on an M9000 AI E8 gateway are operating correctly the FAN OK LED on the SEM is o...

Page 58: ...he SEM to reset the SEM After the SEM is reset verify that the ACTIVE LED is on 4 If the issue persists contact H3C Support Switching fabric module failure Symptom The RUN ALM LED for a switching fabr...

Page 59: ...D of an interface connected to the network is off Solution To resolve the issue 1 Verify that the SEM interface module or service module where the interface resides operates correctly For more informa...

Page 60: ...e 1 Replacing a SEM 1 Replacing a switching fabric module 2 Replacing an interface switch module or AI security engine module 4 Replacing an interface module or service module 5 Replacing a transceive...

Page 61: ...t to install a new module in a slot after removing the old one install a filler panel in the slot for adequate heat dissipation and dust prevention Before removing a module first remove the cables fro...

Page 62: ...antistatic mat 6 Install a new SEM For the installation procedure see Installing the gateway Figure 2 Removing a SEM from an M9000 AI E16 gateway Replacing a switching fabric module Replacing a switc...

Page 63: ...ching fabric module from an M9000 AI E8 gateway Replacing a switching fabric module for an M9000 AI E16 gateway 1 Prepare an antistatic mat for placing the removed switching fabric module 2 Wear an ES...

Page 64: ...interface switch module 2 Wear an ESD wrist strap and make sure it makes good skin contact and is reliably grounded 3 Pivot down the ejector levers of the interface switch module 4 Use a Phillips scr...

Page 65: ...g the removed interface module 2 Wear an ESD wrist strap and make sure it makes good skin contact and is reliably grounded 3 Remove the interface switch module where the interface module resides For t...

Page 66: ...the optical fiber from the transceiver module To remove the optical fibers with an LC connector press the clips on the connector to pull the LC connector out of the port as shown in Figure 7 To remov...

Page 67: ...ay To avoid bodily injury do not touch the spinning fans when you replace the fan tray When you hot swap a fan tray the fan rotation speed of the remaining fan trays automatically increases and the fa...

Page 68: ...e the fan trays one after another and finish replacing each fan tray within 3 minutes To replace a fan tray 1 Prepare an antistatic mat for placing the removed fan tray 2 Wear an ESD wrist strap Make...

Page 69: ...hassis wait until the status LED on it is off To avoid being hurt allow a power supply to cool before removing it Power supply is also called power module in this document To avoid device damage and b...

Page 70: ...he latch on the power supply towards the handle direction and pull the power supply part way out of the slot 6 Holding the power supply handle with one hand and supporting the power supply bottom with...

Page 71: ...compatibility matrixes 1 Supervisor engine modules 1 Switching fabric modules 1 AI security engine modules 1 Interface switch modules and interface modules 2 Transceiver modules 2 Power supplies 2 DC...

Page 72: ...e M9000 AI gateways and switching fabric module models Table 2 Switching fabric module and gateway compatibility Switching fabric module model Applicable gateway NSQM5FAB08A1 M9000 AI E8 NSQM5FAB16A1...

Page 73: ...bnormal flow cleaner module NS ADEEMPA0 application delivery engine module NS ADEEMPC0 application delivery engine module M9000 AI E8 For more information about the interface switch modules interface...

Page 74: ...0404A0RL 3 m 9 84 ft 3 1 5 mm 0 002 in High voltage DC power cord Used on the PSR3000 54AHD power supply AC power cord AC power cords are used for connecting the power supplies of the gateway to the e...

Page 75: ...consumption and system power consumption 2 Card power consumption 2 Fan tray power consumption 3 System power consumption 3 Modules 4 Supervisor engine modules 4 AI security engine modules 4 Service...

Page 76: ...in 243 mm 9 57 in 278 4 mm 10 96 in NSQM5FAB16A1 4 kg 8 82 lb 39 8 mm 1 57 in 284 4 mm 11 20 in 520 6 mm 20 50 in NSQM5AIASKA1 9 64 kg 21 25 lb 50 mm 1 97 in 432 6 mm 17 03 in 512 3 mm 20 17 in NSQM5...

Page 77: ...5 67 in 263 mm 10 35 in 97 mm 3 82 in M9000 AI E16 fan tray 1 75 kg 3 86 lb 128 mm 5 04 in 367 mm 14 45 in 90 mm 3 54 in Module power consumption and system power consumption Card power consumption Th...

Page 78: ...ion Maximum fan tray power consumption M9000 AI E8 fan tray 14 W 255 W M9000 AI E16 fan tray 75 W 264 W System power consumption The system power consumption of the gateway depends on the type and num...

Page 79: ...gory 5 twisted pair cable NSQM5SUP16A1 Ports One console port One mini USB console port reserved for future use One USB port reserved for future use Two management Ethernet copper ports Two management...

Page 80: ...e Two console ports RJ 45 Two USB ports reserved for future use USB Two management Ethernet copper ports RJ 45 NS AFC2000EMPA 1 Anomaly flow cleaner module Two console ports RJ 45 Two USB ports reserv...

Page 81: ...100 Gigbit Ethernet optical interface module LC MPO 6 100 Gbps QSFP28 module Power supplies The gateway supports power supplies of models NSQM1AC2500 and NSQM1DC2400 An NSQM1AC2500 power supply is an...

Page 82: ...ply exceeds the normal operating temperature the power supply is automatically powered off When the temperature recovers to the normal temperature the power supply is automatically powered on Fan tray...

Page 83: ...ure levels are different when the fan speeds are different For more information see Table 7 Table 13 Sound pressure levels Model Sound pressure level under normal temperature Sound pressure level when...

Page 84: ...s 3 NSQM5AIASKA1 NSQM5AIASKB1 AI security engine module LEDs 3 LEDs on other service modules 4 Switching fabric module LEDs 4 NSQM5FAB08A1 switching fabric module LEDs 4 NSQM5FAB16A1 switching fabric...

Page 85: ...t Ethernet copper port LEDs 3 SEM active standby status LED 4 Card status LEDs 5 Power status LEDs 6 Fan tray status LEDs Figure 2 NSQM5SUP16A1 SEM LEDs 1 Fan tray status LED 2 Power status LED 3 Card...

Page 86: ...D on the NSQM5SUP16A1 Status Description Steady green The power supplies are operating correctly Steady red A power supply is faulty Off The gateway is not powered on Fan LEDs Each SEM provides a fan...

Page 87: ...eeded the upper warning threshold or dropped below the lower warning threshold Steady on Steady on The card is in boot state or has failed Off Off The card is not present Table 8 Description for the c...

Page 88: ...e operation status for the module Table 10 LED description for other service modules LED Status Description CPU running status LED RUN ALM Flashing green at 8 Hz The CPU is loading software Flashing g...

Page 89: ...or the switching fabric module Table 13 NSQM5FAB16A1 switching fabric module LED description LED Status Description RUN ALM Steady green The switching fabric module is operating correctly Steady red T...

Page 90: ...an tray is faulty Power supply LEDs The PSR2400 54A PSR2400 54D and PSR3000 54A power supplies each have one AC OK LED and one DC OK LED to indicate its operating status The PSR3000 54AHD power supply...

Page 91: ...f protection state Green The power supply does not have power input OUT OK Green The power supply is outputting power correctly Amber The power supply is in an over temperature condition Red The power...

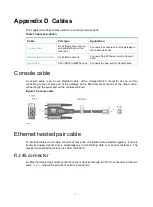
Page 92: ...thernet twisted pair cable 1 RJ 45 connector 1 Cable pinouts 2 Cable type 2 Pin assignments 3 Making an Ethernet twisted pair cable 4 Optical fiber 5 Optical fiber 5 Optical fiber cable 5 Patch cord 5...

Page 93: ...is an 8 core shielded cable with a crimped RJ 45 connector at one end for connecting to the console port of the gateway and a DB 9 female connector at the other end for connecting to the serial port...

Page 94: ...t a maximum speed of 100 Mbps with a bandwidth of 100 MHz Category 5e Transmits data at a maximum speed of 1000 Mbps with a bandwidth of 100 MHz Category 6 Transmits data at a speed higher than 1 Gbps...

Page 95: ...RJ 45 Ethernet interfaces see Table 3 and Table 4 Straight through cable white orange orange white green blue white blue green white brown brown 1 2 3 4 5 6 7 8 white orange orange white green blue wh...
Page 96: ...Bi directional data cable C To ensure normal communication the pins for sending data on one port should correspond to the pins for receiving data on the peer port When both of the ports on the two dev...

Page 97: ...ad Period of force Tensile load N Crush load N mm Short period 150 500 Long term 80 100 Optical fiber cable An optical fiber cable is a cable containing one or more optical fibers The optical fiber el...

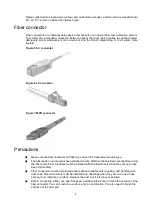
Page 98: ...onnector and fiber type match the transceiver module type The fiber ports on some cards have shielded covers Remove the shielded covers before using the fiber ports Fiber interfaces must be installed...

Page 99: ...minimum static bend radius is 10 D D indicates the outer diameter of dust caps If the fiber has to pass through a metallic board hole the hole must have a sleek and fully filleted surface the filleti...

Page 100: ...i Contents Appendix E Slot arrangement and interface numbering 2 Card slot arrangement 2 Example 4 Interface numbering 4 Example 4...

Page 101: ...2 Appendix E Slot arrangement and interface numbering Card slot arrangement Figure 1 Card slot arrangement for the M9000 AI E8...

Page 102: ...M9000 AI E8 Supervisor engine module SEM slots slots 4 and 5 At the left edge of the slot Slots for interface switch modules and service modules slots 0 through 3 At the left and right edges of the sl...

Page 103: ...interface W IRF member device ID X Number of the slot where the card resides For more information about the slot number on the gateway see Table 1 Y Number of the slot where the subcard resides on the...

Page 104: ...aces on the interface module are numbered as shown in the output of the display interface Ten GigabitEthernet brief command Sysname display interface Ten GigabitEthernet brief Brief information on int...

Page 105: ...Affixing labels 3 Affixing a label to a network cable 3 Affixing a label to a power cord 4 Affixing a generic label 5 Affixing a label to a device 5 Guidelines 5 Examples 6 Engineering labels for twi...

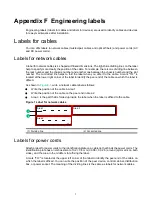
Page 106: ...fy the peer end of the cable on which the label is affixed As shown in Figure8 1 write a network cable label as follows Write the position of the cable in Area 1 Write the position of the cable on the...

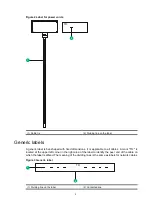
Page 107: ...ns It is applicable to all cables A mark TO is located at the upper left corner in the right area of the label to identify the peer end of the cable on which the label is affixed The meaning of the di...

Page 108: ...two nibs Be sure to use the smaller nib to write labels Affixing labels After printing or writing a label remove the label from the bottom page and affix it to the network cable or the identification...

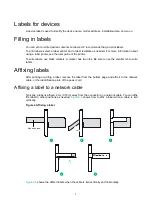
Page 109: ...s bundled 2 cm 0 79 in away from the connector You can affix the label to other positions as needed Figure8 6 shows how to affix a label when a cable is laid horizontally Figure 6 Affixing a label Bin...

Page 110: ...cable For the example of affixed labels see Figure8 8 Figure 8 Affixing a generic label Affixing a label to a device Remove the device label and stick it to the device You can stick a device label to...

Page 111: ...down and left right order with two digits for example 01 MN Z MN Rack number M Row number of the rack in the equipment room in the range of A to Z N Column number of the rack in the equipment room in...

Page 112: ...at connects two devices Table 2 Information on labels affixed to the fiber between two devices Content Meaning Example MN B C D R T MN Rack number M Row number of the rack in the equipment room in the...

Page 113: ...column number of ODF M Row number of the rack in the equipment room in the range of A to Z N Column number of the rack in the equipment room in the range of 01 to 99 For example G01 is the ODF of Row...

Page 114: ...net and distribution box BC identifies the row and column number of the 48V connector if there is no row number or column number or the connector can be identified without them BC can be omitted RTN a...

Page 115: ...overed with insulating sheath so the labels only need to contain AC and the cabinet number The labels for AC power cords are affixed to one side of the identification plates on cable ties Table 5 Info...

Page 116: ...11 You can fill in the device name model IP address serial number installation address and installation date on a device label Figure 14 Example of a device label...

Page 117: ...i Contents Appendix G Cabling recommendations 1 Routing cables 1 Routing power cords 1 General cabling requirements 2 Prerequisites 2 Cable management guidelines 2...

Page 118: ...ng power cords When you route power cords take consideration of the layout of the equipment room including the locations of the power distribution cabinet AC power receptacles and lightning protection...

Page 119: ...at least 20 times the fiber s diameter When the fiber is attached the curvature radius of the fiber should be at least 10 times the fiber s diameter NOTE The fiber s diameter refers to the outer diame...

Page 120: ...0 51 in After binding the cables cut the excess from the ties leaving no sharp or angular tips See Figure 2 Figure 3 Cutting cable ties When you bend cables bind them as shown in Figure 3 To avoid ex...

Page 121: ...to fasten the connecting terminals Bind together cables that are the same type and routed in the same direction Table 1 lists the cable bundling specifications Table 1 Tie binding parameters Cable bu...

Page 122: ...Removing the grounding cable 1 Removing the twisted pair and optical fiber 1 Repackaging the gateway 2 Repackaging a power supply 2 Repackaging a card 2 Repackaging the gateway chassis 2 Optional Rem...

Page 123: ...crew on the power cord and then pull out the plug Removing the console cable 1 Pull the RJ 45 connector of the console cable out from the console port of the gateway 2 Pull the DB 9 connector of the c...

Page 124: ...aterials are clean dry and not damaged 2 Remove the transceiver modules if any from the card If no transceiver module is installed on the card go to the next step For how to remove a transceiver modul...

Page 125: ...y If possible use a mechanical lift to move the gateway To remove the chassis from the rack 1 Prepare the wooden carton and packing bag of the chassis Make sure the carton and bag are clean dry and no...

Page 126: ...t the chassis onto the pallet base of the wooden carton Repackaging the gateway chassis 1 Align the left and right edges of the chassis bottom with the left and right positioning lines respectively on...

Page 127: ...brackets align with the mounting holes on the wooden pallet base Use screws to attach the L type brackets to the wooden pallet base as shown by callout 2 in Figure 3 4 Cover the chassis with the packi...

Page 128: ...is top and make sure the mounting brackets seat into the internal notches of the foam cushion 7 Fit the accessory box into the notch of the foam cushion near to the rear end of the chassis Then close...

Reviews: