background image

6

1.06 

Assembling before use

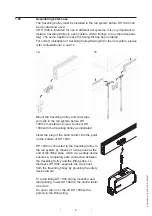
The travelling trolley must be installed in the rail system before DH 1000 can 

be mounted and used.

If DH 1000 is intended for use in different rail systems, it is very important to 

install a travelling trolley in each system. (Extra trolleys to be ordered separa-

tely). The same applies in case the Swing-Kit has been ordered.

For correct installation of travelling trolleys/Swing-Kit in the rail system, please 

refer to illustrations 1a and 1b.

1a   


1b

Mount the travelling trolley and end stops 

correctly in the rail system before DH 

1000 is mounted and used. Connect DH 

1000 with the travelling trolley as illustrated.

Insert the plug of the hand control into the point 

on the bottom of DH 1000.

DH 1000 is connected to the travelling trolley in 

the rail system by means of a snap hook at the 

end of the lifting strap, which via a safety device 

ensures a completely safe connection between 

the travelling trolley and the lifting strap. To 

dismount DH 1000, separate the snap hook 

from the travelling trolley by pressing the safety 

device inward. 

To avoid lifting DH 1000 during mounting and 

dismounting, lower DH 1000 to the floor/a table/

a bed etc.

Do never clip-on or clip-off DH 1000 with a  

person in the lifting sling.

©

 G

ul

dm

an

U

S

-8

90

/0

1/

06

 •

 #

 90067

©

 G

ul

dm

an

U

S

-8

90

/0

1/

06

 •

 #

 90067

Summary of Contents for 12071

Page 1: ...GB US DH 1000 ...

Page 2: ... 8 2 02 Operating the hoist 8 2 03 Safety functions 9 2 04 Recharging connecting the hoist 9 2 05 Connection of Charger 9 2 06 Accessories 10 3 00 Transport 10 4 00 Maintenance and storage 10 4 01 Cleaning the hoist 10 4 02 Storing the hoist 10 4 03 How to prevent avoid corrosion 10 4 04 Maintenance which should be carried out by the owner 11 5 00 Service and Life Span 11 5 01 Life span and servic...

Page 3: ... 1000 is used the assumption is that it will be operated by qualified staff DH 1000 is used in Guldmann rail systems equipped with Guldmann lifting slings Use slings with 4 6 lifting straps designed for use with hooks of min Ø 8 mm Lifting to and from a sitting position When lifting from e g a wheelchair move DH 1000 towards the person to be lifted DH 1000 should be level with the chest and positio...

Page 4: ...lue or red type marking bands run paral lel to the spine The user should not sit on the sling Bring the leg straps along the outer thigh and then under the thigh between the back of the knee and the hip Now cross the leg straps in front of the user All four straps are now ready to be mounted to the lifting hanger Lying position in bed on a mattress or on the floor Turn the user on his side Place th...

Page 5: ...han the lifting capacity of the DH 1000 are to be used The lifting straps must be suitable for hooks with a diameter of minimum 8 mm The lifting slings must be designed for use with four point lifting hooks Guldmann cannot be rendered liable for defects and accidents due to use of a sling manufactured by others 1 05 Unpacking and preparation of the hoist Visual check of hoist Should the packaging ...

Page 6: ... before DH 1000 is mounted and used Connect DH 1000 with the travelling trolley as illustrated Insert the plug of the hand control into the point on the bottom of DH 1000 DH 1000 is connected to the travelling trolley in the rail system by means of a snap hook at the end of the lifting strap which via a safety device ensures a completely safe connection between the travelling trolley and the lifti...

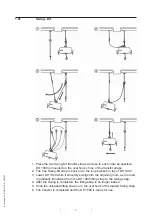
Page 7: ...f DH 1000 3 Lower DH 1000 while it smoothly swings into the adjoining room as the load is gradually transferred from the DH 1000 lifting strap to the Swing strap 4 After the Swing is completed the lifting strap is no longer loaded 5 Hook the unloaded lifting strap on to the oval hook of the loaded Swing strap 6 The transfer is completed and the DH 1000 is ready for use Guldmann US 890 01 06 90067 ...

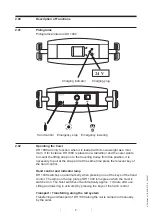
Page 8: ...ssary to pull at the strap and at the same time press the relevant key of the hand control Hand control and indicator lamp DH 1000 switches on automatically when pressing one of the keys of the hand control The lamp on the top plate of DH 1000 turns green when the hoist is switched on The hoist switches off automatically approx 1 minute after use Lifting and lowering is activated by pressing the k...

Page 9: ... have been activated the defect has to be repaired before DH 1000 is ready for operation again Description of the safety strap function The lifting stops automatically when not performed vertically when the lifting strap is twisted or in case of overloading 2 04 Recharging connecting the hoist When the green lamp on the top plate of DH 1000 starts flashing the hoist must be recharged as soon as pos...

Page 10: ...oth 4 02 Storing the hoist DH 1000 should be kept in a dry room where the humidity does not exceed 70 per cent This is why the hoist must never be kept in bathrooms and similar areas DH 1000 should be stored in cool rooms e g a basement DH 1000 should be stored at temperatures below 15 C and the fuses should be removed 4 03 How to prevent avoid corrosion DH 1000 should not be kept remain in damp s...

Page 11: ...neer or by the Guldmann Service Team 5 03 Service check During the inspection a service report shall be made describing what has been checked and exchanged Worn or defective parts shall be replaced by new spareparts from V Guldmann A S 1 Visual check of the product Check the product for wear and tear Check the product for any deformity Check that the product does not show any other dificiencies 2 T...

Page 12: ...hat the plug for the hand control is correctly inserted Check that the emergency stop is not activated Please contact your local Guldmann representative If the green light on the top plate of DH 1000 does not come on when pressing the keys of the hand control Check that the emergency stop is not activated Check that the batteries are charged Check that the charger is on The hand control could be f...

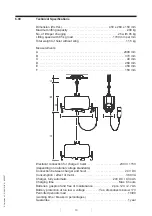
Page 13: ...ical connection for charger hoist 230V 115V depending on national voltage standards Connection between charger and hoist 24V DC Consumption effect of motor 360 VA Charger fully automatic 24V DC 0 34 Ah Charging time Max 6 hours Batteries gasproof and free of maintenance 2 pcs 12V 2 7 Ah Battery protection at too low a voltage Yes disconnects below 17V Permitted periodic load 10 90 working time bre...

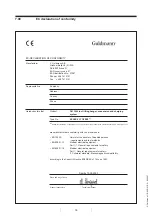
Page 14: ...XX YYYY ZZZZ x x XXXXX Reference No of the product YYYY Serial No of the product in the production year ZZZZ Production year was manufactured in conformity with the provisions in EN 10535 Hoists for the transfer of disabled persons requirements and test methods EN 60601 1 1 Medical electrical equipment Part 1 1 General requirements for safety EN 60601 1 2 Medical electrical equipment Part 1 Genera...

Page 15: ...ce with the specifications set forth in the documentation provided with the equipment The above express warranties are made for a period of 365 days from the date the lifting equipment is delivered to you as the first user Your distributor will replace any lifting equipment which proves defective in materials or workmanship without additional charge on an exchange basis Your distributor will either ...

Page 16: ...ddress for returning the defective item for warranty service or replacement You must insure any defective item being returned because Guldmann does not assume the risk of loss or damage while in transit Do not return items or warranty service to Guldmann The warranties set forth above are in lieu of all other express and implied warranties whether oral written or implied and the remedies set for a...

Page 17: ...00 Århus N Tel 45 8741 3100 Fax 45 8741 3131 E mail info guldmann com www guldmann com Guldmann Inc 5505 Johns Road Suite 700 Tampa FL 33634 Tel 800 664 8834 Tel 813 880 0619 Fax 813 880 9558 E mail info guldmann net www guldmann net Guldmann US 890 01 06 90067 ...

Reviews: