background image

19

ENGLISH

OPERATION ______________________________

Preparation

1  

Remove all packaging and sticker materials and 
dispose of them according to the applicable lo-
cal regulations.

2  

Before using the appliance for the first time, clean 
the appliance (See the “Cleaning and care” sec-
tion).

3  

Make  sure  that  the  appliance  is  in  an  upright 
position and on a stable, flat, clean, dry and non-
slip surface.

Note


7

When  using  the  appliance  for  the  first  time, 

smoke can develop due to production residues. 

However, this does not mean the appliance is 

defective. The first time you switch it on use the 

appliance as you normally would but without 

bread. It is recommended to use the medium 

setting of the browning control 

F

 for heating. 

Ensure for proper room ventilation.

Toasting

1  

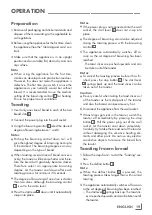
Insert only one slice of bread in each of the two 
bread slots 

B

.

2  

Connect the power plug into the wall socket.

3  

Using the browning control 

F

 select the desired 

degree of browning between 1 and 6.

Notes


7

Pushing the browning control down to 1 will 

give the lightest degree of browning and up to 

6 the darkest. The browning degree can vary 

depending on the type of bread.


7

When toasting several slices of bread consecu-

tively, the toaster will become hotter and there-

fore the bread will gradually become darker. 

Therefore  select  an  appropriate  browning 

degree. Let the toaster cool down after each 

toasting process for minimum 30 seconds.


7

The degree of browning of one slice is darker 

than two slices, although the browning control 

F

 is set to the same level. 

4  

Press the start lever 

B

 down until it automatically 

snaps into place.

Notes


7

If the power plug is not connected into the wall 

socket,  the  start  lever 

B

  does  not  snap  into 

place.


7

The degree of browning can also be adjusted 

during the toasting process with the browning 

control 

F

.

5  

The  appliance  automatically  switches  off  as 
soon as the set degree of browning has been 
reached. 
– The toast slices are pushed upwards and can 

be taken out of the toaster.

Notes


7

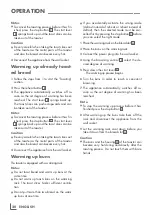
To cancel the toasting process before it has fin-

ished, press the stop button 

C

. The start lever 

B

 springs back up and the toast slices can be 

taken out of the toaster.

Caution


7

Be very careful when taking the toast slices out 

of the toaster as the metal parts of the toaster 

and also the bread can become very hot.

6  

Disconnect the appliance from the wall socket.


7

If toast slices get stuck in the toaster, switch the 

toaster  off  immediately  by  pressing  the  stop 

button 

C

. Pull the power plug out of the wall 

socket. Let the toaster cool down completely. 

Carefully try to take the bread out of the toaster 

without  damaging  the  sensitive  heating  ele-

ments and other parts. Do not use any electro-

conductive objects to remove the bread from 

the toaster.

Toasting frozen bread

1  

Follow the steps from 1 to 4 at the “Toasting” sec-
tion.

2  

Press the defrost button 

D

.

Note


7

When  the  defrost  button 

D

  is  pressed,  the 

toasting process takes longer than with normal 

toasting.

3  

The appliance automatically switches off as soon 
as the set degree of browning has been reached. 

–  The start lever 

B

 springs back up. The toast slic-

es are pushed upwards and can be taken out of 
the toaster.

Summary of Contents for TA 6330

Page 1: ...STAINLESS STEEL TOASTER TA 6330 DE EN FR TR...

Page 2: ......

Page 3: ...3 _________________________________________________________________________________ C B A F G D H E...

Page 4: ...4 DEUTSCH 05 13 FRAN AIS 23 32 ENGLISH 14 22 T RK E 33 40 ________________________________________________________________________________...

Page 5: ...nd Br tchen geeig net 7 7 Das Ger t nicht im Freien oder im Badezimmer benutzen 7 7 Pr fen ob die Netzspannung auf dem Typenschild mit der lokalen Versorgungsspannung bereinstimmt Die einzige M glichk...

Page 6: ...nter keinen Umst n den ffnen F r Sch den auf grund von falscher Benutzung wird keine Haftung bernom men 7 7 Ger t immer von Kindern fern halten 7 7 Dieses Ger t kann von Kindern ab 8 Jahren sowie von...

Page 7: ...e deckt wird 7 7 Papier Pappe oder Kunststoff nicht in oder unter dem Ger t verwenden 7 7 Brotscheiben verwenden die f r die Brotschlitze geeignet sind 7 7 Ger t ausschlie lich mit den mitgelieferten...

Page 8: ...und bei Nichtbenutzung immer von der Stromversorgung tren nen SICHERHEIT UND AUFSTELLEN________________ 7 7 Bei der ersten Inbetriebnahme kann sich aufgrund von Pro duktionsr ckst nden Rauch bilden Di...

Page 9: ...GRUNDIG setzt intern wie auch bei unseren Lieferanten auf ver traglich zugesicherte soziale Ar beitsbedingungen mit fairem Lohn auf effizienten Rohstoffeinsatz bei stetiger Abfallreduzierung von mehr...

Page 10: ...r unungsgrad ist bei einer Scheibe h her als bei zwei Scheiben auch wenn die Br u nungskontrolle F auf der selben Stufe einge stellt ist 4 Starthebel B so weit nach unten dr cken bis er automatisch ei...

Page 11: ...en Aufw rmen von Br tchen Dieser Toaster ist mit einem Br tchenaufsatz ausgestattet Hinweise 7 7 Brot und Br tchen d rfen nicht gleichzeitig ge toastet und aufgew rmt werden 7 7 Keine Toastbrotscheibe...

Page 12: ...__________ Reinigung und Pflege Achtung 7 7 Zur Reinigung des Ger tes niemals Benzin L sungsmittel Scheuermittel oder harte B rsten verwenden 7 7 Weder Ger t noch sein Netzkabel in Wasser oder andere...

Page 13: ...90 597 31 E Mail service grundig com http www grundig com de de support Unter den obengenannten Kontaktdaten erhal ten Sie ebenfalls Auskunft ber den Bezug m gli cher Ersatz und Zubeh rteile GRUNDIG K...

Page 14: ...ponds to your local mains supply The only way to disconnect the appliance from the mains is to pull out the plug 7 7 For additional protection this appliance should be con nected to a household faulty...

Page 15: ...nderstand the haz ards involved Children shall not play with the appliance Cleaning and user mainte nance shall not be made by children without supervision 7 7 Do not leave the appliance unattended wh...

Page 16: ...ects onto the appliance 7 7 This appliance must not be op erated with an external clock timer or separate remote con trol system 7 7 When using for the first time smoke can develop due to production r...

Page 17: ...bread may be very hot 7 7 The toaster can only be switched on when the plug is connected to a wall socket 7 7 Do not use any tools or ob jects in the appliance Metal objects could cause short cir cuit...

Page 18: ...le trading Both internally and for suppliers GRUNDIG insists on contractually guaranteed social working condi tions with fair wages efficient use of raw materials with continuous reduction in waste of...

Page 19: ...browning control F is set to the same level 4 Press the start lever B down until it automatically snaps into place Notes 7 7 If the power plug is not connected into the wall socket the start lever B d...

Page 20: ...ng rack Notes 7 7 Do not toast bread and warm up buns at the same time 7 7 Do not warm up toast slices on the warming rack The toast slices hinder sufficient ventila tion 7 7 Do not put more than two...

Page 21: ...e cable coil on the bottom of the toaster Store the appliance in a cool dry place Make sure the appliance is kept out of the reach of children Compliance with the WEEE Directive and Disposing of the W...

Page 22: ...MATION_ ___________________________ Technical data Power supply 220 240 V 50 60 Hz Power 720 850 W Technical and design modifications reserved This user manual is available for review and download at...

Page 23: ...et r chauffer du pain et des pe tits pains uniquement 7 7 vitez d utiliser l appareil l ext rieur ou dans la salle de bain 7 7 Assurez vous que la tension de secteur figurant sur la plaque signal tiqu...

Page 24: ...n semblable ou une personne agr e afin d viter tout risque Des r parations d fectueuses et non profession nelles peuvent tre sources de danger et de risque pour l utilisateur 7 7 N ouvrez en aucun cas...

Page 25: ...leur gaz du br leur lec trique ou du four chaud 7 7 Le pain peut s enflammer en cas de surchauffe N utilisez jamais l appareil l int rieur ou proximit des com bustibles des endroits des mat riaux et d...

Page 26: ...est correctement ven til e 7 7 Pour viter le risque d incen die retirez fr quemment les miettes du tiroir miettes 7 7 N utilisez pas le grille pain sans son tiroir ramasse miettes 7 7 N utilisez pas...

Page 27: ...nt causer des courts circuits ou chocs lec triques N endommagez pas les l ments chauffant et la m canique 7 7 N utilisez pas l appareil comme source de chaleur 7 7 N essayez pas de sortir le pain quan...

Page 28: ...RUNDIG se concentre sur des conditions de travail sociales avec des salaires justes pour ses em ploy s et ses fournisseurs sur l utili sation efficace de mat riaux bruts avec une constante r duction d...

Page 29: ...um 30 secondes apr s chaque pain grill 7 7 Le degr de brunissage d une tranche est plus lev que celui de deux tranches m me si la commande de brunissage F est r gl e sur le m me niveau 4 Enfoncez le l...

Page 30: ...branchez la prise de la prise murale FONCTIONNEMENT_________________________ R chauffer des petits pains Ce grille pain est quip d une grille de r chauffage int gr e Remarques 7 7 N essayez pas de gri...

Page 31: ...nch et enti rement sec Enroulez le c ble d alimentation autour de l en rouleur de c ble au bas du grille pain Conservez le dans un lieu frais et sec Assurez vous de tenir l appareil hors de port e des...

Page 32: ..._______________ Donn es techniques Alimentation 220 240 V 50 60 Hz Puissance 720 850 W Modifications relatives la technique et la conception r serv es Vous pouvez consulter ou t l charger ce manuel d...

Page 33: ...riliminin yerel e beke gerilimiyle uyumlu olup olmad n kontrol edin Ciha z n elektrik ba lant s n kesme nin tek yolu fi ini ekmektir 7 7 Bu cihaz ilave koruma i in azami 30 mA l k ev tipi bir ka ak ak...

Page 34: ...cihaz n g venli bir ekilde kullan m yla ilgili ola rak g zetim alt nda tutulmalar veya kendilerine talimat veril mesi ve cihaz n kullan m yla ilgili tehlikeleri anlamalar ko uluyla 8 ya ve zeri ocuk l...

Page 35: ...iniz slak veya nemliyken kullanmay n 7 7 Cihaz daima dengeli d z temiz kuru ve kaymayan bir y zey zerinde kullan n 7 7 Cihaz n kullan m esnas nda elektrik kablosunun yanl l kla ekilmesi veya birinin k...

Page 36: ...cihaz eker i eren her hangi bir yiyecek maddesiyle veya re el ya da konserve i e ren r nlerle kullanmay n 7 7 Ekme i tereya gibi a r ak c maddelerle k zartmay n 7 7 Elektrikli par alarla temas elektr...

Page 37: ...tedarik iler i in adil cretlendirme sunan s zle meyle kabul edilmi sosyal al ma ko ullar sa lamay hedef al r Hammaddelerin etkin kullan m ve her y l d zenli olarak plastik at k miktar n birka ton aza...

Page 38: ...a kontrol F ayn seviyede olsa bile bir dilimin k zarma seviyesi iki dilime g re daha y ksektir 4 Otomatik olarak yerine oturana kadar al t rma kolunu B a a ya bast r n K zartma i lemi ba lar Durdurma...

Page 39: ...k k zartma makinesin den kar rken dikkatli olun zira cihaz n metal par alar ve ayr ca ekmek dilimleri de ok s n m olabilir 4 Cihaz n fi ini prizden ekin reklerin s t lmas Bu ekmek k zartma makinesinde...

Page 40: ...du un dan ve tamamen kuru oldu undan emin olun Elektrik kablosunu ekmek k zartma makinesinin alt taraf ndaki kablo halkas na dolay n Cihaz serin ve kuru bir yerde saklay n Cihaz n ocuklar n ula amayac...

Page 41: ......

Page 42: ......

Page 43: ......

Page 44: ...Grundig Intermedia GmbH Thomas Edison Platz 3 D 63263 Neu Isenburg www grundig com 17 46...

Reviews: