background image

12 /EN

Washer-Dryer

 / 

 User Manual

If any leak occurs, turn off the tap and 

remove the nut. Retighten the nut carefully 

after checking the seal. In order to prevent 

the water leaks, keep the taps closed 

when you do not use the product.

3.5 Connecting to the drain

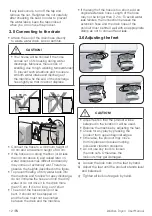
•  Attach the end of the drain hose directly 

to waste water drain, sink or bathtub. 

A

 CAUTION!

•  Your house will be flooded if the hose 

comes out of its housing during water 

discharge. Moreover, there is risk of 

scalding due to high washing temperatures! 

To prevent such situations and to ensure 

smooth water intake and discharge of 

the machine, fix the end of the discharge 

hose tightly so that it cannot displace.

90 cm

 90

40

 90

40

90 cm

90 cm

min.40

90 cm

 90

40

 90

40

90 cm

90 cm

min.40

90 cm

 90

40

 90

40

90 cm

90 cm

min.40

•  Connect the hose to a minimum height of 

40 cm and a maximum height of 90 cm.

•  If the hose is run along the floor (or at less 

than 40 cm above it) and raised later on, 

water drain becomes difficult and laundry 

may come out extremely wet. Therefore, 

observe the heights described in the figure.

•  To prevent flowing of dirty water back into 

the machine and to allow for easy discharge, 

do not immerse the hose end into the dirty 

water or do not drive it in the drain more 

than 15 cm. If it is too long, cut it short.

•  The end of the hose should not be 

bent, it should not be stepped on 

and the hose must not be pinched 

between the drain and the machine.

•  If the length of the hose is too short, add an 

original extension hose. Length of the hose 

may not be longer than 3.2 m. To avoid water 

leak failures, the connection between the 

extension hose and the drain hose of the 

product must be fitted well with an appropriate 

clamp as not to come off and leak.

3.6 Adjusting the feet

A

 CAUTION!

•  Adjust feet so that the product will be 

balanced in the location it will be used.

•  Balance the machine by adjusting the feet.

•  Check for any play by pressing the 

product from upper diagonal edges.

•  Otherwise, the product may move 

from its place and cause crushing, 

noise and vibration problems.

•  Do not use any tools to loosen 

the lock nuts. Otherwise, the 

lock nuts may get damaged.

a)   Loosen the lock nuts on the feet by hand.
b)   Adjust the feet until the product stands level 

and balanced.

c)   Tighten all lock nuts again by hand.

Summary of Contents for GWDE18400W

Page 1: ...2820529340_EN 23 02 21 8 19 Document Number Washer Dryer User Manual GWDE18400W ...

Page 2: ...symbols used throughout this User Manual B DANGER Warning for electric shock DANGER Product weight warning DANGER Fire risk warning A CAUTION Warning for hazardous situations with regard to life and property A PRECAUTION Precautions that need to be taken C INFORMATION Important information or useful hints about usage Read user manual Packaging materials of the product are manufactured from recycla...

Page 3: ...your product C INFORMATION Always have the installation procedures carried out by authorised persons The manufacturer shall not be held liable for damages that may arise from procedures carried out by unauthorised persons 1 1 1 Electrical safety B DANGER If the product has a failure it should not be operated unless it is repaired by the Authorised Service Agent There is risk of electric shock Neve...

Page 4: ...ergents softeners and supplements suitable for washing machines only C INFORMATION Do not install or leave the product in places where it might be exposed to outdoor conditions Do not play with control elements of the product If a non self resetting thermal cut out is required in order to comply with the standard then the instructions for appliances incorporating a non self resetting thermal cutou...

Page 5: ... or power failure the laundry in the machine might be hot Be careful A CAUTION Do not stop the machine before the drying programme is completed If you have to do so remove all laundry place it at an appropriate place and wait for it to cool down Your product is designed to work at temperatures between 0 C and 35 C Ambient temperatures between 15 C and 25 C are suitable for your product Do not let ...

Page 6: ... Check the symbols on the label of the clothes before washing and drying The water supply pressure required to run the product is between 1 to 10 bars 0 1 1 MPa Do not use old or used water inlet hoses on the new product It may cause stains on your laundry 1 2 Intended use C INFORMATION This product has been designed for domestic use It is not suitable for commercial use and it must not be used ou...

Page 7: ...ufactured with high quality parts and materials which can be reused and are suitable for recycling Therefore do not dispose of the product with normal domestic waste at the end of its service life Take it to a collection point for the recycling of electrical and electronic equipment Please consult your local authorities to learn about the nearest collection point 2 Your washer dryer 2 1 Overview 1...

Page 8: ...scharge hose Transit bolts Mains water inlet hose Liquid detergent container User manual Plastic plug group C INFORMATION Figures in this manual are schematic and may not match the product exactly This may be supplied with the machine depending on the model of your product ...

Page 9: ...on is off C INFORMATION SUPPLIER S NAME MODEL IDENTIFIER A A The model information as stored in the product database can be reached by entering following website and searching for your model identifier found on energy label https eprel ec europa eu Rinse Spin Drain Prewash Fast Fast Extra Rinse Extra Water Anti Crease Pet Hair Removal Rinse Hold No Water Drain Soaking Spin No Spin Tap Water Cold S...

Page 10: ...ion location Place the product on a solid and level floor Do not place it onto a carpet with high pile or other similar surfaces Do not place the product close to the edge if the floor contains steps Do not also place the product on a platform Do not place the product on the power cable Do not install the product in environments where the temperature falls below 0 ºC See Warnings for Drying Leavin...

Page 11: ... have your product run smoothly Attach a pressure reducing valve if water pressure is higher A CAUTION Models with a single water inlet should not be connected to the hot water tap In such a case the laundry will get damaged or the product will switch to protection mode and will not operate Do not use old or used water inlet hoses on the new product It may cause stains on your laundry 1 2 1 Connec...

Page 12: ...d in the figure To prevent flowing of dirty water back into the machine and to allow for easy discharge do not immerse the hose end into the dirty water or do not drive it in the drain more than 15 cm If it is too long cut it short The end of the hose should not be bent it should not be stepped on and the hose must not be pinched between the drain and the machine If the length of the hose is too s...

Page 13: ...entifying the terminals on your plug proceed as follows 1 Connect the green yellow or green earth wire to the terminal in the plug marked E or with the symbol f or coloured green and yellow or green 2 Connect the blue neutral wire to the terminal in the plug marked N or coloured black 3 Connect the brown live wire to the terminal in the plug marked L or coloured red With the alternative plugs a 13...

Page 14: ...ys follow the instructions on the package C INFORMATION Laundry that are subjected to materials such as flour lime dust milk powder etc intensely must be shaken off before being placed into the machine Such dusts and powders on the laundry may build up on the inner parts of the product in time and can cause damage Keep laundry items made of Angora wool in a plastic bag in the freezer for a few hou...

Page 15: ... type Weight g Bathrobe 1200 Hand towel 100 Fabric napkin 100 Nightgown 200 Bed sheet 700 Underclothing 100 Bed sheet 500 Men s work shirts 600 Pillowcase 200 Men s shirt 200 Tablecloth 250 Men s pyjamas 500 Towel 200 Blouses 100 4 6 Loading the laundry 1 Open the loading door 2 Place the laundry loosely in the product 3 Push the loading door to close it until you hear a locking sound Ensure that ...

Page 16: ... and quilts it is recommended to use liquid detergent Wash woollens at suggested programme with special detergent made specifically for woollens Please review the programme descriptions part for suggested programme for different textiles All recommendations about detergents are valid for selectable temperature range of programmes A CAUTION Use only detergents manufactured specifically for washing ...

Page 17: ...tween the laundry close to the lower part of the drum in future washings Use the tablet or gel detergent without selecting the prewash function C INFORMATION Before drying remember to remove objects such as the plastic detergent container from the drum 4 7 8 Using laundry starch Add liquid starch powder starch or the fabric dye into the softener compartment Do not use softener and starch together ...

Page 18: ...t dosages recommended for heavily soiled clothes Prefer liquid detergents produced for delicate clothes Woollen and silk clothes must be washed with special woollen detergents Normally Soiled For example stains caused by body on collars and cuffs Powder and liquid detergents recommended for whites can be used at dosages recommended for normally soiled clothes Powder and liquid detergents recommend...

Page 19: ...othes A very small amount of laundry should be loaded Delicate Silk Woollens Cashmere Angora wool etc content Clothes Not recommended Not recommended Not recommended Not recommended Not recommended Bulky laundry such as blankets coats curtains etc Not recommended It is not appropriate to dry bulky laundry in the washer Dry them by hanging them or laying them flat Not recommended It is not appropri...

Page 20: ...0 1200 800 600 a b c d e f g h i j k l m n o p a Temperature indicator b Spin speed indicator c Child lock enabled symbol d Loading door lock engaged symbol e Duration information f Programme follow up indicator g No water indicator h Delayed start enabled indicator i Auxiliary function indicators 2 j Auxiliary function indicator 1 k Drying level indicator l Wireless connection indicator m Remote ...

Page 21: ...heets bedlinen towels bathrobes underwear etc in this programme When you press the quick wash function button programme duration becomes notably shorter but effective washing is ensured thanks to intense washing movements If the quick wash function is not selected superior washing and rinsing performance is ensured for your heavily soiled laundry C INFORMATION You can dry your laundry without any ...

Page 22: ...me will end on the display of the machine If you don t want drying to take place after the programme you have selected press the Drying auxiliary function button until the Drying light turns off Delicates You can use this programme to wash delicate laundry such as cotton synthetic mix knitted clothes or socks Washing movements in this programme are more delicate Set the temperature to 20 degrees o...

Page 23: ...achine Otherwise permanent damage will occur to the machine Downloaded Program This is a special programme that allows you to download different programmes when you want to At the start there is a programme you will see with the HomeWhiz application as default However you can use the HomeWhiz application to select a programme from the predefined programme settings and then change it C INFORMATION ...

Page 24: ... machine If you don t want drying to take place after the programme you have selected press the Drying auxiliary function button until the Drying light turns off Lingerie You can use this programme to wash hand washable delicate clothes or women s underwear Small amount of laundry must be washed in a laundry bag Clasps and buttons must be done up and clothes with zip must be zipped Curtain You can...

Page 25: ... permit you can change the spin speed after the washing cycle has started If they don t permit it you can t do it 5 7 2 Auxiliary function selection for drying When you select a new washing programme press the Drying Level Adjustment button to set the drying option suitable for this programme C INFORMATION If you press the Drying auxiliary function button in programmes where the drying step is not...

Page 26: ...ORMATION When this programme is selected the external Drying auxiliary function cannot be selected In the 5 kg Washing and 5 Drying programme it is recommended to load the machine up to the level shown above for ideal drying conditions you can see the level arrow if you open the loading door Mini Wash Dry Use this programme to wash 0 5 kg of laundry 2 shirts in 40 minutes or 1 kg of laundry 5 shir...

Page 27: ...EN 62512 and energy label test program in accordance with Commission Delegated Regulation EU 2019 2014 These programmes can be used with the HomeWhiz application Energy consumption may increase with connection See the programme description for maximum load EN 1 Auxiliary functions Programme C Max Load kg Water Consumption l Energy Consumption kWh Max Speed Steam Express Anti Crease Drying Selectab...

Page 28: ...els may be added or the existing ones may be removed Spin speed of your machine may vary depending on the programme the spin speed cannot exceed the maximum spin speed of your machine Always select the lowest appropriate temperature The most efficient programmes in terms of energy consumption are generally those that perform at lower temperatures and longer duration Noise and remaining moisture co...

Page 29: ...on conflicting with the first one is selected before starting the machine the function selected first will be canceled and the second auxiliary function selection will remain active An auxiliary function which is not compatible with the programme cannot be selected See Programme and consumption table Some programmes have auxiliary functions that must run together with the selected programme These ...

Page 30: ...s only with the HomeWhiz application When this auxiliary function is enabled you can add up to 4 additional rinse steps to the programme You can select and use some auxiliary functions even though they are not found on your product You can increase and decrease the time of the Cottons and Synthetics programmes within a safe range C INFORMATION When the Specialised Programme auxiliary function is s...

Page 31: ...utton 1 To disable Child Lock Press and hold the auxiliary function button 1 for 3 seconds When the countdown CL 3 2 1 on the display ends Child Lock off icon will disappear Wireless Connection You can use the wireless connection function to pair your machine with your smart device This way you can use your smart device to get information about your machine and control it To activate wireless conn...

Page 32: ...ndicator is illuminated 9 10 11 12 13 14 15 16 8 7 6 5 4 3 2 1 To ensure that the Delayed Start function is enabled and the program ends at the end of the defined duration you should press Start Pause after setting the duration The Start Pause button will stop flashing and remain on 9 10 11 12 13 14 15 16 8 7 6 5 4 3 2 1 If you want to cancel Delayed Start function press the On Off button to turn ...

Page 33: ... 16 Loading door lock There is a locking system on the loading door of the machine that prevents opening of the loading door in cases when the water level is unsuitable Door Locked symbol appears on the display when the loading door is locked Opening the loading door in case of power failure C INFORMATION In case of a power failure you can use the loading door emergency handle under the pump filte...

Page 34: ...ry function spin speed and temperature settings Depending on the step the current programme has reached you can cancel or enable auxiliary functions See Auxiliary function selection Also you can change the spin speed temperature and drying settings See Spin speed selection and Temperature selection C INFORMATION If changes are not allowed an audible warning will be heard If the temperature of the ...

Page 35: ...n the Products page to see the products paired with your account You can pair these products on this page Once the application is installed the Remote Control function allows your washing machine to send you push notifications through your smart device C INFORMATION Please visit www homewhiz com to see the Android and iOS versions supported by the HomeWhiz application Your washing machine will sen...

Page 36: ...rised service provider C INFORMATION You can use your washing machine with more than one smart device To do this download the Remote Control app on the other smart device as well After launching the app you will need to sign in to your account you have previously created and paired with your washing machine Otherwise please read Setting up a washing machine that is connected to someone else s acco...

Page 37: ...ection symbol on the display to track your connection status If the symbol is continuously on you have connection If the symbol is flashing the product is trying to connect If the symbol is off you have no connection A WARNING If the wireless network connection is enabled on your product you can select the Remote Control function If the Remote Control function cannot be selected check the connecti...

Page 38: ...erienced problems will be reduced if it is cleaned at regular intervals 6 1 Cleaning the detergent drawer Clean the detergent drawer at regular intervals every 4 5 washing cycles as shown below in order to prevent accumulation of powder detergent in time 1 Remove the siphon by lifting it from behind as shown in the picture After performing the below mentioned cleaning procedures replace the siphon...

Page 39: ... this way 3 Take out the filters on the flat ends of the water intake hoses together with the gaskets and clean thoroughly under running water 4 Replace the gaskets and filters carefully in their places and tighten the hose nuts by hand 6 5 Draining remaining water and cleaning the pump filter The filter system in your machine prevents solid items such as buttons coins and fabric fibres clogging t...

Page 40: ...he product due to the quality control processes carried out during production This is not a failure water does not harm the machine Water is leaking from the bottom of the machine There might be a problem with the hoses or the pump filter Make sure that the seals of the water inlet hoses are securely fitted Attach the hose to the tap tightly Pump filter might not be closed securely Make sure that ...

Page 41: ... drum Programme time does not countdown The laundry in the machine might be unbalanced The automatic unbalanced load detection system might have been activated due to uneven distribution of the laundry in the drum Machine does not switch to spinning step The laundry in the machine might be unbalanced The automatic unbalanced load detection system might have been activated due to uneven distributio...

Page 42: ...n the main wash compartment got wet while the machine was taking in the prewash water Holes of the detergent compartment might have been blocked Check the holes and clean if they are clogged There might be a problem with the detergent drawer valves Call the Authorised Service Agent Detergent might have been mixed with softener Do not mix the detergent with softener Wash and clean the drawer with h...

Page 43: ...or cannot be opened The door of your machine might not be opening due to safety reasons If the door locked indicator is active on the display after the drying step the machine will keep the door locked for your safety until it cools down The loading door will not open if there is no power To open the loading door open the pump filter cap and pull down the emergency handle positioned at the rear si...

Page 44: ...eover to ensure product safety and to prevent risk of serious injury the mentioned self repair shall be done following the instructions in the user manual for self repair or which are available in support grundig com For your safety unplug the product before attempting any self repair Repair and repair attempts by end users for parts not included in such list and or not following the instructions ...

Page 45: ...llation or use of a product where such installation or use fails to meet the requirements contained in this guarantee or the User Instructions Booklet Repairs to a product operated at any time on commercial or non residential household premises unless we have previously agreed to the installation environment This guarantee is limited to the cost of repairing the product To the extent permitted by ...

Page 46: ...ll not be liable for delays or if it is unable to carry out a repair because a convenient appointment cannot be arranged Will there be any charge for the repairs It is your responsibility to provide evidence to the Engineer that your product is covered by this guarantee with a proof of purchase The Manufacturer reserves the right to charge for the reasonable cost of any service call if You cannot ...

Page 47: ...d 3 To activate your guarantee you MUST register your appliance within 90 days of the original purchase date by visiting Grundig co uk register 4 Customers will receive a unique reference code as proof of guarantee validation by email or post which must be quoted at the time of a claim being made 5 Any repair replacement of the Eco Inverter motor must only be carried out by an authorised Grundig S...

Page 48: ...ging service the area around the product must be easily accessible to the Engineer without the need for cabinets or furniture to be removed or moved It is your responsibility to ensure our Engineers have a clean and safe environment to carry out any repairs Please have your Model number and Serial number available when you call us as you may be required to input your serial number into your teleph...

Reviews: