background image

11

EN

2.5 Compliance with the WEEE regulation and disposing of the 

waste product

This product complies with EU WEEE Directive (2012/19/

EU).  This product bears a classification symbol for waste 

electrical and electronic equipment (WEEE).
This product has been manufactured with high quality 

parts and materials which can be reused and are suitable 

for recycling. Do not dispose of the waste product with normal 

domestic and other wastes at the end of its service life. Take it to 

the collection center for the recycling of electrical and electronic 

equipment. Please consult your local authorities to learn about 

these collection centers.

R290 is an flammable refrigerant. Thus, ensure that the 

system and the pipes are not harmed during operation 

and handling.
Keep the product away from potential heat sources that 

may cause it to ignite in case of damage.
Do not dispose of the product by putting it in fire.

2.6 Compliance with RoHS Directive:
The product you have purchased complies with EU RoHS 

Directive (2011/65/EU).  It does not contain harmful and 

prohibited materials specified in the Directive.

2.7 Package information

Packaging materials of the product are manufactured from 

recyclable materials in accordance with our National Environment 

Regulations. Do not dispose of the packaging materials together 

with the domestic or other wastes. Take them to the packaging 

material collection points designated by the local authorities.

Summary of Contents for GTN 38250 TGCW

Page 1: ...EN www grundig com DRYER USER INSTRUCTIONS GTN 38250 TGCW ...

Page 2: ......

Page 3: ...sounds 18 4 9 Changing the illumination lamp 18 5 Preparation 19 5 1 Laundry suitable for drying in the dryer 19 5 2 Laundry not suitable for drying in the dryer 19 5 3 Preparing laundry for drying 19 5 4 Things to be done for energy saving 19 5 5 Correct load capacity 20 6 Operating the product 21 6 1 Control panel 21 6 2 Display Symbols 21 6 3 Preparing the machine 22 6 4 Programme selection and...

Page 4: ...ay also be applicable for several other models Differences between models will be listed If you have any questions or concerns please call our contact centre or find help and information online at www grundig co uk Explanation of symbols used throughout this User Manual Read the instructions C Important information or useful hints about usage A Warning for hazardous situations with regard to life ...

Page 5: ...erstand the ha zards involved Children shall not play with the appliance Cleaning and user maintenance shall not be made by child ren without supervision Children of less than 3 years should be kept away unless continously supervised Adjustable feet should not be removed The gap between the dryer and the floor should not be reduced with materi als such as carpet wood and tape This will cause probl...

Page 6: ... dryer when it is not in use Unplug the dryer from the mains during installation main tenance cleaning and repair works Do not touch the plug with wet hands Never unplug by pul ling on the cable always pull out by grabbing the plug Do not use extension cords multi plugs or adaptors to con nect the dryer to power supply in order to decrease the risk of fire and electric shock Power cable plug must ...

Page 7: ...ration for fire hazard Below specified laundry or items must not be dried in the dryer considering fire hazard Unwashed laundry items Items soiled with oil acetone alcohol fuel oil ke rosene stain removers turpentine paraffin or pa raffin removers must be washed in hot water with plenty of detergent before being dried in the dryer For this reason especially the items containing the above specified...

Page 8: ... provide enough ventilation in order to prevent ga ses exiting from devices operating with other types of fuels including the naked flame from accumulating in the room due to the back fire effect A Underwear that contains metal reinforcements should not be dried in the dryer Dryer may be damaged if metal reinforcements come loose and break off during drying C Use softeners and similar products in ...

Page 9: ...e lint must not be allowed to accumulate around the tumble dryer 2 2 Mounting over a washing machine A fixing device should be used between the two machines when installing the dryer above a washing machine The fitting device must be installed by the authorized service agent Total weight of the washing machine and the dryer with full load when they are placed on top of each other reaches to approx...

Page 10: ...arisen from in correct usage or transportation The service life of the dryer that you purchased is 10 years During this period original spare parts will be available to operate the dryer properly 2 4 Child safety Packaging materials are dangerous for the children Keep packaging materials away from children Electrical products are dangerous for the children Keep children away from the product when ...

Page 11: ... collection centers R290 is an flammable refrigerant Thus ensure that the system and the pipes are not harmed during operation and handling Keep the product away from potential heat sources that may cause it to ignite in case of damage Do not dispose of the product by putting it in fire 2 6 Compliance with RoHS Directive The product you have purchased complies with EU RoHS Directive 2011 65 EU It ...

Page 12: ... washing For the location of the type label on the dryer C Technical specifications of the dryer are subject to specification without notice to improve the quality of the product C Figures in this manual are schematic and may not match the product exactly C Values stated on markers on the dryer or in the other published documentation accompanying with the dryer are obtained in laboratory in accord...

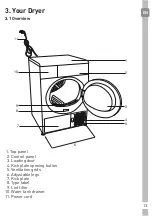
Page 13: ...1 8 7 6 11 4 9 2 3 10 5 1 Top panel 2 Control panel 3 Loading door 4 Kick plate opening button 5 Ventilation grids 6 Adjustable legs 7 Kick plate 8 Type label 9 Lint filter 10 Water tank drawer 11 Power cord 3 1 Overview ...

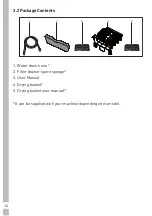
Page 14: ...14 3 2 Package Contents 1 2 3 5 4 1 Water drain hose 2 Filter drawer spare sponge 3 User Manual 4 Drying basket 5 Drying basket user manual It can be supplied with your machine depending on its model ...

Page 15: ...ot be reduced by the materials such as carpet wood and tape Do not cover the ventilation grills of the dryer There must not be a lockable sliding or hinged door that may block the opening of the loading door in the place where your dryer is to be installed Once the dryer is installed it should stay at the same place where its connections have been made When installing the dryer make sure that its ...

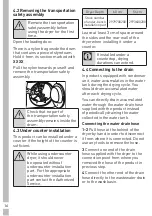
Page 16: ...ch installation part 2979700200 2973600200 Leave at least 3 cm of space around the sides and the rear wall of the dryer when installing it under a counter C If installed under a countertop drying durations can extend 4 4 Connecting to the drain In products equipped with condenser unit water accumulates in the water tank during the drying cycle You should drain accumulated water after each drying c...

Page 17: ... machine by adjusting the feet Turn the feet to left or right until the dryer stands level and firmly C Never unscrew the adjustable feet from their housings 4 6 Electrical connection For specific instructions for electrical connection required during installation see 2 1 1 Electrical Safety 4 7 Transporation of the dryer Unplug the dryer before transporting it Drain all water that has remained in...

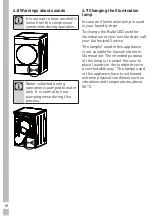
Page 18: ...ase an illumination lamp is used in your laundry dryer To change the Bulb LED used for illumination of your tumble dryer call your Authorized Service The lamp s used in this appliance is not suitable for household room illumination The intended purpose of this lamp is to assist the user to place laundry in the tumble dryer in a comfortable way The lamps used in this appliance have to withstand ext...

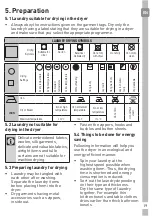
Page 19: ...ry Do not dry clean 5 2 Laundry not suitable for drying in the dryer C Delicate embroidered fabrics woolen silk garments delicate and valuable fabrics airtight items and tulle curtains are not suitable for machine drying 5 3 Preparing laundry for drying Laundry may be tangled with each other after washing Separate the laundry items before placing them into the dryer Dry garments having metal acces...

Page 20: ...ad capacity Follow the instructions in the Programme selection and consumption table Do not load more than the capacity values stated in the table C It is not recommended to load the dryer with laundry exceeding the level indicated in the figure Drying performance will degrade when the machine is overloaded Furthermore dryer and the laundry can get damaged Following weights are given as examples L...

Page 21: ...ting the product 6 1 Control panel 9 1 2 8 7 6 5 4 1 2 3 4 5 6 7 8 16 15 14 13 12 11 10 9 3 Remaining time indicator Filter drawer Heat exchanger cleaning Filter cleaning warning symbol Audio warning Symbol Child Lock warning symbol Water Tank warning symbol End Time Symbol Start Pause symbol Programme progress bar Time that appears on display indicates the remaining time until the end of the prog...

Page 22: ...econd long 4 When your machine is operated for the first time it starts with the default programme wardrobe dryness for cottons C Pressing the On Off Cancel button does not necessarily mean the programme has started Press Start Pause button to start the programme C Airtouch programmes are recommended use for one piece apparel ...

Page 23: ...yProtect It is a long term program that you can use for the clothes baby clothes towels underwear etc cotton you require hygeine Hygiene is provided with high temperature It is especially suitable for durable fabrics This program is identified and approved by England s The British Founda tion Allergy UK 5 800 220 Night silent In this programme the level of noise emitted to the environment will be ...

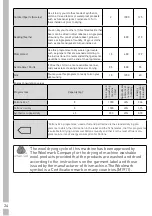
Page 24: ...0 5 800 55 Silk You may use this program to ready to iron your silk laundry 1 5 1200 40 Energy consumption values Programmes Capacity kg Spin speed in washing machine rpm Approximate amount of remaining humidity Energy consumption value kWh Cottons Eco 8 1000 60 2 26 Cottons Iron dry 8 1000 60 1 75 Synthetics cupboard dry 4 5 800 40 0 70 Cottons Eco programme used at full and partial load is the s...

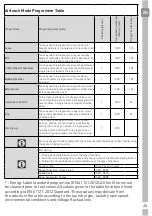
Page 25: ... be dried 1 1200 65 Silk You may use this program to ready to iron your silk laundry delicately A single piece of laundry shall be dried 1 800 75 Flat drying This program allows you to dry clothing such as caps purses canvas shoes or sneakers by setting the time as you desire A single piece of laundry shall be dried with this program You shall not dry your suede or leather shoes using this program...

Page 26: ...e comes to an end Use the Audio Warning Level button to adjust the sound level Airtouch Mode When the Airtouch mode is ON position the Airtouch paddle at the bottom for dry flat and silk programmes Firstly you select compatible Airtouch program with apparel Then press the Airtouch button When Airtouch button is pressed ON will be appear on the screen and switched to the Airtouch mode 1 2 3 4 5 6 7...

Page 27: ...section Water tank When the programme is completed a warning symbol will appear to remind that the water tank needs to be drained If the water tank becomes full while the programme is running the warning symbol will start to flash and machine will pause Drain the water in the water tank and press Start Pause button to resume the programme The warning symbol turns off and the programme resumes oper...

Page 28: ...ion If you want to cancel the End Time countdown and start the programme immediately 1 Press On Off Cancel button for 3 seconds to cancel the programme 2 Press On Off Cancel button to start the programme you have previously selected 6 7 Starting the programme Press Start Pause button to start the programme Start symbol will light up to indicate that the programme has started and symbol in the midd...

Page 29: ...rogramme Adding removing laundry in Pause mode In order to add or take out laundry after the drying programme has started 1 Press Start Pause button to switch the machine to Pause mode Drying process will stop 2 While in Pause mode open the loading door add or take out laundry and close the loading door 3 Press the Start Pause button to start the programme C Any laundry added after the drying proc...

Page 30: ...chine is running activate the ventilation programme to cool it down 6 11 End of programme Lint Filter Cleaning and Water Tank warning symbols light up in the programme follow up indicator when the programme comes to an end The loading door can be opened and the machine becomes ready for a second cycle Press On Off Cancel button to switch off the machine C 2 hour Anti creasing programme will be act...

Page 31: ...ilter and remove it by pulling it upwards Collect the hair fibres and cotton balls with hand or with a soft cloth Remove the second part outer filter by pulling it upwards C Ensure that hair fibre and cotton balls do not fall into the slot where the filters are installed Open both fibre filters inner and outer filters remove the hair fibre cotton balls with your damp hand or a vacuum cleaner or a ...

Page 32: ...d and condensed during drying process and the water that arise accumulates in the water tank Drain the water tank after each drying cycle A WARNING Condensed water is not drinkable Never remove the water tank when the program is running If you forget to drain the water tank the machine will stop during the subsequent drying cycles when the water tank is full and the Water Tank warning symbol will ...

Page 33: ...door move the release latch Clean the fibres on the evaporator with a damp cloth vacuum cleaner with a brush by moving upwards and downwards After the cleaning process is completed place the air router door to its place move the latches to close it and close the toe board A WARNING You can clean by hand provided you wear protective gloves Do not try to clean with bare hands Evaporator fins may dam...

Page 34: ... amount of laundry might be loaded Do not load the drying machine excessively Laundry might not have been wrung adequately Perform a higher speed wringing on the washing machine Drying machine does not turn on or program cannot be started Drying machine does not run after it is configured Power plug might be unplugged Make sure the power cord is plugged in Loading door might be open Ensure that th...

Page 35: ...o their places An audible warning is heard from the machine Fibre filters may not be inserted Insert the interior and exterior filters to their places Evaporator warning icon is flashing Evaporator front side may be clogged with fibres Clean the front side of the evaporator Fibre filters may not be inserted Insert the interior and exterior filters to their places The lighting inside the drying mac...

Page 36: ...ed plug is not suitable for your socket then the plug should be cut off and an appropriate plug fitted The moulded plug on this appliance incorporates a 13A fuse Should the fuse need to be replaced an ASTA approved BS1362 fuse of the same rating must be used Do not forget to refit the fuse cover In the event of losing the fuse cover the plug must not be used until a replacement fuse cover has been...

Page 37: ... If in doubt contact a qualified electrician Green and yellow or green N Blue or black L Brown or red 9 4 Washer dryer combination Do not stack washing machine on top of the tumble dryer This would damage both appliances and guarantees would become void It is also unsafe to stack an appliance on top of another without using a suitable and approved stacking kit obtained from specialist retailers ...

Page 38: ...at full load kWh Energy consumption of the standard cotton programme at partial load kWh Power consumption of the off mode for the standart cotton programme at full load PO W Power consumption of the left on mode for the standart cotton programme at full load PL W The duration of the left on mode min Standard cotton programme 3 Programme time of the standard cotton programme at full load Tdry min ...

Page 39: ...stallation or use of a product where such installation or use fails to meet the requirements contained in this guarantee or the User Instructions Booklet Repairs to a product operated at any time on commercial or non residential household premises unless we have previously agreed to the installation environment This guarantee is limited to the cost of repairing the product To the extent permitted ...

Page 40: ...ill not be liable for delays or if it is unable to carry out a repair because a convenient appointment cannot be arranged Will there be any charge for the repairs It is your responsibility to provide evidence to the Engineer that your product is covered by this guarantee with a proof of purchase The Manufacturer reserves the right to charge for the reasonable cost of any service call if You cannot...

Page 41: ...riod 3 To activate your guarantee you MUST register your appliance within 90 days of the original purchase date by visiting Grundig co uk register 4 Customers will receive a unique reference code as proof of guarantee validation by email or post which must be quoted at the time of a claim being made 5 Any repair replacement of the Eco Inverter motor must only be carried out by an authorised Grundi...

Page 42: ...nging service the area around the product must be easily accessible to the Engineer without the need for cabinets or furniture to be removed or moved It is your responsibility to ensure our Engineers have a clean and safe environment to carry out any repairs Please have your Model number and Serial number available when you call us as you may be required to input your serial number into your telep...

Page 43: ......

Page 44: ...www grundig com 2960312097 080719 0948 Document Number ...

Reviews: