background image

17

ENGLISH

OPERATION

Check whether the mains voltage given on the 
rating plate (on the underside of the appliance) 
matches the local mains voltage.

Preparation

Your  appliance  is  supplied  with  a  dust  bag 
already  fitted.  Once  you  have  assembled  the 
individual parts the appliance is ready to use.

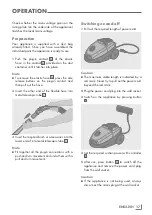
1  

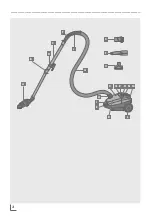
Push  the  plug­in  contact 

G

  of  the  elastic 

hose  in the contact 

H

 provided on the dust 

container until it latches into place.

Note

  To remove the elastic hose 

G

, press the side 

release  buttons  on  the  plug­in  contact  and 
then pull out the hose.

2  

Insert  the  other  end  of  the  flexible  hose  into  
metal telescopic tube 

C

.

3  

Insert the required brush or accessories into the 
lower end of into metal telescopic tube 

C

.

Note

  Fit  together all the plug­in connections with a 

push and turn movement and undo them with a 
pull and turn movement.

Switching on and off

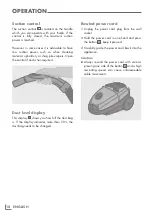
1  

Pull out the required length of power cord.

Caution

  The maximum cable length is indicated by a 

red mark. Never try to pull out the power cord 
beyond the red mark.

2  

Plug the power cord plug into the wall socket.

3  

Switch  on  the  appliance  by  pressing  button 

O

.

4  

Set the required suction power with controller 

P

.

5  

After  use,  press  button 

O

  to  switch  off  the 

appliance  and  remove  the  power  cord  plug 
from the wall socket.

Caution

  If  the  appliance  is  not  being  used,  always 

disconnect the mains plug at the wall socket. 

Summary of Contents for Bodyguard VCC 4950

Page 1: ...CYLINDER VACUUM CLEANER BODYGUARD VCC 4950 EN...

Page 2: ...3 ________________________________________________________ B D A C F J U T S G H I E K L R Q P O N M...

Page 3: ...4 ________________________________________________________ ENGLISH 14 21...

Page 4: ...ance to another room always disconnect the power cord and carry the appliance by the handle Never move the appliance by pulling on the power cord Never operate the appliance without the dust bag or fi...

Page 5: ...ility of at least 5 years for all accessories For a future worth living For a good reason Grundig Controls A Multi floor brush B Switch for height setting C Metal telescopic tube D Holder for accessor...

Page 6: ...sible Suitable for all types of carpets as well as hard floors 1 Push the Multi floor brush G onto the metal telescopic tube C 2 Alter the switch on the Multi floor brush depending on the carpet thick...

Page 7: ...into metal telescopic tube C 3 Insert the required brush or accessories into the lower end of into metal telescopic tube C Note Fit together all the plug in connections with a push and turn movement a...

Page 8: ...ol if and when required Dust level display This display R shows you how full the dust bag is If the display indicates more than 50 the dust bag needs to be changed Rewind power cord 1 Unplug the power...

Page 9: ...tainer Note Test the appliance after changing the dust bag If the indicator R is still red the tools hoses or filter are blocked see following section You should use dust bags from Swirl Type Y 05 for...

Page 10: ...e parts Note The filter in the dust container should be changed every six months or sooner if neces sary The exhaust air filter should be replaced every six to nine months or sooner if necessary Frequ...

Page 11: ...his is indicated by the following symbol on the product in the instructions for use or on the packaging Please contact your local authority to find out where your local collection points are Reusing a...

Page 12: ...Grundig Intermedia GmbH Beuthener Strasse 41 90471 N rnberg www grundig com 72011 908 0700 12 48 AUS GUTEM GRUND...

Reviews: