
PACKAGE CONTENTS
The Silentair compressor comes in two boxes.
Box #1 (Small Box) Contains:
• Compressor Fan –
(#004-693)
• 1 Bottle of Silentair Synthetic Oil,
with Applicator Spout –
(#022-163)
• Silentair Reservoir Bottle
Box #2 (Large Box) Contains:
• Silentair Compressor Assembly,
with Coalescing Filter
• Silentair Regulator / Primary Filter
• 2 Rolls of Nylon Tubing
• Packet of Threaded Fastener*, Short Clear
Hose*, and Black Air Intake Filter —
Attached to Red Cap on Compressor
*Not used for this application.
NOTE: Before using this compressor, read all
instructions to avoid DAMAGE.
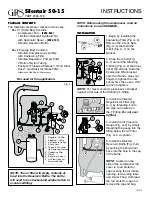
INSTALLATION
1. Begin by installing the
Coalescing Filter (Fig. A–6).
Remove the 2 Lock Nuts
(Fig. A–4) that hold the
U-bolt (Fig. A–7) on the
bracket.
2. Wrap the U-bolt (Fig.
A–7) around the Standing
T-Fitting (Fig. A–2) that rises
out of the air tank. Slide the
Coalescing Filter bracket
onto the threads. Use your
fingers to tighten the nuts
evenly first, then use a 7/16”
wrench to tighten.
NOTE: For most secure fit, place back of bracket
against a flat side of the Standing T-Fitting.
3. Install the Silentair
Regulator Air Filter (Fig.
A–1) by threading it onto
the pipe nut located on
the T-Fitting. Do not over
tighten!
4. Install the Air Pressure
Gauge (Fig. A–3) by simply
threading the gauge into the
fitting below the Air Filter
(Fig. A–1) as shown.
5. Install the Silentair
Reservoir Bottle (Fig. A–9)
by pushing the bowl drain
hose into the hole in the cap
of the bottle.
NOTE: Located on the
side of the compressor top
cover is a red protector
cap covering the air intake
opening, red warning label
and zip-lock bag. Unthread
the red protector cap and
remove the tag and bag.
Silentair 50-15
PART #004-678
INSTRUCTIONS
5
7
6
8
9
1 Regulator Air Filter
2 Standing T-Fitting
3 Air Pressure Gauge
4 2 Lock Nuts
5 Tubing B Connector
(to Engraving System)
6 Coalescing Filter
7 U-Bolt
8 Buffer Air Tubing A
9 Air Filter Clean-out
Reservoir Bottle
NOTE: The air filter will empty contents of
bowl into the Reservoir Bottle. The bottle
will need to be checked and emptied often to
avoid overfilling.
Fig. A
7
4
7
4
6
2
5
7
6
8
9
5
7
6
8
9
LIT-073