


-36-
Model G1014Z/G1014ZX (Mfd. Since 08/22)
Figure 58. Example of miter sanding.
Figure 59. Example of angle sanding.
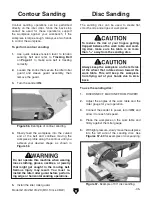
Note: To prevent burning the workpiece and over-
loading the sanding disc, move the workpiece
slowly back and forth from the left side of the
sanding disc to the center.
Figure 60. Example of sanding round workpiece.
Vertical Sanding
If the sanding belt frame is in the horizontal posi-
tion, proceed to
Setting up Sander for Vertical
Sanding. If the sander is already in the vertical
position, skip to
Performing Vertical Sanding
on
Page 38.
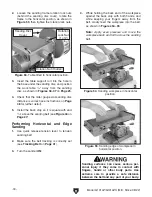
Figure 61. Location of top rotation lock nut.
Top Rotation Nut
Figure 62. Location of bottom rotation lock nut.
Bottom
Rotation Nut
Setting Up Sander for Vertical
Sanding
1. Make sure the sanding belt is tensioned—if it
is not already tight.
2. Make sure the belt tracking is correctly set
(see
Tracking Belt on Page 41).
3. DISCONNECT MACHINE FROM POWER!
4. Remove the back stop and miter gauge from
the work table.
5. Loosen the sanding frame rotation lock nuts
(behind the sanding disc cover) as shown in
Figures 61–62.


