


-50-
Model G0899 (Mfd. Since 10/20)
SECTION 5: SHOP MADE SAFETY
ACCESSORIES
Easily made from scrap stock, featherboards
provide an added degree of protection against
kickback, especially when used together with
push sticks. They also maintain pressure on the
workpiece to keep it against the fence or table
while cutting, which makes the operation easier
and safer because the cut can be completed with-
out the operator’s hands getting near the blade.
The angled ends and flexibility of the fingers allow
the workpiece to move in only one direction.
Making a Featherboard
This sub-section covers the two basic types of
featherboards: 1) Those secured by clamps, or 2)
those secured with the miter slot.
Material Needed for Featherboard
Hardwood
3
⁄
4
" x 3" x 10" (Minimum)
Hardwood
3
⁄
4
" x 6" x 28" (Maximum) ..................1
Additional Material Needed for Mounting
Featherboard in Miter Slot
Hardwood
3
⁄
8
" x (Miter Slot Width) x 5"L ...........1
Wing Nut
1
/
4
"-20 ..................................................1
Flat Head Screw
1
⁄
4
"-20 x 2" ...............................1
Flat Washer
1
⁄
4
"-20..............................................1
To make a featherboard:
1. Cut a hardwood board approximately
3
⁄
4
" thick
to size. The length and width of the board
can vary according to your design. Most
featherboards are 10"–28" long and 3"–6"
wide. Make sure the wood grain runs paral-
lel with the length of the featherboard, so the
fingers you will create in
Step 3 will bend
without breaking.
2. Cut a 30º angle at one end of the board.
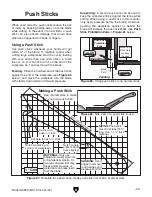
Featherboards
A
B
30°
2"-3"
1
⁄
16
"-
1
⁄
8
"
Kerf
1
⁄
16
"-
1
⁄
8
"
Kerf
2"-3"
10" (Minimum)
Initial Cut
Progressively
Longer Cuts
3
⁄
8
"
3
⁄
8
"
Figure 79. Patterns for featherboards (top view).
3. Make a series of end cuts with the grain
3
⁄
8
"–
1
⁄
4
" apart and 2"–3" long, as shown in
Figure 79 (A). Alternatively, start cuts at 2"-3"
deep, then make them progressively deeper,
as shown in
Figure 79 (B).
IMPORTANT: Cuts made across the grain result
in weak fingers that easily break when flexed.
When made correctly, the fingers should with-
stand flexing from moderate pressure. To test the
finger flexibility, push firmly on the ends with your
thumb. If the fingers do not flex, they are likely too
thick (the cuts are too far apart).
We recommend using a bandsaw for mak-
ing fingers in the next step because it tends
to be safer. A table saw can be used, but it
will over-cut the underside of the ends, pro-
duce a thicker kerf, and require you to stop
the blade half-way through the cut, which
can be dangerous.
Only Steps 1–3 are required to make a
clamp-mounted featherboard. Refer to Page
52 for instructions on clamping.
Summary of Contents for G0899
Page 92: ......