background image

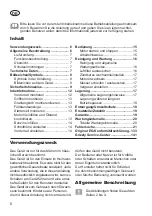
BRM 42-141 T-OHV Trike

Originalbetriebsanleitung

Traduction de la notice d’utilisation originale

Tłumaczenie oryginalnej instrukcji obsługi

Vertaling van de originele gebruiksaanwijzing

Translation of the original instructions for use

Traduzione delle istruzioni per l’uso in originale

Překlad originálního návodu k obsluze

Originalios eksploatavimo instrukcijos vertimas

Benzinrasenmäher

Tondeuse à gazon à essence

Spalinowa kosiarka do trawy

Benzinegrasmaaier

Petrol lawn mower

Tosaerba a benzina

Benzinová travní sekačka

Benzininė vejapjovė

DE

NL

FR

PL

GB

CZ

LT

IT

Summary of Contents for BRM 42-141 T-OHV Trike

Page 1: ...ng Translation of the original instructions for use Traduzione delle istruzioni per l uso in originale Překlad originálního návodu k obsluze Originalios eksploatavimo instrukcijos vertimas Benzinrasenmäher Tondeuse à gazon à essence Spalinowa kosiarka do trawy Benzinegrasmaaier Petrol lawn mower Tosaerba a benzina Benzinová travní sekačka Benzininė vejapjovė DE NL FR PL GB CZ LT IT ...

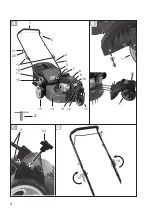
Page 2: ...19 19 D 1 2 3 5 6 7 8 9 10 11 12 13 4 14 11 15 16 17 18 19 27 23 3 29 21 11 28 2 ...

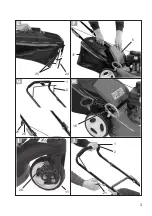
Page 3: ...21 2 1 25 24 17 16 11 26 21 20 2 1 5 3 ...

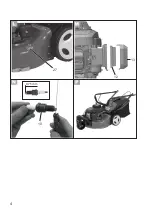
Page 4: ...0 75 mm 10 12 13 27 4 ...

Page 5: ...ginalnej instrukcji obsługi 39 Vertaling van de originele gebruiksaanwijzing 55 Translation of the original instructions for use 71 Traduzione delle istruzioni per l uso in originale 86 Překlad originálního návodu k obsluze 102 Originalios eksploatavimo instrukcijos vertimas 117 NL FR PL GB CZ LT IT ...

Page 6: ...ngsintervalle 20 Fehlersuche 21 Verwendungszweck Das Gerät ist nur für das Mähen im häus lichen Bereich bestimmt Das Gerät ist für den Einsatz im Heimwer kerbereich bestimmt Es wurde nicht für den gewerblichen Dauereinsatz konzipiert Jede andere Verwendung die in dieser Anleitung nicht ausdrücklich zugelassen wird kann zu Schäden am Gerät führen und eine ernst hafte Gefahr für den Benutzer darstel...

Page 7: ...lemme 5 Prallschutz 6 Öltankkappe mit Ölmessstab 7 Tankdeckel 8 Motorabdeckung 9 Auspuffschutz 10 Zündkerzenstecker Zündkerze 11 1 Vorderrad 12 Luftfilter 13 Luftfilterabdeckung 14 Stahlblechgehäuse 15 2 Hinterräder 16 Hebel zur Schnitthöhen Einstel lung 17 Grasfangkorb zweiteilig 18 Füllstandsanzeige 19 2 Feststellhebel zur Holmbefesti gung 20 Starterseil Führung 21 Startergriff mit Seil Schutzei...

Page 8: ...t kann auch zu einer einleitenden Einschätzung der Aus setzung verwendet werden Warnung Der Schwingungsemis sionswert kann sich während der tatsächlichen Benutzung des Ge rätes von dem Angabewert unter scheiden abhängig von der Art und Weise in der das Gerät verwendet wird Es besteht die Notwendig keit Sicherheitsmaßnahmen zum Schutz des Bedieners festzulegen die auf einer Abschätzung der Aus setz...

Page 9: ...Benzineinfüllstutzen Vorsicht Vor dem Start Ölstand prüfen Bildzeichen am Öleinfülldeckel Hinweis auf Öleinfüllstutzen Sicherheitshinweise Dieser Abschnitt behandelt die grundle genden Sicherheitsvorschriften bei der Arbeit mit dem Benzinrasenmäher WARNUNG Lesen Sie alle Sicherheitshinweise und Anwei sungen Versäumnisse bei der Einhaltung der Sicherheitshin weise und Anweisungen können elektrische...

Page 10: ...cht während des Einfüll vorgangs Benzin ist vor dem Starten des Mo tors einzufüllen Während der Motor läuft oder bei heißem Gerät darf der Tankverschluss nicht geöffnet oder Benzin nachgefüllt werden falls Benzin übergelaufen ist darf kein Versuch unternommen werden den Motor zu starten Stattdessen ist das Gerät von der benzinver schmutzten Fläche zu entfernen Jeglicher Zündversuch ist zu ver meid...

Page 11: ...lassen des Mo tors darf das Gerät nicht gekippt wer den es sei denn das Gerät muss bei dem Vorgang angehoben werden In diesem Fall kippen Sie das Gerät nur so weit wie es unbedingt erforderlich ist und heben Sie nur die vom Benut zer abgewandte Seite hoch Starten Sie den Motor nicht wenn Sie vor dem Auswurfkanal stehen Schalten Sie den Motor nach Anwei sung ein und nur dann wenn Ihre Füße in siche...

Page 12: ...ist sollte dies im Freien erfolgen Behandeln Sie Ihr Gerät mit Sorgfalt Halten Sie die Werkzeuge scharf und sauber um besser und sicherer arbei ten zu können Befolgen Sie die War tungsvorschriften Versuchen Sie nicht das Gerät selbst zu reparieren es sei denn Sie besit zen hierfür eine Ausbildung Sämtliche Arbeiten die nicht in dieser Anleitung angegeben werden dürfen nur von von uns ermächtigten ...

Page 13: ...d nehmen Sie den Gras fangkorb 17 heraus 6 Entleeren Sie den Grasfangkorb siehe Kapitel Entsorgung Um weltschutz und montieren Sie ihn wieder Füllstandsanzeige Seitlich am Grasfangkorb 17 ist eine Füllstandsanzeige 18 angebracht Die aerodynamische Luftführung der Klappe sorgt zusätzlich für die optimale Füllung GO Füllstandsanzeige geöffnet Grasfangkorb leer STOP Füllstandsanzeige geschlossen Gras...

Page 14: ...es frisches Benzin Lagern Sie Benzin nicht länger als einen Monat da sich seine Qualität verschlechtert 1 Schrauben Sie den Tankdeckel 7 ab und füllen Sie Benzin bis zur Unter kante des Einfüllstutzens ein Füllen Sie den Tank nicht ganz voll da mit das Benzin Platz zum Ausdehnen hat 2 Wischen Sie um den Tankdeckel Benzinreste ab und schließen Sie den Tankdeckel wieder Schnitthöhe einstellen Das Ge...

Page 15: ...tartergriff langsam in die Starterseil Führung 20 zu rückgleiten Motor stoppen 4 Lassen Sie den Sicherheitsbügel 2 los Der Motor schaltet ab und das Messer wird abgebremst Überprüfen Sie regelmäßig die Messerstoppvorrichtung Lassen Sie den Sicherheitsbügel 2 los Der Motor schaltet ab und das Messer wird abgebremst Das Messer muss innerhalb von 7 Sekunden stoppen Arbeitshinweise Mähen Sie möglichst...

Page 16: ...nach dem Mähen an haftende Pflanzenreste mit einem Holz oder Plastikstück Reinigen Sie insbesondere die Lüftungsöffnungen der Auswurföffnung und den Messerbe reich Verwenden Sie keine harten oder spitzen Gegenstände sie könnten das Gerät beschädigen Ölen Sie von Zeit zu Zeit die Räder Kontrollieren Sie den Rasenmäher vor jedem Gebrauch auf offensichtliche Män gel wie lose abgenutzte oder beschä di...

Page 17: ...r ölwechsel nach etwa 5 Be triebsstunden danach alle 50 Betriebsstunden oder jährlich durch Entsorgen Sie das Altöl umwelt gerecht siehe Entsorgung Um weltschutz 1 Ziehen Sie den Zündkerzenstecker 10 ab siehe Zündkerze warten 2 Öffnen Sie die Öltankkappe 6 und pumpen Sie das Motoröl mit einer Ölpumpe ab 3 Füllen Sie Motoröl nach siehe Inbe triebnahme Messer schleifen austauschen Ziehen Sie den Zün...

Page 18: ...hen Sie die Zündkerze heraus si ehe Kapitel Reinigung und Wartung Zündkerze wechseln einstellen füllen Sie einen Esslöffel Motoröl durch die Zündkerzenöffnung in den Motorraum ziehen Sie das Anwerfseil bei gezo genem Sicherheitsbügel mehrmals langsam zum Verteilen des Öls im Innern des Motors schrauben Sie die Zündkerze wieder fest Entsorgen Sie Altöl und Benzinreste um weltgerecht siehe Entsorgun...

Page 19: ...ureichende Schmierung zurückzuführen sind Folgende Teile unterliegen einem nor malen Verschleiß und fallen deshalb nicht unter die Garantie Schneidein richtung Zündkerzen Kraftstofffilter Luftfilter Starterseil Grasfangkorb Bei Vorliegen eines berechtigten Garantiefalles bitten wir um telefonische Kontaktaufnahme mit unserem Service Center Dort erhalten Sie weitere Infor mationen über die Reklamat...

Page 20: ...iten siehe Reinigung und War tung Vor Nach nach ersten 5 Std nach 8 Std nach 50 Std jähr lich der Arbeit Schrauben Muttern Bolzen prüfen und anziehen Motorölstand Benzinstand kontrollieren und bei Bedarf Motoröl Benzin nachfüllen Bedienungselemente Bereich um Schalldämpfer reinigen Motoröl wechseln Luftfilter austauschena Zündkerze reinigen einstellen austauschen Schalldämpfer und Funken fänger pr...

Page 21: ...r mischung Vergaser von einer Fachwerkstatt einstellen lassen Verrußte Zündkerze 10 Zündkerzen reinigen einstellen oder ersetzen siehe Reinigung und Wartung Motor wird über hitzt Lüftungsschlitze verstopft Lüftungsschlitze reinigen Falsche Zündkerze 10 Zündkerze wechseln Zu wenig Motoröl im Motor Motoröl einfüllen siehe Inbetrieb nahme Arbeitsergebnis nicht zufrieden stellend oder Motor arbeitet s...

Page 22: ...nge Accessoires 35 Garantie 36 Intervalles d entretien 37 Tableau Intervalles d entretien 37 Détection des pannes 38 Utilisation conforme Cet appareil n est destiné qu à la tonte de surfaces de gazon et d herbe allant dans le domaine domestique L appareil est conçu pour une utilisation domestique Il n est pas destiné à une utilisation industrielle continue Toute autre utilisation qui n est pas exp...

Page 23: ...ité et d un guidon repliable Aperçu 1 guidon supérieur 2 barre de sécurité 3 guidon inférieur 4 serre câble 5 protection anti choc 6 bouchon de réservoir d huile avec jauge d huile 7 bouchon du réservoir 8 couvercle du moteur protection des doigts 9 protection du pot d échappement 10 fiche de bougie bougie 11 1 roue avant 12 filtre à air non visible 13 couvercle du filtre à air 14 boîtier en tôle ...

Page 24: ... sont sans enga gement de notre part Par conséquent des prétentions à des revendications juridiques qui se basent sur le manuel d instructions d emploi seront sans effet La valeur totale de vibrations déclarée a été mesurée conformément à une mé thode d essai normalisée et peut être utili sée pour comparer un outil à un autre L indication du fait que la valeur totale de vibrations déclarée peut ég...

Page 25: ...rtie traite des réglementations de sécurité de base lorsque l on travaille avec l appareil Attention l essence est inflam mable Ne pas fumer et maintenir les sources de chaleur à distance Risques de blessure dus à des lames acérées Tenir ses pieds et ses mains éloignés Éteindre le moteur et dévisser les fiches de bougies avant d effectuer des travaux d entretien Attention surfaces brûlantes Risque...

Page 26: ...t pas pris connais sance de la notice La législation locale permet de déterminer l âge minimum de l utilisateur Ne passez jamais la tondeuse alors que des personnes en particulier des enfants ou des animaux se trouvent à proximité Une distraction peut vous faire perdre le contrôle de l appareil N oubliez pas que l utilisateur est res ponsable de tout accident impliquant des personnes ou les objets...

Page 27: ...urez vous toujours du positionne ment stable de l appareil en particu lier sur les côtes les décharges les fossés ou les digues Cela permet de mieux contrôler l appareil dans une situation inattendue Travaillez toujours perpendiculaire ment à la pente jamais en montée ou en descente Soyez particulièrement prudent lorsque vous changez de direction sur une pente Ne tondez pas les pentes extrême ment...

Page 28: ...appareil avant de faire le plein Réduisez les gaz pendant la phase d arrêt du moteur et si celui ci com porte une valve de fermeture de carbu rant coupez l arrivée de carburant à la fin de la tonte Ne laissez jamais l appareil sans sur veillance sur les lieux de travail Ne travaillez jamais avec un appareil abîmé incomplet ou modifié sans autorisation du fabricant L utilisation de machine dans un ...

Page 29: ...as échéant la hauteur de coupe Monter la roue avant 1 Insérez par l intérieur les deux vis dans les entailles présentes sur le carter avant en tôle d acier 14 2 Fixez la roue avant 11 à l aide des deux rondelles et écrous 3 Fixez la roue avant 11 avec les vis et écrous sur la partie supérieure du carter de la ton deuse 14 Monter le guidon 1 Poussez les deux extrémités du longeron poignée inférieur...

Page 30: ...servoir d huile avec jauge 6 et versez de l huile dans le réservoir Le réservoir d huile a une contenance de 500 ml Utilisez une huile de marque SAE 30 ou 10W 30 par exemple 2 Pour contrôler le niveau d huile es suyez la jauge avec un chiffon propre et remettez la entièrement dans le réservoir 3 Lisez le niveau d huile sur la jauge après l avoir ressortie Le niveau d huile doit se situer entre les...

Page 31: ... La bonne hauteur de coupe est de 30 à 45 mm pour un gazon d ornement et de 40 à 65 mm pour un gazon utilitaire Choisir une hauteur plus élevée pour la première tonte de la saison Régler les roues avant En raison de la construction spéciale des roues avant la tondeuse est extrêmement flexible et maniable Celles ci peuvent être réglées comme suit en fonction de la situation 1 Le fait d encranter l ...

Page 32: ... venaient à entrer en contact avec un corps étranger éteignez immé diatement le moteur Attendez que les lames s arrêtent complètement de tour ner et vérifiez que l appareil n a pas été endommagé Ne reprenez le travail que si l appareil n a pas été abîmé Éteignez l appareil lorsque vous effec tuez de longues pauses pendant le tra vail et pour transporter l appareil et atten dez que les lames s arrê...

Page 33: ...trent sinon dans le mo teur et endommagent la machine Maintenez le filtre à air propre 1 Dévissez couvercle du filtre à air 13 et rabattez le 2 Retirez le filtre à air 12 3 Échangez le filtre à air contre un nouveau voir Pièces de rechange 4 Pour le montage placez le nouveau filtre à air 12 dans le couvercle de filtre à air 13 5 Refermez le couvercle du filtre à air et faites le encranter en appuy...

Page 34: ...e optimale Si des réglages postérieurs devaient s avérer nécessaires faites les effectuer par un spécialiste Rangement Conseils généraux de range ment N entreposez pas l appareil avec le sac de récupération rempli Par temps chaud l herbe com mence à fermenter sous l effet de la chaleur Risques d incendie Nettoyez l appareil effectuez son entretien avant de le ranger Laissez le moteur refroidir ava...

Page 35: ...nation protection de l environnement Rapportez l appareil ses accessoires et son emballage pour un recyclage écolo gique Videz soigneusement les réservoirs d essence et d huile et rapportez votre appareil à un centre de récupération Les éléments en plastique et en métal peuvent être triés et recyclés Remettez l huile usagée et les restes d essence aux déchetteries et points de collecte appropriés ...

Page 36: ...e normale et ne sont donc pas concernées par la garantie barre de coupe bougies d allumage filtres à air filtre à carburant câble de starter sac de récupération de l herbe Veuillez n envoyer aucun appareil à nos ateliers de service après vente sans accord téléphonique préalable car sinon vous pourriez avoir à supporter des frais en cas de non acceptation de notre part Attention n envoyez en aucun ...

Page 37: ... pre mières heures au bout de 8 heures au bout de 50 heures une fois par an la tonte contrôler et resserrez les écrous les boulons et les vis Contrôler le niveau d huile d essence et remplir au besoin d huile d essence Nettoyer les éléments de commande la zone autour de l isolation sonore Changer l huile du moteur Échanger les filtres à aira Nettoyer ajuster remplacer les bougies d allumage Contrô...

Page 38: ...rage spécialisé les bougies sont pleines de suie 10 mettre les fiches de bougie en place nettoyer ajuster ou remplacer les bou gies voir Nettoyage et entretien le moteur sur chauffe les ouvertures d aération sont bou chées nettoyer les ouvertures d aération on utilise les mauvaises bougies 10 échanger les bougies pas assez d huile dans le moteur remplir d huile de moteur voir Mise en service résul...

Page 39: ...nych 53 Odszukiwanie błędów 54 Przeznaczenie Urządzenie jest przeznaczone wyłącznie do koszenia muraw i trawników o po wierzchni w otoczeniu domów mieszkal nych Urządzenie jest przeznaczone do amatorskich prac w gospodarstwie domo wym Nie jest ono przeznaczone do sta łego stosowania w celach zarobkowych Każdy inny sposób używania urządzenia który nie jest jednoznacznie określony jako dozwolony w n...

Page 40: ...hronne i nauszniki ochronne Nie wystawiaj urządzenia na desz cz Wybieg noża tnącego Ryzyko kontuzji Okrąg cięcia Poziom ciśnienia akustycznego LWA w dB Przed oddaleniem się od urządzenia wyłączyć silnik Nigdy nie należy kosić gdy w pobliżu znajdują się inne oso by w szczególności dzieci lub zwierzęta Niebezpieczeństwo Trzymaj ręce i nogi w bez piecznej dległości STOP GO Symbole wskaźnik po ziomu n...

Page 41: ...iego wszelkie przedmioty np kamienie kije druty zabawki które mogą zostać uchwy cone i wyrzucone przez urządzenie Ostrzeżenie Benzyna jest bardzo łatwopalna przechowuj benzynę tylko w spe cjalnych przeznaczonych do tego celu pojemnikach Znak nakazu w miejscu wykrzyk nika objaśnienie nakazu z infor macjami na temat zapobiegania szkodom Znak informacyjny ze wskazówka mi ułatwiającymi posługiwanie si...

Page 42: ...ancyjnych Manipulowanie urządzeniem Nie pozwalaj silnikowi spalinowemu pracować w zamkniętych pomieszcze niach w których może się gromadzić trujący tlenek węgla Pracuj wyłącznie przy świetle dzien nym lub przy dobrym oświetleniu sztucznym W miarę możliwości unikaj koszenia mokrej trawy Zwracać zawsze uwagę na bezpiecz ną pozycję szczególnie na zboczach hałdach odpadów rowach i wałach Zapewni to le...

Page 43: ...zenie Wyłącz silnik zawsze gdy zostawiasz urządzenie bez nadzoru przed zatankowaniem paliwa gdy urządzenie nie jest używane Jeżeli silnik zgaśnie wskutek braku paliwa należy zamknąć przepustnicę Nigdy nie zostawiaj urządzenia bez opieki w miejscu pracy Nie pracuj uszkodzonym niekomplet nym lub przebudowanym bez zgody producenta urządzeniem Nie używaj urządzenia do celów nie zgodnych z jego przezna...

Page 44: ...awę Zaciski kabla Akcesoria montażowe do mocowania Uchwytu do obudowy kosiarki Klucz do świec zapłonowych Instrukcja obsługi Opis działania Urządzenie jest napędzane wydajnym sil nikiem 4 suwowym ZongShen General Power Machine XP140 Obsługę urządzenia ułatwiają system Ready Star z ssaniem automatycznym wyposażonym we włącznik temperaturowy napęd na tyl ne koła i funkcja hamowania noża Urządzenie p...

Page 45: ...Parametry akustyki i wibracji zostały okre ślone zgodnie z normami wymienionymi w Deklaracji Producenta Zmiany techniczne i optyczne mogą być wprowadzane bez zapowiedzi w trakcie procesu dalszego rozwoju urządzenia Wszelkie wymiary wskazówki i dane podane w niniejszej instrukcji obsługi są w związku z tym podawane w sposób niewiążący Roszczenia zgłaszane na podstawie treści instrukcji obsługi są n...

Page 46: ...e używaj urządzenia bez prawidłowo założonego ko sza na trawę albo bez zderzaka Niebezpieczeństwo zranienia Składanie kosza na trawę 1 Nasuń plastikowe zaczepy 25 na drążki kosza na trawę Zakładanie kosza na trawę na urządzeniu 2 Podnieś zderzak 5 3 Zawieś kosz na trawę 17 w przewidzianych do tego celu za czepach na tylnej części urzą dzenia 4 Opuść zderzak 5 utrzymuje on kosz w odpowiednim położe...

Page 47: ...enzyny wycieraj rozlaną benzynę Trzymaj benzynę z daleka od iskier otwartego płomienia i innych źródeł zapłonu Nie używaj mieszanki benzyno wo olejowej Używaj bezołowiowej benzyny normalnej lub Super Używaj tylko czystej świeżej benzyny Nie przechowuj benzyny przez okres dłuższy niż miesiąc po nieważ powoduje to pogorsze nie jej jakości 1 Odkręć korek wlewu zbiornika 7 i wlej benzynę do poziomu do...

Page 48: ... nie w wysokiej trawie Upewnij się że mechanizm tnący nie dotyka żadnych przedmiotów ani podłoża Regularnie sprawdzaj poziom ben zyny i oleju patrz Uruchamianie i uzupełniaj je dostatecznie wcze śnie Uruchamianie silnika 1 Pociągnij pałąk zabezpieczają cy 2 w kierunku uchwytu 1 i przytrzymuj go 2 Pociągnij uchwyt rozrusznika 21 3 Gdy silnik zostanie uruchomiony powoli puszczaj uchwyt rozrusz nika ...

Page 49: ...ilniku i odłączonej wtyczce świecy zapłonowej Niebezpie czeństwo zranienia Przed wszelkimi pracami kon serwacyjnymi i oczyszczaniem zaczekaj aż urządzenie wy stygnie Elementy silnika są gorące Niebezpieczeństwo opa rzenia Przy obchodzeniu się z nożem noś rękawice Czyszczenie i ogólne prace z zakresu konserwacji Nie przewracać urządzenia na bok ani do przodu Płyny eksploatacyj ne mogą wypłynąć i mo...

Page 50: ... przeciwnym do kierunku ruchu wskazówek zegara przy pomocy klucza do świec 3 Sprawdź odstęp elektrod przy pomocy szczelinomierza do stępny w handlu specjalistycz nym Odstęp elektrod musi wynosić 0 75 mm 4 W razie potrzeby ustaw odstęp ostrożnie zginając elektrody świecy 5 Oczyść świecę zapłonową szczotką drucianą 6 Zamontuj oczyszczoną i wyre gulowaną świecę zapłonową lub wymień uszkodzoną świecę ...

Page 51: ... miejscu Nie zawijaj urządzenia w worki nylo nowe może w nich powstawać wilgoć i grzyb Aby przechowywane urządzenie nie zajmowało niepotrzebnej ilości miejsca możesz opuścić górny uchwyt prowadzący Odkręć na krętki motylkowe i złóż uchwyt pro wadzący Przechowywanie podczas dłuższych przerw w pracy Nieprzestrzeganie zasad prze chowywania urządzenia może wywołać problemy z rozruchem lub trwałe uszko...

Page 52: ...owania ko mercyjnego W przypadku użytkowa nia komercyjnego wygasają prawa z tytułu gwarancji Z zakresu gwarancji są wykluczone Szkody wywołane przez naturalne zużycie przeciążenie lub nieprawi dłową obsługę Urządzenia używane do prac za robkowych Uszkodzenia powstałe wskutek nie przestrzegania instrukcji obsługi lub niezachowania interwałów czysz czenia Urządzenia w które dokonywano ingerencji tec...

Page 53: ...ny w razie potrzeby uzupeł nienie oleju benzyny Oczyszczenie elementów ob sługowych i okolicy tłumika Wymiana oleju silnikowego Wymiana filtra powietrzaa Oczyszczenie regulacja wy miana świecy zapłonowej Kontrola tłumika i wychwytu iskier Oczyszczenie pneumatyczne go układu chłodzeniaa a przy dużych ilościach pyłu lub silnym zabrudzeniu czyścić częściej Naprawa lub wymiana urządzenia nie powoduje ...

Page 54: ...egularnie przerywa Nieprawidłowo ustawiona mie szanka w gaźniku Zleć wyregulowanie gaźnika specja listycznemu warsztatowi Świeca pokryta sadzą 10 Oczyść wyreguluj lub wymień świe ce zapłonowe patrz Czyszczenie i konserwacja Silnik przegrzewa się Zatkane szczeliny wentylacyjne Oczyść szczeliny wentylacyjne Nieprawidłowa świeca zapłono wa 10 Wymień świecę zapłonową Za mało oleju w silniku Uzupełnij ...

Page 55: ...e gegevens 56 Pictogrammen Symbolen 57 Symbolen op het apparaat 57 Symbolen in de gebruiksaanwijzing 58 Veiligheidsinstructies 58 Ingebruikname 61 Voorwiel monteren 62 Hoofdligger van de handgreep monteren 62 Grasvangmand monteren ledigen 62 Niveau indicator 62 Starterkabel monteren 62 Motorolie ingieten en oliepeil controleren 63 Benzine ingieten 63 Snoeihoogte instellen 63 Voorwielen instellen 6...

Page 56: ... hoofdligger van de handgreep 4 Kabelklem 5 Stootbescherming 6 Olietankdop met oliemeetstaaf 7 Tankdeksel 8 Motorafdekking 9 Uitlaatbescherming 10 Bougiedop Bougie 11 1 voorwiel 12 Luchtfilter 13 Luchtfilterafdekking 14 Plaatstalen behuizing 15 2 achterwielen 16 Hefboom voor de instelling van de snoeihoogte 17 Grasvangmand tweedelig 18 Niveau indicator 19 2 Vastzethefboom ter bevesti ging van de d...

Page 57: ...gemeten en kan ter vergelijking van een stuk gereedschap met een ander gebruikt worden De aangegeven trillingemissiewaarde kan ook voor een inleidende inschatting van de blootstelling benut worden Waarschuwing Afhankelijk van de manier waarop het gereedschap gebruikt wordt kan de trilingemissiewaarde tijdens het effectieve gebruik van het gereed schap van de aangegeven waarde verschillen De noodza...

Page 58: ...len aan de hoofdligger van de handgreep 0 I ON OFF STOP Apparaat stoppen Veiligheidsbeugel loslaten Symbool aan het tankdeksel Aanwijzing op benzinevulpijp Opgepast Vóór de start oliepeil nakijken Symbool aan het olievuldeksel Aanwijzing op olievulpijp Symbolen in de gebruiksaanwijzing Gevaarsymbool met informatie over de preventie van personen of zaakschade Gebodsteken in plaats van het uitroepin...

Page 59: ...bewegende onderdelen vastgegrepen worden Het dragen van geschikte kledij doet het risico voor verwondingen afnemen Controleer het terrein waarop het apparaat gebruikt wordt en verwijder alle voorwerpen bijvoorbeeld stenen stokken draden die vastgegrepen en weggeslingerd kunnen worden Waarschuwing benzine is in hoge mate ontbrandbaar Vuur of ontploffin gen kunnen tot ernstige brandwonden leiden Bew...

Page 60: ... of zonder aan gebouwde beschermingsinrichtingen bijvoorbeeld stootbescherming en of grasvanginrichtingen Daardoor wordt ervoor gezorgd dat de veiligheid van het apparaat gehandhaafd blijft Wijzig de regelaarinstelling van de motor niet of draai deze niet dol U zou het apparaat kunnen beschadigen Voordat u de motor start ontkoppelt u al het snoeigereedschap en alle aan drijvingen Start of activeer...

Page 61: ... te vermijden houdt u motor uitlaat en de zone rond de brandstoftank vrij van gras bladeren of vrijkomend vet olie Controleer regelmatig de grasvang inrichting op slijtage of verlies van de functionaliteit Vervang versleten of beschadigde onderdelen omwille van de veiligheid Vervang defecte geluiddempers Indien de brandstoftank geledigd dient te worden dient dit in de open lucht te gebeuren Behand...

Page 62: ...verwondingen Vangmand monteren 1 Stulp de kunststofstrips 25 over het stangenmechanisme 24 van de vangmand Grasvangmand aan het appa raat aanbrengen 2 Til de stootbescherming 5 op 3 Haak de grasvangmand 17 in de daarvoor voorziene ophan ging aan de achterzijde van het apparaat vast 4 Til de stootbescherming 5 op en neem de grasvangmand uit Vangmand afnemen ledigen 5 Til de stootbescherming 5 op en...

Page 63: ...ne Tankdeksel voorzichtig openen op dat de overdruk kan afnemen Bij het tanken niet roken Huidcontact en het inademen van de dampen vermijden Gemorste benzine verwijderen Benzine op een veilige afstand tot vonken open vlammen en andere ontstekingsbronnen houden Gebruik geen mengsels van ben zine met olie Gebruik loodvrije normale of super benzine Gebruik uitsluitend zuivere benzine Bewaar benzine ...

Page 64: ...orwerpen noch de grond raakt Controleer regelmatig benzine en oliepeil zie Ingebruikname en vul tijdig bij Motor starten 1 Trek de veiligheidsbeugel 2 in de richting van de hoofdlig ger van de handgreep en houd deze tegen 2 Trek aan de startergreep 21 3 Wanneer de motor start laat u de startergreep langzaam terug in de startkabelgeleiding 20 glijden Motor stoppen 4 Laat de veiligheidsbeugel 2 los ...

Page 65: ...or geen water het zou de brandstofin stallatie kunnen verontreinigen Verwijder na het maaien vastklevende plantenresten met een stuk hout of plastic Reinig in het bijzonder de ven tilatieopeningen de uitwerpopening en het bereik van de messen Gebruik geen harde of puntige voorwerpen u zou het apparaat kunnen beschadigen Smeer de wielen van tijd tot tijd met olie in Controleer de grasmaaier telkens...

Page 66: ...rijf suren of jaarlijks Voer de oude olie op milieuvrien delijke wijze af zie Afvalverwijde ring milieubescherming 1 Trek de bougiestekker af 10 ab zie Bougie wisselen instellen 2 Open de dop van de olietank 6 en pomp de motorolie af met een oliepomp 3 Giet motorolie bij zie Ingebruikne ming Mes slijpen uitwisselen Laat een stop mes altijd op een ser vicewerkplaats bijslijpen omdat men daar een co...

Page 67: ... om de olie in het binnenste gedeelte van de motor te verdelen Schroef de bougie weer vast Voer oude olie en benzineresten op milieuvriendelijke wijze af zie Afval verwijdering milieubescherming De benzinetank moet niet geledigd worden wanneer u aan de benzine een brandstofstabilisator toevoegt Afvalverwijdering milieu bescherming Breng het apparaat de toebehoren en de verpakking naar een geschikt...

Page 68: ...rmale slijtage onderhevig en vallen daarom niet onder de garantie snoei inrichting bougies luchtfilter brandstoffilter start kabel grasvangvoorziening Gelieve geen apparaten zonder voor afgaande telefonische coördinatie naar onze servicewerkplaatsen te zenden In het andere geval kunnen u ten gevolge van weigering van acceptatie kosten ten deel vallen Opgelet Stuur ons in geen geval een defecte mac...

Page 69: ...zie Reiniging en onderhoud Vóór na Na eerste 5 uren Na 8 uren Na 50 uren Jaar lijks het werk Schroeven moeren bouten nakijken en aandraaien Motoroliepeil benzinestand controleren en zo nodig motorolie benzine bijvullen Bedieningselementen bereik en ge luiddempers reinigen Motorolie verversen Luchtfilter uitwisselena Bougie reinigen instellen uitwisselen Geluiddempers en vonkenvangers nakijkenb Luc...

Page 70: ...ingesteld carburateur mengsel Carburateur op een servicewerk plaats laten instellen Vol roet gekomen bougie 10 Bougies reinigen instellen of ver vangen zie Reiniging en onder houd Motor wordt oververhit Ventilatiesleuven verstopt Ventilatiesleuven reinigen Verkeerde bougie 10 Bougie wisselen Te weinig motorolie in de motor Motorolie ingieten zie Ingebruik name Resultaat van het werk niet bevredige...

Page 71: ... Longer Breaks from Operation 82 Disposal Environmental Protection 83 Replacement parts Accessories 83 Table maintenance intervals 84 Troubleshooting 85 Intended Use The equipment is intended only for mowing lawns and grass in domestic use This equipment is not suitable for commer cial use Commercial use will invalidate the guarantee Any use other than specifically permitted in these instructions ...

Page 72: ...of burning Caution risk of injury Wear eye and ear protection Cutting width Information of the acoustic power level LWA in dB Switch off the engine when you leave the device Never mow if there are people particularly children or animals near by Danger Keep hands and feet away STOP GO Symbols on the level gauge of the grass collection box Symbols on the handle bar 0 I ON OFF STOP Stop the equipment...

Page 73: ... they do not play with the appliance Do not allow children or other people who are unfamiliar with the operating instructions to use the equipment Local regulations may set a minimum age for the user Do not mow whilst people especially children or animals are nearby If distracted you may lose control of the equipment The operator or user is responsible for accidents or damage to other persons or t...

Page 74: ...nt only at walking speed Take particular care when turning the equipment around or pulling it towards you Stop the cutting tool if the equipment has to be tipped up for transportation over a surface other than grass and when moving the equipment from and to the surface to be mown Do not use the equipment with dam aged safety equipment or guards or with no safety equipment attached e g impact prote...

Page 75: ...ccidents are caused by poorly maintained equipment Do not keep the equipment with petrol in the tank inside a building in which petrol fumes could potentially come into contact with open fire or sparks Allow the engine to cool before plac ing the equipment in enclosed spaces Risk of fire To avoid the risk of fire keep the en gine exhaust and area around the fuel tank free of grass leaves or leak i...

Page 76: ...ble 13 Air filter cover 14 Sheet steel housing 15 2 rear wheels 16 Lever for cutting height adjust ment 17 Grass collection box two parts 18 Level gauge 19 2 Locking lever to fix bar 20 Starter cord guide 21 Starter handle with starter cord Safety Equipment 2 Safety catch The equipment stops when the safety catch is released 5 Impact protection protect the operator from parts that are flung out an...

Page 77: ...utions aimed at pro tecting the user should be based on estimated exposure under actu al usage conditions all parts of the operating cycle are to be consid ered including for example times during which the power tool is turned off and times when the tool is turned on but is running idle Initial Operation Caution Risk of injury from rotating blades Carry out work on the equipment only when the blad...

Page 78: ... cord into the starter cord guide 20 3 Release the safety catch 2 Filling with Engine Oil and Checking the Oil Level Place the equipment on a level base 1 Unscrew the oil filler cap and dipstick 6 and pour oil into the tank Use brand oil e g SAE 30 or 10W 30 2 To check the oil level wipe the dip stick on a clean cloth and replace it in the tank until it stops 3 After pulling it out read off the oi...

Page 79: ...s to the special con struction of the front wheels These are to be adjusted according to the specific situation as follows 1 The alignment of the wheel is fixed once the clamping brack ets 28 snaps into place If the wheel is desired in another running direction lift clamp ing bracket to release it Bring wheel into new position and clamping brackets snaps into place once again 2 Should the front wh...

Page 80: ...d check the equipment for damage Restart work only if the equipment is undamaged Switch off the equipment during long er breaks and for transportation and wait until the blade is stationary Clean the equipment after each use as described in the cleaning and maintenance chapter Cleaning and Maintenance Have any repair and mainte nance work not described in these instructions carried out by a specia...

Page 81: ...oo large will result in a re duction of engine performance 1 Disconnect the spark plug con nector 10 from the spark plug by simultaneously pulling and turning 2 Unscrew spark plug counter clockwise with spark plug socket 3 Check the spark gap using a feeler gauge available from specialist shops The spark gap must be at least 0 75 mm 4 If necessary adjust the gap by carefully bending the ground ele...

Page 82: ...ach of children Do not wrap the equipment in nylon bags as damp and mould could form For space saving storage the up per handle bar can be folded down Release the quick release lever and fold down the handle bar so the equipment takes up less space Storage During Longer Breaks from Operation Non observance of the storage instructions may cause starting problems or permanent damage as a result of f...

Page 83: ...ting instructions from motor manufacturer Briggs Strat ton carefully This guarantee does not affect your legal guarantee rights The respective Briggs Stratton Service is responsible for motor issues of your lawn mower please see attached dealer list If you have any other prob lems please return the equipment intact to your dealer together with pur chase and guarantee certificate The guarantee does...

Page 84: ...nance work listed in the maintenance intervals table Regular maintenance prolongs the life of the equipment It also gives optimum cut ting performance and avoids accidents Table maintenance intervals Maintenance Work See cleaning and mainte nance Before After After 1st 5 Hrs After 8 Hrs After 50 Hrs Annual Work Check and tighten screws nuts and bolts Check the engine oil level petrol level and ref...

Page 85: ...mix Have the carburettor adjusted by a specialist workshop Sooted spark plug 10 Clean adjust or replace the spark plugs see cleaning and maintenance Engine overheats Ventilation holes blocked Clean the ventilation slot Incorrect spark plug 10 Change the spark plug Too little engine oil in the engine Fill with engine oil see initial opera tion Output unsatisfac tory or engine is labouring hard Gras...

Page 86: ...altimento Rispetto dell ambiente 99 Pezzi di ricambio accessori 99 Garanzia 99 Intervalli di manutenzione 100 Tabella intervalli di manutenzione 100 Ricerca dei guasti 101 Uso previsto L apparecchio è concepito esclusivamente per la falciatura di prati in ambito dome stico È adatto all uso per piccoli lavori domestici Non è stato concepito per l im piego aziendale prolungato Ogni altro utilizzo no...

Page 87: ...sponibili tre modalità d impiego la falciatura con cestello raccoglierba la pacciamatura e la falciatura con espulsione laterale dell er ba Panoramica 1 Sbarra impugnatura superiore 2 Staffa di sicurezza 3 Sbarra impugnatura inferiore 4 Fermacavo 5 Protezione antiurto 6 Tappo del serbatoio dell olio con astina di controllo del livello dell olio 7 Tappo carburante 8 Copertura del motore 9 Carter ma...

Page 88: ...ezionamento senza alcun pre avviso Tutte le misure le avvertenze e i dati riportati nelle presenti istruzioni d uso rappresentano pertanto valori indicativi Di conseguenza non si accettano even tuali rivendicazioni in merito alle istruzioni d uso Il valore sulle vibrazioni emesse indicato è stato calcolato conformemente ad una procedura di test ai sensi di legge e può essere sfruttato per confront...

Page 89: ...dell apparecchio Istruzioni di sicurezza Questo paragrafo illustra le norme di sicu rezza fondamentali da seguire per l utiliz zo del tosaerba a benzina Attenzione la benzina è infiammabile Non fumare e tenere lontane le fonti di calore Pericolo di lesioni dovuto alle lame affilate Tenere lontano piedi e mani Prima di ogni lavoro di manutenzi one spegnere il motore e tirare il cappuccio della cand...

Page 90: ... alla protezione antirumore e le disposizio ni locali Misure preliminari Per la falciatura indossare sempre cal zature antiscivolo e pantaloni lunghi Non falciare a piedi nudi o con sandali leggeri L abbigliamento lento i gioielli e i capelli lunghi possono incastrarsi nei componenti mobili dell apparecchio Indossare un abbigliamento consono riduce il rischio di lesioni Controllare il terreno sul ...

Page 91: ...o verso di sé Arrestare l utensile di taglio qualora l apparecchio debba essere ribaltato per trasportarlo su superfici non erbo se e durante il suo spostamento da e verso la superficie da falciare Non utilizzare mai l apparecchio con dispositivi di protezione o griglia di pro tezione danneggiati o in assenza di di spositivi di protezione ad es protezione antiurto e o dispositivi raccoglierba In t...

Page 92: ...cchio all interno di un edificio senza prima aver svuotato la benzina dal serbatoio se esiste la possibilità che vapori di benzina entrino a contatto con fuochi liberi o scintille Lasciare raffreddare il motore prima di riporre l apparecchio in un ambiente chiuso Pericolo di incendio Per evitare di provocare un incendio mantenere il motore la marmitta e l a rea attorno al serbatoio del carburante ...

Page 93: ...zare l apparecchio solo con il raccoglierba completa mente montato e con la protezio ne antiurto Pericolo di lesioni Assemblaggio del raccoglierba 1 Tirare le linguette in plastica 25 lungo le sbarre del racco glierba 24 Applicazione del raccoglierba nell apparecchio 2 Sollevare la protezione antiurto 5 3 Inserire il raccoglierba 17 nell apposito gancio sul retro dell apparecchio 4 Rilasciare la p...

Page 94: ... punto di contrassegno inferiore Rabboccare la benzina Avvertenza La benzina è infiam mabile e dannosa per la salute conservare la benzina in appositi contenitori effettuare il rabbocco solo all aperto e mai con il motore acceso o con la macchina calda aprire il tappo del carburante con cautela in modo da poter scaricare la sovrappressione non fumare durante il rabbocco del la benzina evitare il c...

Page 95: ...o rimanere libere di muoversi sol levare la staffa di serraggio 28 e non innestarla nella rientran za ma collocarla accanto sulla piastra Uso Rispettare la protezione antirumo re e le disposizioni locali Avviamento arresto del motore Avvertenza La benzina è un mate riale infiammabile Avviare il motore mantenendo una distanza di almeno 3 m dal punto di rifornimento Avviare l apparecchio su un terre...

Page 96: ...la candela estratto Pericolo di lesioni Fare raffreddare l apparecchio prima di ogni lavoro di manuten zione e pulizia I componenti del motore sono molto caldi Perico lo di ustione Indossare i guanti per maneggiare la lama Pulizia e lavori di manutenzio ne generali Non ribaltare l apparecchio lateral mente o in avanti I liquidi possono fuoriuscire e il motore potrebbe subire dei danni Tenere sempr...

Page 97: ...una spaz zola metallica 6 Inserire la candela pulita e re golata o sostituire la candela eventualmente danneggiata con una nuova Torch F6RTC alter nativamente Champion RN9Y o NGK BPR 6ES coppia di ser raggio raccomandata 20 Nm Cambio dell olio motore Effettuare il cambio dell olio motore a serbatoio del carburante vuoto e motore caldo Effettuare il primo cambio dell o lio motore dopo circa 5 ore d...

Page 98: ...gare la sbarra impugnatura in modo che l apparecchio occupi poco spazio Conservazione nei lunghi peri odi di inutilizzo In presenza di residui di carbu rante nel carburatore il mancato rispetto delle istruzioni per la con servazione può rendere difficoltoso l avviamento o causare danni per manenti Svuotare il serbatoio della benzina in un locale ben arieggiato Svuotare il carburatore A tal fine av...

Page 99: ...di acquisto e vale solo per il pri mo acquirente L apparecchio non è destinato a un uso commerciale Un eventuale utilizzo commerciale com porta l estinzione della garanzia Sono esclusi dalla garanzia i danni riconducibili all usura natu rale a sovraccarico o a un utilizzo non conforme gli apparecchi impiegati per uso commerciale i danni verificatisi in seguito all inos servanza delle istruzioni pe...

Page 100: ...one sostituzione della candela Controllo di silenziatore e parascintille Pulizia del sistema di raffred damento dell ariaa a Se la presenza di polvere è elevata o in caso di forte imbrattamento effettuare la pulizia più fre quentemente Attenzione non inviare in alcun caso un apparecchio difettoso senza pri ma avere svuotato il serbatoio del carburante e dell olio Il serbatoio deve essere assolutam...

Page 101: ...on eseguita correttamente Far regolare il carburatore da un officina specializzata Candela coperta di fuliggine 10 Pulire regolare o sostituire le candele vedere Pulizia e manutenzione Il motore si surriscalda Bocchette di aerazione intasate Pulire le bocchette di aerazione Candela errata 10 Sostituire la candela Livello di olio motore insufficiente Rabboccare l olio motore vedere Messa in funzion...

Page 102: ...olí 113 Náhradní díly Příslušenství 114 Záruka 114 Intervaly údržby 115 Tabulka intervalů údržby 115 Hledání chyb 116 Účel použití Přístroj je určen pouze pro sekání trávníků a trávy o ploše v domácí oblasti Přístroj je určen pro použití v domácích dílnách Nebyl koncipován pro průmyslové trvalé používání Jakékoliv jiné použití které tento ná vod výslovně nepřipouští může vést k poškození přístroje...

Page 103: ...luchu Ponecháte li zařízení bez do zoru vypněte motor Nikdy nesečte nacházejí li se v blízkosti osoby zejména děti nebo zvířata Průměr střihu Nebezpečí Udržujte si přístroj v dostatečné vzdálenosti od rukou a nohou Přístroj nevystavujte dešti Pozor Doběh nože sekačky na trávu Údaj hladiny akustického tlaku LWA v dB STOP GO Symboly indikace napl nění Symboly na rukojeti 0 I ON OFF STOP Zastavení př...

Page 104: ... aby děti nebo jiné osoby které se neobeznámily s návo dem k obsluze přístroj používaly Míst ními ustanoveními může být stanoven minimální věk uživatele Nikdy nekoste když se v blízkosti nachází osoby zejména děti nebo zvířata Při rozptýlení můžete ztratit kontrolu nad přístrojem Myslete na to že uživatel je zodpovědný za nehody a úrazy s účastí dalších lidí a jejich majetku Dodržujte ochranu prot...

Page 105: ...ke svahu nikdy směrem do svazu nebo ze svahu Buďte obzvláště opatrní jestliže měníte na svahu směr jízdy Nesekejte trávu na příliš strmých svazích max 10 Veďte přístroj pouze rychlostí chůze Buďte zvláště opatrní jestliže přístroj otáčíte nebo jej přitahujete k sobě Řezací nástroj zastavte v případě že je nutno přístroj naklonit že je trans portován přes jiné plochy než je tráva a jestliže přístro...

Page 106: ... úra zu elektrickým proudem Údržba a skladování Zajistěte aby byly všechny matice čepy a šrouby pevně utaženy a aby se přístroj nacházel v bezpečném pracovním stavu Hodně nehod bývá způsobeno špatně udržovanými přístroji Nikdy neuchovávejte přístroj s ben zínem v nádrži uvnitř budovy ve které mohou možné benzínové výpary přijít do styku s otevřeným ohněm nebo jis krami Než přístroj odstavíte v uza...

Page 107: ...tům 6 víčko olejové nádrže s měrkou oleje 7 uzávěr palivové nádrže 8 kryt motoru 9 ochrana výfuku 10 koncovka zapalovacího kabelu zapalovací svíčka 11 1 přední kolo 12 vzduchový filtr není vidět 13 kryt vzduchového filtru 14 kryt z ocelového plechu 15 2 zadní kola 16 páka pro nastavení výšky sekání 17 sběrný koš na trávu dvoudílný 18 Indikace naplnění 19 2 aretační páky pro upevnění rukojeti 20 ve...

Page 108: ...stavení emisím Výstraha Emisní hodnota vi brací se může během skutečného používání elektrického přístroje odlišovat od uvedené hodnoty v závislosti na způsobu kterým je elektrický přístroj používán Je zde nutné aby byla stanovena bezpečnostní opatření k ochraně uživatele která by se opírala o odhad vystavení emisím během skutečných provozních podmí nek přitom musí být zohledněny všechny části prov...

Page 109: ...e Montáž lana startéru 1 Přitáhněte bezpečnostní páku 2 směrem k rukojeti 1 a podržte ji 2 Táhněte pomalu lano startéru na rukojeti startéru 21 směrem k rukojeti a zavěste lano starté ru do vedení 20 3 Bezpečnostní páku povolte Plnění motorového oleje a kon trola hladiny oleje Postavte přístroj na rovný podklad 1 Odšroubujte víčko olejové nádrže s měrkou 6 a nalejte olej do nádrže Používejte značk...

Page 110: ...šku také na předním kole Zatáhněte páku 26 směrem ven a posuňte ji do požadované polohy Správná výška sekání u okrasného tráv níku činí přibližně 30 45 mm v případě užitkového trávníku přibližně 40 65 mm Pro první sekání v sezóně by měla být zvolena vysoká výška sekání Nastavení předních kol Sekačka na trávu je díky své zvláštní konstrukci předních kol velmi flexibilní a obratná Podle situace je n...

Page 111: ...o sekání bez mezer by se dráhy měly vždy o několik centimetrů překrývat Neposunujte se směrem dozadu Na svazích pracujte vždy šikmo ke svahu Pokud by přišly nože do kontaktu s cizími tělesy motor okamžitě vypněte Počkejte až se nůž zastaví a zkon trolujte zda není přístroj poškozen V práci pokračujte pouze tehdy jestliže není přístroj poškozen V pracovních přestávkách a při trans portu přístroj vy...

Page 112: ... kryt odklop te 2 Vyjměte vzduchový filtr 12 3 Vyměňte vzduchový filtr za nová filtr viz Náhradní díly 4 Pro montáž vložte nový vzdu chový filtr 12 do krytu 13 5 Přiklopte kryt vzduchového filtru a pevně jej zacvakněte Výměna Nastavení zapalovací svíčky Opotřebované zapalovací svíčky nebo příliš velký interval zapalo vání vede ke snížení výkonu mo toru 1 Současným táhnutím a otáčením sejměte konco...

Page 113: ...čí požáru Před skladováním přístroj vyčistěte a proveďte jeho údržbu Než přístroj odstavíte do uzavřených prostor nechejte motor vychladnout Pro uskladnění paliva používejte vhod né a přípustné nádoby Přístroj skladujte na suchém místě chráněném před prachem a mimo do sah dětí Přístroj neobalujte do nylonových sáčků protože se může vytvořit vlhkost a plíseň Za účelem úsporného skladování můžete sk...

Page 114: ...ervice Center Záruka Záruční doba pro tento přístroj je 2 roky od data zakoupení a platí pou ze pro prvního kupce Tento přístroj není určený pro komerční využití Při komerčním použití záruka zanikne Ze záruky jsou vyloučeny škody které vznikly přirozeným opotřebením přetížením nebo ne odbornou obsluhou přístroje které jsou používány pro využití k podnikatelským účelům škody které vznikly v důsledk...

Page 115: ...ý olej benzín doplňte Vyčistěte ovládací prvky oblast kolem tlumiče hluku Vyměňte motorový olej Vyměňte vzduchový filtra Vyčistěte nastavte vyměňte zapalovací svíčku Zkontrolujte tlumič hluku a lapač jisker Vyčistěte systém chlazení vz duchua a v případě vysokého výskytu prachu nebo silného znečištění provádějte čištění častěji způsobené požárem během přepravy jdou na vrub odesílatele Oprava nebo ...

Page 116: ... Karburátor nechejte nastavit speci alizovanou dílnou Začouzená zapalovací svíčka 10 Zapalovací svíčky vyčistěte seřiďte nebo vyměňte viz Čištění a údržba Motor se přehřívá Větrací štěrbiny jsou ucpané Větrací štěrbiny vyčistěte Nesprávná zapalovací svíčka 10 Vyměňte zapalovací svíčku Příliš málo motorového oleje v motoru Doplňte motorový olej viz Uve dení do provozu Výsledek práce není uspokojivý...

Page 117: ...jamas retai 128 Utilizavimas aplinkos apsauga 129 Atsarginės dalys Priedai 129 Garantija 130 Techninės priežiūros intervalai 131 Techninės priežiūros intervalų lentelė 131 Klaidų paieška 132 Paskirtis Šis prietaisas yra skirtas namų vejos ir žolės plotams pjauti Prietaisas pritaikytas naudoti tik namų srityje Šis prietaisas nepritaikytas profesionaliam nuolatiniam naudojimui Griežtai draudžiama na...

Page 118: ...enimis kaip išvengti žalos žmonėms ir materialiniam turtui Paveikslėliai simboliai Paveikslėliai ant prietaiso Įspėjimas Perskaityti naudojimo instrukciją Pavojus susižeisti dėl išsviedžiamų dalių Aplink veikiantį prietaisą negali būti asmenų Atsargiai nuodingi garai Prietaiso nenaudokite uždarose patalpose Atsargiai benzinas yra degus Nerūkykite ir laikykite atokiai nuo šilumos šaltinių Pavojus s...

Page 119: ...imai yra riboti taip pat asme nims kurie neturi patirties ar nemoka naudotis įrenginiu nebent asmuo atsakingas už tokių asmenų saugumą juos prižiūrėtų arba nurodytų kaip pri etaisu naudotis Būtina prižiūrėti kad su įrenginiu nežaistų vaikai Niekada neleiskite vaikams arba kitiems asmenims kurie nėra susipažinę su naudojimo instrukcija naudotis prietaisu Vietos nuosta tos gali apriboti minimalų nau...

Page 120: ... nepjaukite drėgnos žolės Dbejte vždy na bezpečnou stabili tu zejména na svazích skládkách příkopech nebo nábřežích To Vám umožní lépe kontrolovat přístroj v neočekávaných situacích Ant šlaito visada stovėkite ir pjaukite skersai niekada nepjaukite aukštyn arba žemyn Būkite labai atsargūs jei stovėdami ant šlaisto norite pakeisti važiavimo kryptį Nepjaukite labai stačių šlaitų maks 10 Prietaisą st...

Page 121: ...řístrojem nepracujte Nebezpečí úra zu elektrickým proudem Techninė priežiūra ir laikymas Pasirūpinkite kad visos veržlės sraig tai ir varžtai būtų tvirtai priveržti ir prie taisas būtų saugios darbinės būklės Daug nelaimingų atsitikimų įvyksta jei netinkamai atliekami prietaisų techni nės priežiūros darbai Prietaiso su pripildytu benzino bakeliu niekada nelaikykite pastato viduje kur galėtų įvykti...

Page 122: ...ės su rinkimo dėžė ir sulankstomas rankenos lankas Apžvalga 1 Viršutinis rankenos lankas 2 Apsauginis lankas 3 Apatinis rankenos lankas 4 2 kabelių spaustuvai 5 Apsauga nuo smūgių 6 Alyvos bakelio dangtelis su aly vos lygio matuokliu 7 Bakelio dangtelis 8 Variklio gaubtas 9 Išmetamojo vamzdžio apsauga 10 Uždegimo žvakės kištukas uždegimo žvakė 11 1 priekinis ratas 12 Oro filtras nejsou viditelné 1...

Page 123: ... duomenys Dėl to mes neprii mame teisinių pretenzijų dėl eksploatavimo instrukcijoje pateikiamų duomenų Nurodyta vibracijos emisijos vertė buvo išmatuota pagal standartuose patvirtintus patikros metodus ir gali būti taikoma kitam panašiam elektriniam įrankiui Nurodyta vibracijos emisijos vertė gali būti taikoma pradiniam poveikiui įvertinti Įspėjimas naudojant elektrinį įrankį tikroji vibracijos e...

Page 124: ...rinkimo dėžę 17 į jai numatytą pakabą esančią prietaiso antroje pusėje 4 Nuleiskite apsaugą nuo smūgių 5 ji laikys surinkimo dėžę tin kamoje padėtyje Surinkimo dėžės nuėmimas ištuštinimas 5 Pakelkite apsaugą nuo smūgių 5 ir išimkite surinkimo dėžę 17 6 Ištuštinkite surinkimo dėžę žr skyrių Utilizavimas aplinkos apsauga ir vėl ją sumontuokite Paleidimo lyno montavimas 1 Patraukite apsauginį lanką 2...

Page 125: ...t viršaus kad benzinas turėtų vietos plėstis 2 Nuo bakelio dangtelio nuvalykite ben zino likučius ir vėl uždarykite bakelio dangtelį Pjovimo aukščio nustatymas Prietaisui galima nustatyti vieną iš 6 pjovi mo aukščio padėčių nuo 25 iki 75 mm 1 Pastumkite svirtį 16 į išorę ir traukite ją į norimą padėtį 2 Po to svirtį vėl paspauskite į viršų 3 Atitinkamą aukštį nustatykite taip pat ir priekiniame ra...

Page 126: ...šsijungia ir pei lis sustabdomas Peilis turi sustoti per 7 sekundes Pripildymo lygio indikatorius Žolės surinkimo dėžės 17 šone įmontuotas pripildymo lygio indikatorius 18 Vožtuvo aerodinaminė oro nu kreipimo sistema papildomai užtikrina optimalų pripildymą GO Pripildymo lygio indikatorius atida rytas žolės surinkimo dėžė tuščia STOP Pripildymo lygio indikatorius uždarytas žolės surinkimo dėžė pri...

Page 127: ... likučius Kruopščiai išvalykite ventili acijos angas išmetimo angą ir peilio sritį Nenaudokite kietų arba aštrių daiktų nes jie gali pažeisti prietaisą Retkarčiais alyva sutepkite ratus Prieš kiekvieną naudojimą patikrin kite ar nesimato aiškių vejapjovės trūkumų pavyzdžiui ar dalys ne atsilaisvino nenusidėvėjo ir nėra pažeistos Patikrinkite ar visos veržlės sraigtai ir varžtai tvirtai priveržti P...

Page 128: ...ą 3 Vėl įpilkite variklio alyvos žr Eksp loatavimo pradžia Peilių galandimas keitimas Ištraukite uždegimo žvakės kištuką ir patikrinkite ar peilis nenusidėvėjo ir nėra pažeistas Atšipusį peilį visada paveskite pagaląsti specializuotų dirbtuvių darbuotojams nes jie gali patikrinti disbalansą Pažeistą peilį arba netinkamai subalansuotą peilį visada keiskite specializuotose dirbtuvėse Netinka mai sum...

Page 129: ...asiskirstytų alyva vėl tvirtai prisukite uždegimo žvakę Panaudotą alyvą ir benzino likučius utilizuokite nekenkdami aplinkai žr Utilizavimas aplinkos apsauga Benzino bakelio nereikia ištuštinti jei į benziną pylėte degalų priedų Utilizavimas aplinkos apsauga Prietaisą priedus ir pakuotę perduokite utilizuoti aplinkos apsaugos atliekų uti lizavimo įstaigai Rūpestingai ištuštinkite benzino ir alyvos...

Page 130: ...išinį visiems įrenginio jei jie atsiranda dėl nepakan kamo tepimo Toliau nurodytos dalys dėvisi todėl joms garantija nesuteikiama pjovimo įtaisas uždegimo žvakės oro filtras paleidimo lynas žolės surinkimo dėžė Nesiųskite prietaiso prieš tai nepaskambinę mums telefonu ir nesusitarę su mūsų priežiūros dirbtuvėmis antraip Jums teks išlaidos už nepriimto siuntinio grąžinimą Dėmesio sugedusių prietais...

Page 131: ...iūros darbai žr Valymas ir techninė priežiūra Prieš Po Po pirmųjų 5 val Po 8 val Po 50 val Kasmet darbą darbo Patikrinti ir priveržti varžtus veržles sraigtus Patikrinti variklio alyvos lygį benzino lygį ir prireikus papil dyti variklio alyvos benzino Nuvalyti valdymo elementus garso slopintuvo sritį Pakeisti variklio alyvą Pakeisti oro filtrąa Nuvalyti nustatyti pakeisti uždegimo žvakę Patikrinti...

Page 132: ... mišinys Karbiuratorių nuneškite nustatyti į specializuotas dirbtuves Aprūko uždegimo žvakė 10 Nuvalykite nustatykite arba pakeis kite uždegimo žvakes žr Valymas ir techninė priežiūra Variklis perkaista Užsikišo ventiliacijos anga Išvalykite ventiliacijos angą Netinkama uždegimo žvakė 10 Pakeiskite uždegimo žvakę Variklyje per mažai variklio alyvos Įpilkite variklio alyvos žr Eksploa tavimo pradži...

Page 133: ...en und Bestimmungen angewendet EN ISO 14982 2009 EN ISO 5395 1 2013 EN ISO 5395 2 2013 A1 A2 Zusätzlich wird entsprechend der Geräuschemissionsrichtlinie 2000 14 EG bestätigt Schallleistungspegel Garantiert 96 dB A Gemessen 94 dB A Angewendetes Konformitätsbewertungsverfahren entsprechend Anh VI 2000 14 EG und 2005 88 EG Benannte Stelle SNCH NB 0499 Die alleinige Verantwortung für die Ausstellung ...

Page 134: ... nationales suivantes ont été appliquées EN ISO 14982 2009 EN ISO 5395 1 2013 EN ISO 5395 2 2013 A1 A2 Nous certifions également conformément à la directive sur les émissions de bruit 2000 14 EC que Niveau de puissance sonore garanti 96 dB A mesuré 94 dB A Procédé d évaluation de la conformité appliqué selon l annexe VI 2000 14 EC et 2005 88 EC Bureau declaré SNCH NB 0499 Le fabricant assume seul ...

Page 135: ... normy harmonizujące oraz normy i przepisy krajowe EN ISO 14982 2009 EN ISO 5395 1 2013 EN ISO 5395 2 2013 A1 A2 Ponadto potwierdzono zgodnie z dyrektywą w sprawie emisji hałasu 2000 14 EC poziom mocy akustycznej gwarantowany 96 dB A zmierzony 94 dB A Zastosowana procedura oceny zgodności odpowiada załącznikowi VI 2000 14 EC i 2005 88 EC Placówka zgłoszenia SNCH NB 0499 Wyłączną odpowiedzialność z...

Page 136: ... en bepalingen toegepast EN ISO 14982 2009 EN ISO 5395 1 2013 EN ISO 5395 2 2013 A1 A2 Bovendien wordt in overeenstemming met de geluidsemissierichtlijn 2000 14 EC bevestigd akoestisch niveau Gegarandeerd 96 0 dB A Gemeten 94 dB A Toegepaste conformiteitbeoordelingsprocedure in overeenstemming met Annex VI 2000 14 EC 2005 88 EC Aangemeld bij SNCH NB 0499 De exclusieve verantwoordelijkheid voor de ...

Page 137: ...ons have been applied EN ISO 14982 2009 EN ISO 5395 1 2013 EN ISO 5395 2 2013 A1 A2 The following are also confirmed as complying with Noise Emissions Directive 2000 14 EC Guaranteed sound power level 96 dB A Measured sound power level 94 dB A The conformity evaluation procedure employed is compliant with appendix VI 2000 14 EC 2005 88 EC Registered Office SNCH NB 0499 This declaration of conformi...

Page 138: ...zioni nazionali che seguono EN ISO 14982 2009 EN ISO 5395 1 2013 EN ISO 5395 2 2013 A1 A2 Si dichiara inoltre in conformità alla direttiva 2000 14 CE sull emissione acustica am bientale Livello di potenza sonora garantita 96 dB A misurata 94 dB A Procedura della valutazione della conformità applicata come da allegato VI 2000 14 CE 2005 88 EC Autorità registrata SNCH NB 0499 Il produttore è il solo...

Page 139: ...é normy národní nor my a ustanovení EN ISO 14982 2009 EN ISO 5395 1 2013 EN ISO 5395 2 2013 A1 A2 Navíc se v souhlase se směrnicí pro emisi hluku 2000 14 EC potvrzuje Úroveň akustického výkonu zaručená 96 dB A měřená 94 dB A Použitý postup konformitního ohodnocení dle dodatku VI 2000 14 EC 2005 88 EC Místo hlášení SNCH NB 0499 Výhradní odpovědnost za vystavení tohoto prohlášení o shodě nese výrobc...

Page 140: ...009 EN ISO 5395 1 2013 EN ISO 5395 2 2013 A1 A2 Remiantis 2000 14 EB dėl valstybių narių įstatymų reglamentuojančių lauko sąly gomis naudojamos įrangos į aplinką skleidžiamą triukšmą suderinimo papildomai patvirtinama Garso galingumo lygis Numatyta 96 dB A Išmatuota 94 dB A Taikytas atitinkamas 2000 14 EB ir 2005 88 EB VI priede nurodytas atitikties įvertini mo metodas Paskelbtoji įtaisas SNCH NB ...

Page 141: ...03 fr Boutique en ligne www sav03 fr boutique ITSw bv BE Tel 03 54 13760 Fax 03 54 15651 e mail forteam esther skynet be Novo CSV Ltd Unit 3 Beldray Park Beldray Road Mount Pleasant Bilston West Midlands WV14 7NH Tel 0845 683 2672 e mail care novoserv co uk DE Krysiak Sp z o o ul Rolna 6 62 081 Baranowo Tel 061 650 75 30 Fax 061 650 75 32 e mail krysiak krysiak pl Homepage www krysiak pl Garden It...

Page 142: ...142 ...

Page 143: ...143 B 40846_20180309_mt ...

Page 144: ......

Reviews: