GreenWorks 27072 Operator'S Manual Download Page 6

Do not over-reach. Keep proper footing and balance
at all times.
 This enables better control of the power tool
in unexpected situations.

Dress properly. Do not wear loose clothing or jewelry.
Keep your hair, clothing and gloves away from
moving parts.
 Loose clothes, jewelry or long hair can be
caught in moving parts.

Do not let familiarity gained from frequent use of tools
allow you to become complacent and ignore tool safety
principles. 
A careless action can cause severe injury
within a fraction of a second.

2.4

POWER TOOL USE AND CARE

Do not force the power tool. Use the correct power
tool for your application.
 The correct power tool will do
the job better and safer at the rate for which it was
designed.

Do not use the power tool if the switch does not turn it
on and off.


Any power tool that cannot be controlled with

the switch is dangerous and must be repaired.

Disconnect the plug from the power source and/or
remove the battery pack, from the power tool before
making any adjustments, changing accessories, or
storing power tools.
 Such preventive safety measures
reduce the risk of starting the power tool accidentally.

Store idle power tools out of the reach of children and
do not allow persons unfamiliar with the power tool or
these instructions to operate the power tool.
 Power
tools are dangerous in the hands of untrained users.

Maintain power tools and accessories. Check for
misalignment or binding of moving parts, breakage of
parts and any other condition that may affect the
power tool's operation. If damaged, have the power
tool repaired before use.
 Many accidents are caused by
poorly maintained power tools.

Keep cutting tools sharp and clean. Properly
maintained cutting tools with sharp cutting edges are less
likely to bind and are easier to control.

Use the power tool, accessories and tool bits etc. in
accordance with these instructions, taking into
account the working conditions and the work to be
performed.
 Use of the power tool for operations different
from those intended could result in a hazardous situation.

Keep handles and grasping surfaces dry, clean and
free from oil and grease.
 Slippery handles and grasping
surfaces do not allow for safe handling and control of the
tool in unexpected situations.

2.5

SERVICE

Have your power tool serviced by a qualified repair
person using only identical replacement parts.


This

will ensure that the safety of the power tool is maintained.

Never service damaged battery packs. Service of
battery packs should only be performed by the
manufacturer or authorized service providers.

3

GENERAL SAFETY RULES

Replacement Parts – When servicing use only identical
replacement parts.

Polarized Appliance Connections – To reduce the risk of
electric shock, this appliance has a polarized plug (one
blade is wider than the other) and will require the use of a
polarized extension cord. The appliance plug will fit into
a polarized extension cord only one way. If the plug does
not fit fully into the extension cord, reverse the plug. If
the plug still does not fit, obtain a correct polarized
extension cord. A polarized extension cord will require
the use of a polarized wall outlet. This plug will fit into
the polarized wall outlet only one way. If the plug does
not fit fully into the wall outlet, reverse the plug. If the
plug still does not fit, contact a qualified electrician to
install the proper wall outlet. Do not change the
equipment plug, extension cord receptacle, or extension
cord plug in any way.

Avoid Dangerous Environment – Don’t use appliances in
damp or wet locations.

Don’t Use In Rain.

Keep Children Away – All visitors should be kept at a
distance from work area.

Dress Properly – Do not wear loose clothing or jewelry.
They can be caught in moving parts. Use of rubber gloves
and substantial footwear is recommended when working
outdoors. Wear protective hair covering to contain long
hair.

Use Safety Glasses – Always use face or dust mask if
operation is dusty.

Use Right Appliance – Do not use appliance for any job
except that for which it is intended.

Warning – To reduce the risk of electric shock, use only
with an extension cord intended for outdoor use, such as
an extension cord of cord type SW-A, SOW-A, STW-A,
STOW-A, SJW-A, SJOW-A, SJTW-A. or SJTOW-A.

Avoid Unintentional Starting – Don’t carry plugged-in
appliance with finger on switch. Be sure switch is off
when plugging in.

Don’t Abuse Cord – Never carry appliance by cord or
yank it to disconnect from receptacle. Keep cord from
heat, oil, and sharp edges.

Don’t grasp the exposed cutting blades or cutting edges
when picking up or holding the appliance.

Don’t Force Appliance – It will do the job better and with
less likelihood of a risk of injury at the rate for which it
was designed.

Don’t Overreach – Keep proper footing and balance at all
times.

Stay Alert – Watch what you are doing. Use common
sense. Do not operate appliance when you are tired.

Disconnect Appliance – Disconnect the appliance from
the power supply when not in use, before servicing, when
changing accessories such as blades, and the like.

5

English

EN

Summary of Contents for 27072

Page 1: ...求 2 说明书为单色印刷 色块全部在外侧 3 骑马钉装订 裁切均匀 无连页 4 说明书可封样 要求无色差 无污点 60g双胶纸 32P 210 145 P0803127 00 P0803127 00 GWK 10 松土机 刘小娟 张君 王小妮 周艳 李海平 2020 12 SCALE A5 5 料件需符合格力博HSF文件 编号 GLB CGR 146 里关于环保和有害物质的具体要求 27072 B 重要度等级 B B A ...

Page 2: ...CUA108 27072 EN OPERATOR MANUAL CULTIVATOR FR MANUEL DE L UTILISATEUR MOTOBÊCHE ES MANUAL DEL OPERADOR CULTIVADOR www greenworkstools com ...

Page 3: ......

Page 4: ...sk levels 6 6 Double insulated 6 7 Extention cords 6 8 Proposition 65 7 9 Installation 7 9 1 Unpack the machine 8 9 2 Install the handle 8 9 3 Install the wheel 8 9 4 Install the tines 8 10 Applications 9 10 1 Start the machine 9 10 2 Stop the machine 9 10 3 Narrow cultivating width 9 10 4 Operation tips 9 11 Maintenance 9 11 1 Clean the machine 10 12 Store the machine 10 13 Troubleshooting 10 14 ...

Page 5: ...is an increased risk of electric shock if your body is earthed or grounded Do not expose power tools to rain or wet conditions Water entering a power tool will increase the risk of electric shock Do not abuse the cord Never use the cord for carrying pulling or unplugging the power tool Keep cord away from heat oil sharp edges and moving parts Damaged or entangled cords increase the risk of electri...

Page 6: ...Never service damaged battery packs Service of battery packs should only be performed by the manufacturer or authorized service providers 3 GENERAL SAFETY RULES Replacement Parts When servicing use only identical replacement parts Polarized Appliance Connections To reduce the risk of electric shock this appliance has a polarized plug one blade is wider than the other and will require the use of a ...

Page 7: ...struc tions Wear eye and ear protection Keep all bystanders at least 15m away Do not expose the product to rain or moist conditions Symbol Explanation Double insulated construction 5 RISK LEVELS The following signal words and meanings are intended to explain the levels of risk associated with this product SYM BOL SIGNAL MEANING DANGER Indicates an imminently haz ardous situation which if not avoid...

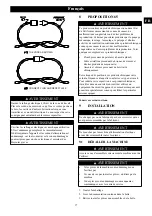
Page 8: ...a knot as shown in Figure A or 2 Use one of the plug receptacle retaining straps or connectors METHOD OF SECURING EXTENSION CORD THE CORD AS SHOWN CONNECT PLUG AND RECEPTACLE WARNING Keep the extension cord clear of the working area Position the cord so that it will not get caught on lumber tools or other obstructions while you are working with a power tool Failure to do so can result in serious p...

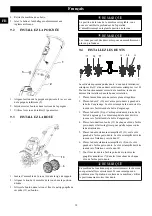
Page 9: ...rod 2 Align the wheel assembly hole to desired position 3 Slide bolt through hole and attach the small hitch pin 13 to bolt NOTE The wheel position of the machine is adjustable You can control the depth of operation through adjusting the wheel position NOTE Wheels can be removed for greater tilling depth 9 4 INSTALL THE TINES 12 12 The cultivator has four tines two inner tines stamped B and C and ...

Page 10: ...t to allow a more narrow cultivating width 1 Remove the ring pins from the holes on the ends of the tine shaft 2 Remove the outside tines and felts from the tine shaft 3 Place the large hitch pins 14 in the holes 10 4 OPERATION TIPS The cultivator can be used to break up garden soil and prepare a seedbed for planting Plan ahead to leave enough room between the seed rows to allow for machine cultiv...

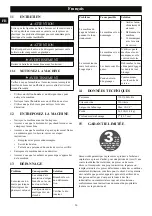
Page 11: ...Cultivating path Max 10 1 4 Weight 26 2 lbs 11 9 kg Cultivating depth 5 12 7 cm 15 LIMITED WARRANTY YEAR ANS AÑOS LIMITED WARRANTY GARANTIE LIMITÉE GARANTÍA LIMITADA 3 Greenworks hereby warranties this product to the original purchaser with proof of purchase for a period of three 3 years against defects in materials parts or workmanship Greenworks at its own discretion will repair or replace any a...

Page 12: ... 7 8 10 9 No Part No Qty Description No Part No Qty Description 1 R0201747 00 1 Handle Knob Assembly 6 R0200155 00 1 Wheel 2 R0201748 00 1 Wheel Shelf Assembly 7 R0202454 00 1 Motor Engagement Box 3 R0201203 00 1 Small Hitch Pin 8 R0201208 00 1 Tine Assembly 4 R0201207 00 1 Large Hitch Pin 9 R0201209 00 1 Ring Pin 5 R0201749 00 1 Shield 10 R0201750 00 1 Gear Box 11 English EN ...

Page 13: ...sur la machine 15 5 Niveaux de risques 16 6 Double isolation 16 7 Rallonges électriques 16 8 Proposition 65 17 9 Installation 17 9 1 Déballer la machine 17 9 2 Installez la poignée 18 9 3 Installez la roue 18 9 4 Installez les dents 18 10 Applications 19 10 1 Démarrer la machine 19 10 2 Arrêtez la machine 19 10 3 Réduisez la largeur de la surface à cultiver 19 10 4 Conseils sur l utilisation 19 11...

Page 14: ...mmables La mise en marche des outils électriques crée des étincelles qui peuvent enflammer la poussière ou les vapeurs Tenez les enfants et les curieux à l écart lorsque vous utilisez un outil électrique Les distractions peuvent vous faire perdre le contrôle 2 2 SÉCURITÉ ÉLECTRIQUE Les prises de l outil électrique doivent être compatibles avec la prise de courant Ne modifiez jamais la prise d aucu...

Page 15: ...anger des accessoires ou de ranger l outil électrique De telles mesures de sécurité préventives réduisent le risque d un démarrage accidentel de l outil électrique Rangez les outils électriques inutilisés hors de portée des enfants et ne laissez pas des personnes qui ne se sont pas familiarisées avec l outil électrique ou ces instructions l utiliser Les outils électriques sont dangereux entre les ...

Page 16: ...squ il n est pas utilisé avant l entretien lors du remplacement des accessoires tels que les lames etc Entreposez les appareils inutilisés à l intérieur Lorsqu ils ne sont pas utilisés entreposez les à l intérieur dans un endroit sec surélevé ou verrouillé hors de la portée des enfants Entretenez l appareil avec soin Gardez les bords tranchants et propres pour une meilleure performance et pour réd...

Page 17: ...onsidérable d une source d alimentation assurez vous d utiliser une rallonge électrique capable de supporter le courant que le produit consommera Un cordon d alimentation trop petit provoquera une chute de la tension secteur ce qui entraînera une surchauffe et une perte de puissance Utilisez le tableau pour déterminer la taille minimale de fil requise pour une rallonge électrique Seuls les cordons...

Page 18: ...ici quelques exemples de ces produits chimiques Plomb provenant de peintures à base de plomb Silice cristalline provenant de briques de ciment et d autres produits de maçonnerie Arsenic et chrome provenant de bois traité chimiquement Votre risque d exposition à ces produits chimiques varie selon la fréquence à laquelle vous faites ce type de travail Pour réduire votre exposition à ces produits chi...

Page 19: ... dans la bonne orientation 1 Placez la machine sur une surface plane et régulière 2 Placez la dent C 10 sur l arbre porte dents à gauche de la boîte d engrenage Le côté estampé de la dent doit être tourné vers l extérieur de la boîte d engrenage 3 Placez la dent B 9 sur l arbre porte dents à droite de la boîte d engrenage Le côté estampé de la dent doit être tourné vers l extérieur de la boîte d e...

Page 20: ...x extrémités de l arbre porte dents 2 Retirez les dents extérieures et les feutres de l arbre porte dents 3 Placez les grandes goupilles de sécurité 14 dans les trous 10 4 CONSEILS SUR L UTILISATION Le cultivateur peut être utilisé pour labourer le sol du jardin et préparer un lit de semence pour la plantation Planifiez à l avance pour laisser suffisamment d espace entre les rangées de semences po...

Page 21: ...oncé Le cordon d ali mentation n est pas branché ou la con nexion est lâche Branchez le cor don d alimenta tion Le disjoncteur do mestique s est dé clenché Vérifiez le dis joncteur Problème Cause possible Solution La machine dé gage de la fumée pendant le fonc tionnement La machine est en dommagée 1 Arrêtez la ma chine immédi atement 2 Débranchez la machine 3 Communiquez avec le centre de service ...

Page 22: ...ieur due à l utilisation ou à l exposition ASSISTANCE TÉLÉPHONIQUE Le service de garantie est accessible en appelant notre ligne d assistance téléphonique sans frais au 1 888 909 6757 FRAIS DE TRANSPORT Les frais de transport pour le déplacement de tout équipement motorisé ou accessoire sont à la charge de l acheteur Il incombe à l acheteur de payer les frais de transport pour toute pièce retourné...

Page 23: ...e 6 R0200155 00 1 Roue 2 R0201748 00 1 Ensemble du support des roues 7 R0202454 00 1 Boîte d engagement du mo teur 3 R0201203 00 1 Petite goupille de sécurité 8 R0201208 00 1 Ensemble de dents 4 R0201207 00 1 Grande goupille de sécurité 9 R0201209 00 1 Goupille annulaire 5 R0201749 00 1 Bouclier 10 R0201750 00 1 Boîte d engrenage 22 Français FR ...

Page 24: ...5 Niveles de riesgo 26 6 Doble aislamiento 27 7 Cables alargadores 27 8 Propuesta 65 28 9 Instalación 28 9 1 Desembalaje de la máquina 28 9 2 Instalación del asa 28 9 3 Instalación de la rueda 29 9 4 Instalación de los dientes 29 10 Aplicaciones 29 10 1 Puesta en marcha de la máquina 29 10 2 Detención de la máquina 30 10 3 Anchura de cultivo estrecha 30 10 4 Consejos de funcionamiento 30 11 Manten...

Page 25: ...utilice una herramienta eléctrica Las distracciones pueden hacer que pierda el control 2 2 SEGURIDAD ELÉCTRICA Los enchufes de las herramientas eléctricas deben corresponder con la toma de corriente Nunca modifique el enchufe en modo alguno No utilice enchufes adaptadores con herramientas eléctricas conectadas a tierra La utilización de enchufes no modificados y de tomas de corriente adecuadas red...

Page 26: ...as con la herramienta eléctrica o estas instrucciones puedan utilizarla Las herramientas eléctricas son peligrosas en manos de usuarios inexpertos Mantenga las herramientas eléctricas y los accesorios Compruebe si hay desalineación o unión de las piezas móviles rotura de piezas y cualquier otra condición que pueda afectar al funcionamiento de la herramienta eléctrica Si ha sufrido daños lleve a re...

Page 27: ...o no estén en uso los aparatos deben almacenarse en interiores en un lugar seco y alto o cerrado fuera del alcance de los niños Cuide el mantenimiento del aparato Mantenga el filo afilado y limpio para un mejor rendimiento y para reducir el riesgo de lesiones Siga las instrucciones para la lubricación y el cambio de accesorios Inspeccione periódicamente el cable del aparato y si está dañado haga q...

Page 28: ... tenga la capacidad de manejar la corriente que utilizará el producto Un cable de tamaño insuficiente producirá una caída en la tensión de la línea lo que a su vez generará sobrecalentamiento y pérdida de energía Utilice el gráfico para determinar el tamaño mínimo de cable necesario en un cable alargador Únicamente deben utilizarse cables redondos revestidos con certificación de Underwriter s Labo...

Page 29: ...s productos de albañilería Arsénico y cromo de la madera tratada químicamente El riesgo de exposición a estas sustancias químicas varía según la frecuencia con la que realice este tipo de trabajo Para reducir su exposición a estas sustancias químicas trabaje en una zona bien ventilada y trabaje con equipos de seguridad aprobados como máscaras antipolvo que estén especialmente diseñadas para filtra...

Page 30: ... caja de engranajes El lado estampado del diente debe quedar alejado de la caja de engranajes 4 Coloque una arandela de fieltro 12 a cada lado del eje de los dientes y deslice para apoyarla contra los dientes interiores 5 Coloque el diente exterior D 11 en el lado izquierdo del eje de los dientes El lado estampado debe mirar hacia el diente C 6 Coloque el diente exterior A 8 en el lado derecho del...

Page 31: ...3 Si el cultivador se queda y cava en un lugar intente moverlo de lado a lado para que empiece a avanzar nuevamente 4 Si la tierra está muy compactada riegue unos días antes de cultivar Evite trabajar la tierra cuando esté húmeda o mojada Espere uno o dos días después de fuertes lluvias para que la tierra se seque 5 El cultivo superficial de menos de 5 cm puede utilizarse para quitar las malas hie...

Page 32: ... A su entera discreción Greenworks reparará o sustituirá cualquiera y todas las piezas que resulten ser defectuosas con un uso normal sin coste alguno para el cliente Esta garantía es válida únicamente para unidades que se hayan utilizado para uso personal que no han sido arrendadas o alquiladas para uso industrial comercial y cuyo mantenimiento se ha realizado de acuerdo con las instrucciones del...

Page 33: ...200155 00 1 Rueda 2 R0201748 00 1 Conjunto de portador de ruedas 7 R0202454 00 1 Caja de acoplamiento del motor 3 R0201203 00 1 Pasador de enganche pe queño 8 R0201208 00 1 Conjunto de dientes 4 R0201207 00 1 Pasador de enganche grande 9 R0201209 00 1 Pasador de anillo 5 R0201749 00 1 Protección 10 R0201750 00 1 Caja de engranajes 32 Español ES ...

Reviews: