Model IGX Make-Up Air
15
®
Slab
1. Pour Concrete Slab
Pour the concrete slab. Make
the slab one foot larger than
the unit on all sides. The slab
must be capable of supporting
the weight of the unit. Proper
subgrade preparation must be completed
under the slab. Allow the concrete slab to properly cure
before installing the unit.
2. Install Unit
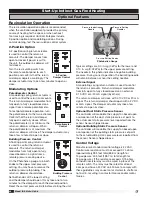
Use a crane and a set of spreader
bars hooked to the factory lifting
lugs to lift and position the unit on
the concrete slab. The use of all
lifting lugs and a set of spreader
bars is mandatory when lifting the
unit. It is recommended that any
shipped loose modules be installed
after the base unit.
The shipped loose modules must be fastened together.
Fasten the cover seams and vertical panels on each
module using sheet metal screws. Using an appropriate
sealant, seal the seam(s) between each shipped loose
module and the weatherhood.
Some shipped loose modules will require field-provided
shims for proper alignment with the base unit.
If an optional evaporative cooling module is included,
reference
Installation, Optional Component Mounting,
Evaporative Cooling Module
section in this IOM for
more information.
Fasten the unit to the slab using appropriate methods.
The installer is responsible for determining appropriate
fastening methods to ensure compliance with all
applicable codes.
3. Attach Ductwork
Use an appropriate sealant
around the discharge opening
of the unit to create a weathertight seal.
Follow good duct practices for all ductwork. Install
ductwork in accordance with SMACNA and AMCA
guidelines, NFPA 96 and local codes. Reference
Installation, Duct Sizes
section in this Installation,
Operation, and Maintenance Manual for proper
duct sizes.
4. Install Stack (optional)
Clearance may require an exhaust stack. Install an
exhaust stack as needed to the exhaust connection on
the unit. Install a vent terminator on the exhaust pipe.
Exhaust transition and vent termination must be
purchased from the factory for proper operation.
Exhaust pipe is by others.
Rail
1. Install Rails
The rails must be located
around the perimeter
of the base unit on
all four sides. This is
required to ensure proper
unit support.
2. Install Unit
Use a crane and a set of
spreader bars hooked to
the factory lifting lugs to lift
and position the unit on the
field-supplied rail supports.
The use of all lifting lugs and
a set of spreader bars is
mandatory when lifting the
unit. It is recommended that
any shipped loose modules be
installed after the base unit.
The shipped loose modules must be fastened together.
Fasten the cover seams and vertical panels on each
module using the appropriate methods. Fasten the unit to
the rails using appropriate methods.
If an optional evaporative cooling module is included,
reference
Installation, Optional Component Mounting,
Evaporative Cooling Module
section in this IOM for
more information.
The installer is responsible for determining appropriate
fastening methods to ensure compliance with all
applicable codes.
3. Attach Ductwork
Use an appropriate sealant around the discharge opening
of the unit to create a weathertight seal.
Follow good duct practices for all ductwork. Install
ductwork in accordance with SMACNA and AMCA
guidelines, NFPA 96 and local codes. Reference
Installation, Duct Sizes
section in this Installation,
Operation, and Maintenance Manual for proper
duct sizes.
4. Install Stack (optional)
Clearance may require an exhaust stack. Install an
exhaust stack as needed to the exhaust connection on
the unit. Install a vent terminator on the exhaust pipe.
Exhaust transition and vent termination must be
purchased from the factory for proper operation.
Exhaust pipe is by others.
Installation
Outdoor Unit Mounting
Spreader Bar
Lifting
Lugs (4)


