❏
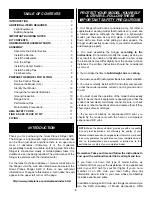
3. Use the ATV function in the transmitter or adjust the
position of the pushrods on the servo arms and the control
horns on the ailevators to get the control surface throws
shown in the chart that follows. The throws are measured at
the widest part of the control surface.
To increase the control surface throw, move the pushrod to
the hole that is farther in on the control horn on the control
surface, or move the pushrod to the hole that is farther out
on the servo arm. To decrease the control surface throw, do
the opposite.
The recommended control throws for the Slinger require
that the ailevators have more throw for aileron travel than for
elevator travel. If your radio transmitter does not have
Adjustable Travel Volume (ATV) or Dual Rates (D/R), which
will enable you to set the recommended throws, you should
carefully consider how to proceed. ATV will allow you to
reduce the elevator throw while keeping a higher aileron
throw. D/R normally is used to set reduced throws, but many
transmitters also allow this function to set increased throws
as well. This would allow you to increase the aileron throw
while keeping a lower elevator throw.
If you are using a very basic radio that does not allow
you to independently adjust the elevator and aileron
travel, you should set both throws to 1/2” [12.7mm].
We do not recommend that you set the elevator travel higher
than 1/2” [12.7mm] on high rate as doing so could cause the
Slinger to snap roll at unexpected times. Without the ATV or
D/R functions, this will restrict the aileron throw to 1/2”
[12.7mm] as well. Sacrificing some aileron authority is
preferable to having too much elevator sensitivity.
The C.G. (center of gravity) must be checked when the model
is ready to fly with the propeller, canopy and battery installed.
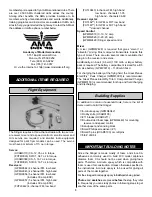
❏
1. Use a felt-tip pen or narrow strips of tape to mark the
balance point on the top of the wing 8” [203mm] from the
forward most part of the model.
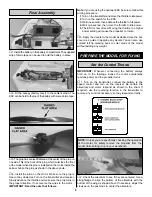
❏
2. Lift the model, upside down, at the balance point you
marked on the top of the wing. In the photo, we are using a
Great Planes CG Machine™. If the nose drops the model is
nose-heavy and you must add weight to the tail. If the tail
drops, the model is tail-heavy and you must add weight to the
nose. In most cases you can relocate the receiver to achieve
the correct balance without adding more weight.
IMPORTANT: More than any other factor, the C.G. (balance
point) can have the greatest effect on how the model flies,
and may determine whether or not your first flight will be
successful. If you value this model, DO NOT OVERLOOK
THIS IMPORTANT PROCEDURE. A model that is not
properly balanced will be unstable and possibly unflyable.
Balance the Model (C.G.)
Set up the Slinger so it has the following control
surface throws:
High Rate
Low Rate
ELEVATOR:
1/2" [13mm]
3/8" [10mm]
up and down
up and down
AILERONS:
3/4" [19mm]
1/2" [13mm]
up and down
up and down
Second to the C.G., the control throws have the greatest
effect on the way a model flies. Set the throws as close to
these settings as possible. If you have too much control
throw the model may respond too quickly. If you do not have
enough throw you may not be able to maneuver the model
or have enough control to land it when the motor is off.
Caution: With more than 1/2" [12.7mm] elevator throw,
the Slinger may snap roll unexpectedly during
aerobatic maneuvers.
9


