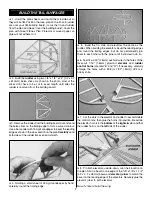
extend from former F4T to the firewall. Note that the top,
middle stringer extends to 7/8" [22mm] aft of the forward
former F3T. Note that the stringers butt-glue to the back of
the firewall.
❏
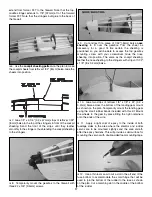
6. Use the
cockpit sheeting pattern
on the plan to make
the cockpit sheets from leftover 1/32" [.8mm] balsa. Glue the
sheets into position.
❏
7. Glue 1/8" x 2-1/4" [3.2 x 57mm] strips of leftover 1/32"
[.8mm] balsa to the top of the stringers in front of the cockpit
sheeting. Sand the front of the strips until they feather
smoothly to the stringers, thus blending the cockpit sheeting
to the stringers.
❏
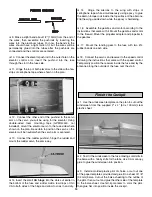
8. Temporarily mount the gearbox to the firewall with
three #2 x 3/8" [9.5mm] screws.
❏
9. Cut and test fit a piece of 1/32" [.8mm] balsa
nose
sheeting
to fit over the gearbox. Trim the sheet as
necessary for a good fit. Be certain the sheeting is
positioned so you will be able to access the top gearbox
mounting screw with your screwdriver. Glue the nose
sheeting into position. The same as the cockpit sheeting,
feather the nose sheeting to the stringers with strips of 1/32"
x 1/8" [.8 x 3.2mm] balsa.
❏
10. Glue two strips of leftover 1/8" x 1/8" x 24" [3.2 x
3.2mm] balsa across the bottom of the landing gear mount
as shown on the plan. Temporarily mount the landing gear
using the small rubber bands included with this kit. Mount
the wheels to the gear by press-fitting the nylon retainers
onto the ends of the wire.
❏
11. Apply a light coat of epoxy to the inside of both
fuselage sides in the area where the elevator and rudder
servos are to be mounted. Lightly sand the area smooth
after the epoxy hardens. This will provide a solid surface for
mounting the servos with double-sided foam mounting tape.
❏
12. Use a thin razor saw to cut a slot in the aft end of the
fuse bottom to accommodate the small hinge that will be
used to join the bottom of the rudder to the fuse as shown
on the plan. Cut a matching slot in the middle of the bottom
of the rudder.
17


