background image

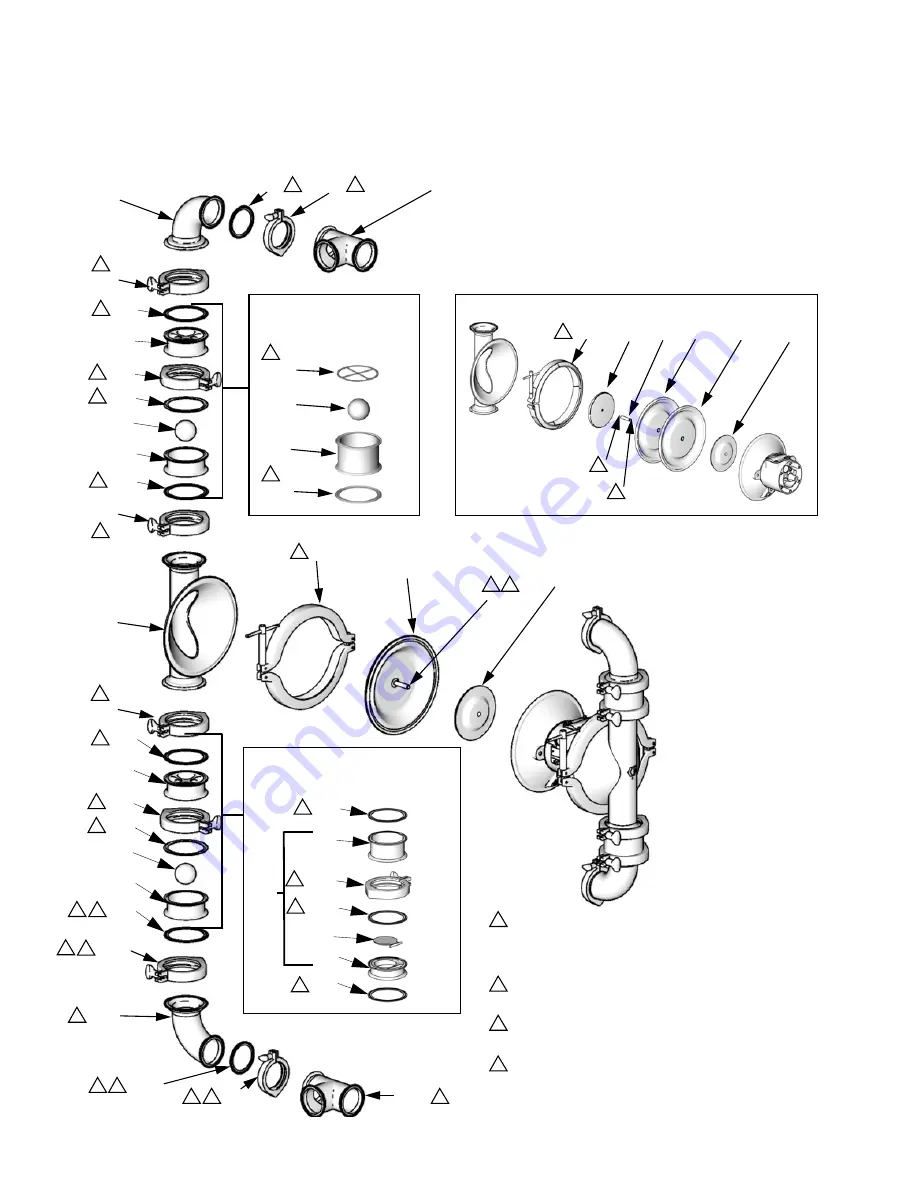
Parts Drawing, Fluid Section 

32

310622ZAL

Parts Drawing, Fluid Section

3A Pump Shown

128

132

*242

*541

233

*240

234

128

*129

130

*331

129*

130

135

446*

Flapper Check Valve 

Assembly

ti17272a

339*

445

Apply a high-strength thread locker to attach 
the screw to the diaphragm plate (sanitary 
pump) or to the diaphragm (3A pump), if 
needed.

Apply a medium strength thread locker to 
shaft side of screw threads.

Apply a waterproof sanitary lubricant to 
clamps, clamping surfaces, and gaskets.

Parts not included on BES/ram models (Part 
Numbers 24xxxx).

1

2

3

4

3

3

3

3

3

3

3

3

2

Sanitary Ball Check 

Valve Assembly

*240

*240

2XA

132

2XB

*240

541

3

3

3

3

132

3

132

3

*240

*240

2XA

132

2XB

*240

541

3

3

3

3

132

3

TI7644a

446*

444 143

445

135

1

2

3

TI4729c

Sanitary Diaphragm Assembly

447*

*240

*240

252

132

248

*240

251

200

3

3

3

3

TI4683a

4

4

4

4

4

4

446a*

1

Tri-Clamp 
Model Shown

Summary of Contents for SaniForce 1590 3A

Page 1: ...nly See Models on page 3 for model numbers descriptions and compliance approvals 120 psi 0 8 MPa 8 bar Maximum Fluid Working Pressure 120 psi 0 8 MPa 8 bar Maximum Air Input Pressure Model SA3AAA Show...

Page 2: ...teel Sanitary Pumps 30 SaniForce 1590 Stainless Steel Sanitary Pumps 31 Parts Drawing Fluid Section 32 Parts List Fluid Section 33 Pump Configuration 33 Inlet and Outlet 33 Diaphragm Material 35 Parts...

Page 3: ...itary Ball Check Pump 3150 SA73A1 DIN 1590 SB_ _ _ _ Flange Sanitary Ball Check Pump 3150 SB_ _ _ 1 Flange 3150 SB6881 DIN 3150 SB7771 DIN 3150 SB_ _ _ 3 Flange 3150 SF_ _ F1 Flange Sanitary Flapper C...

Page 4: ...unting 3150 Sanitary Ball Check Pump for Bin Evacuation Systems with EPDM overmolded diaphragms and PTFE check balls 24E440 is the same as SA3AA3 except it does not include a fluid inlet tee elbows an...

Page 5: ...Models 310622ZAL 5...

Page 6: ...tial static arc Keep work area free of debris including solvent rags and gasoline Do not plug or unplug power cords or turn power or light switches on or off when flammable fumes are present Ground al...

Page 7: ...ffic areas sharp edges moving parts and hot surfaces Do not kink or over bend hoses or use hoses to pull equipment Keep children and animals away from work area Comply with all applicable safety regul...

Page 8: ...each side to allow the pump to rotate while still securely mounted to the bracket FIG 1 Quick release pins for pump rotation Grounding Pump Connect a ground wire and clamp as shown in FIG 2 Loosen the...

Page 9: ...disconnect coupler D onto the end of the air hose A and screw the mating fitting into the pump air inlet snugly Fluid Suction Line 1 Use flexible grounded fluid hoses G where possi ble 2 For best seal...

Page 10: ...uired to relieve pressure in the hose if it is plugged The drain valve reduces the risk of serious injury including splashing in the eyes or on the skin or contamination from hazardous fluids when rel...

Page 11: ...the ports facing the same direction To reorient the ports into any position 1 Remove the clamps 130 holding the inlet and or outlet tee to the elbows 2 Rotate the manifold tee 339 and reattach Instal...

Page 12: ...he end of the air exhaust line to catch fluid in case of a diaphragm rupture See FIG 5 FIG 5 Venting Exhaust Air Be sure the system is properly ventilated for your type of installation You must vent t...

Page 13: ...2 Check connections to be sure they are tight Tighten fluid inlet and outlet connections securely 3 Place the suction tube if used in fluid to be pumped NOTE If fluid inlet pressure to the pump is mo...

Page 14: ...ow the Pressure Relief Procedure page 13 3 Disassemble the fluid section of the pump and accessories See Check Valve Repair page 21 and Standard Diaphragm Repair page 23 or 3A Overmolded Diaphragm Rep...

Page 15: ...ecommended maintenance procedures and frequencies Maintenance must be per formed by trained personnel per the established schedule Task Operator Maintenance Person Daily Weekly Monthly Inspect system...

Page 16: ...wedged into seat 233 due to overpressur ization Follow Pressure Relief Proce dure page 13 Disassemble ball check assembly and inspect for damage see page 21 Dispensing valve clogged Relieve pressure...

Page 17: ...block plate pilot block u cups or pilot pin o rings Repair or replace See page 18 Worn shaft seals Replace See page 23 standard or page 26 3A Overmolded Pump leaks air externally Air valve cover is l...

Page 18: ...Pressure Relief Procedure page 13 2 With a Torx T20 screwdriver or 7 mm 9 32 in socket wrench remove the six screws 103 air valve cover 102 and gasket 104 See FIG 6 3 Move the valve carriage 105 to th...

Page 19: ...as explained on page 28 Reassemble the fluid sec tion 2 Install the valve plate 108 in the cavity seal down Install the three screws 103 using a Torx T20 screwdriver or 7 mm 9 32 in socket wrench Tig...

Page 20: ...5 See FIG 11 8 Install the valve carriage 105 so its tabs slip into the grooves on the narrow end of the actuator pis tons 111 See FIG 11 9 Align the valve gasket 104 and cover 102 with the six holes...

Page 21: ...drain 3 From the outlet manifold remove both upper clamps 132a 4 Remove outlet manifold leaving elbows 128 gas kets 129 clamps 130 and tee 339 assembled 5 For 3A Ball Check pumps remove ball gasket 2...

Page 22: ...pumps remove gasket 240 Remove middle clamp 132c and housing 252 Remove middle gasket 240 and flapper valve 251 Remove lower clamp 132b lower flapper housing 248 and gasket 240 Clean all parts and in...

Page 23: ...erse order See step 5 Tighten clamps hand tight NOTE For flapper check make sure flapper check 251 is placed properly in housing 248 groove Ensure that the flapper check moves freely Standard Diaphrag...

Page 24: ...housing 101 Hold the shaft flats with a 19 mm open end wrench and remove the diaphragm assembly from the shaft Disassemble the remaining diaphragm assembly 8 Inspect the diaphragm shaft 121 for wear...

Page 25: ...e the other diaphragm assembly to the shaft as explained in step 2 6 Using a 5 8 in wrench hold the wrench flats of one diaphragm assembly and torque the other dia phragm to 60 70 ft lb 81 94 N m NOTE...

Page 26: ...assembled handtight To loosen grip both diaphragms securely around the outer edge and rotate counterclockwise One diaphragm assembly will come free and the other will remain attached to the shaft Remo...

Page 27: ...ifted off the air cover at this point 5 Supply the pump with low pressure air less than 7 psi 05 MPa 0 5 bar The diaphragm will very slowly pull onto the air cover 120 Find the pres sure that keeps th...

Page 28: ...with new ones 7 Use a bearing puller to remove the diaphragm shaft bearings 117 air valve bearings 112 or pilot pin bearings 113 Do not remove undamaged bear ings 8 If you removed the diaphragm shaft...

Page 29: ...s near the center of the cover 6 Apply medium strength blue Loctite or equivalent to the threads of the screws 122 Install the screws 122 handtight Using a 10 mm socket wrench torque the screws opposi...

Page 30: ...a three inch inlet and outlet San toprene balls and diaphragms a pump stand and no leak detector is model SB3661 To order replace ment parts refer to the part lists on pages 32 41 The digits in the m...

Page 31: ...EPDM SBBAAA Non 3A Approved No Leak Detector 2 x 2 3A Ball Checks HD 3A PTFE 3A Approved EPDM SBDAAA Non 3A Approved No Leak Detector 50 mm DIN 3A Ball Checks HD 3A PTFE 3A Approved EPDM SBBA11 Non 3A...

Page 32: ...Apply a medium strength thread locker to shaft side of screw threads Apply a waterproof sanitary lubricant to clamps clamping surfaces and gaskets Parts not included on BES ram models Part Numbers 24...

Page 33: ...ll 2XB 15H481 SEAT 4 All 234 249892 COVER Fluid 2 All 240 15H459 GASKET 3 in EPDM 12 All 2XA 15H482 STOP Ball 4 A 3A Approved Ball Check Pump 135 24J608 CLAMP sanitary dia phragm 2 B Standard Ball Che...

Page 34: ...150 All 128 234531 ELBOW 4 129 15H459 GASKET sanitary EPDM 3 in 4 130 15D475 CLAMP sanitary 3 in 4 132 510490 CLAMP sanitary 4 in 6 135 15G323 CLAMP sanitary diaphragm 2 Model 1590 All 128 249894 ELBO...

Page 35: ...ncludes 110 446 110 112181 U CUP 2 446 DIAPHRAGM 2 143 15D021 BOLT 2 444 15D018 PLATE diaphragm 2 445 189298 PLATE diaphragm 2 Model Ref Part Description Qty Model 1590 255058 3A Approved EPDM Overmol...

Page 36: ...part Digit Ref Part Description Qty Model 3150 A 3A Approved PTFE 541 112359 BALL 4 F Flapper check NONE 6 Santoprene 541 112361 BALL 4 7 BUNA N 541 15B492 BALL 4 8 fluoroelastomer 541 15B491 BALL 4 M...

Page 37: ...Parts List Fluid Section 310622ZAL 37...

Page 38: ...659 164 TI4680c TI8068b 638 122 120 119 637 147 Z 3 2 Apply medium strength adhesive to outside surface of piston bearing and inside surface of center housing bore Apply a medium strength thread lock...

Page 39: ...to the diaphragm plate sanitary pump or to the diaphragm 3A pump if needed Apply a medium strength thread locker to shaft side of screw threads Apply a waterproof sanitary lubricant to clamps clamping...

Page 40: ...4 111 188612 PISTON actuator 2 112 188613 BEARING piston 2 113 188611 BEARING pin 2 114 188610 PIN push 2 115 157628 O RING 2 116 188614 BLOCK pilot 1 117 188609 BEARING shaft 2 119 188603 GASKET air...

Page 41: ...086 CLAMP sanitary 4 in used on models 248273 and 24E667 135 15G323 CLAMP sanitary diaphragm 2 143 15D021 BOLT 2 339 234532 TEE outlet 3 x 3 in 1 444 See Table PLATE diaphragm 2 445 See Table PLATE di...

Page 42: ...4 15H407 15H407 15H407 15H407 233 SEAT 4 15D026 15D026 242 BALL STOP GASKET 4 15D346 15D346 444 PLATE diaphragm fluid side 2 15D018 15D018 15D018 445 PLATE diaphragm air side 2 189289 189289 189298 1...

Page 43: ...s flapper check valve to 3A ball check valve Includes four seats and four ball stops Balls need to be ordered separately 16E975 Flapper Valve Conversion Kit Converts ball check valve to flapper check...

Page 44: ...awing 44 310622ZAL Model 1590 Dimensional Drawing NOTE Dimensions are identical for tri clamp and DIN models 23 6 in 599 4 mm 17 0 in 431 8 mm 35 8 in 909 3 mm 24 9 in 632 5 mm 8 6 in 218 4 mm TI8778a...

Page 45: ...operating speed material properties and other variables 28 ft 8 5 m wet 15 ft 4 57 m dry Maximum size pumpable solids 5 8 in 15 9 mm Maximum Noise Level at 100 psi full flow 90 dBa Sound Power Level 1...

Page 46: ...read fluid outlet pressure To find Pump Air Pressure scfm or m3 min at a specific fluid flow gpm lpm and operating air pressure psi MPa bar 1 Locate fluid flow rate along bottom of chart 2 Read vertic...

Page 47: ...37 5 in 952 5 mm 19 3 in 490 2 mm 23 6 in 599 4 mm TI4929e 28 3 in 718 8 mm 6 5 in 165 1 mm 23 5 in 596 9 mm 28 4 in 721 4 mm 6 5 in 165 1 mm 37 6 in 955 0 mm TI7610d 3A Ball Check Valve Pumps Sanitar...

Page 48: ...er 10 ft 3 5 m wet 5 ft 1 75 m dry Ball 18 ft 5 5 m wet 9 ft 2 75 m dry Maximum size pumpable solids Flapper 2 5 in 63 5 mm Ball 1 0 in 25 4 mm Maximum Noise Level at 100 psi full flow 90 dBa Sound Po...

Page 49: ...d outlet pressure To find Pump Air Pressure scfm or m3 min at a specific fluid flow gpm lpm and operating air pressure psi MPa bar 1 Locate fluid flow rate along bottom of chart 2 Read vertical line u...

Page 50: ...D TO WARRANTY OF MERCHANTABILITY OR WARRANTY OF FITNESS FOR A PARTICULAR PURPOSE Graco s sole obligation and the buyer s sole remedy for any breach of warranty shall be as set forth above The buyer ag...

Reviews: