


Operation
Pressure Relief Procedure
WARNING
INJECTION HAZARD
The system pressure must be manually
relieved to prevent the system from
starting or spraying accidentally. Fluid
under high pressure can be injected through the
skin and cause serious injury. To reduce the risk of
an injury from injection, splashing fluid, or moving
parts, follow the Pressure Relief Procedure
whenever you:
are instructed to relieve the pressure,
stop spraying,
check or service any of the system equipment,
or install or clean the spray tip.
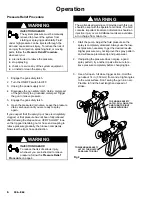
1. Engage the gun safety latch.
2. Turn the ON/OFF switch to OFF.
3. Unplug the power supply cord.
4.
Disengage the gun safety latch. Hold a metal part
of the gun firmly to a grounded metal pail. Trigger
the gun to relieve pressure.
5. Engage the gun safety latch.
6. Open the pressure drain valve. Leave the pressure
drain valve open until you are ready to spray
again.
If you suspect that the spray tip or hose is completely
clogged, or that pressure has not been fully relieved
after following the steps above, VERY SLOWLY loos-
en the tip guard retaining nut or hose end coupling to
relieve pressure gradually, then loosen completely.
Now clear the tip or hose obstruction.
WARNING
INJECTION HAZARD
To reduce the risk of serious injury,
whenever you are instructed to relieve
pressure, follow the Pressure Relief
Procedure on page 6.
WARNING
The wallet-sized warning card provided with this gun
should be kept with the operator at all times. The card
contains important treatment information should an
injection injury occur. Additional cards are available
at no charge from Graco Inc.
1.
Start the pump. Adjust the fluid pressure so the
spray is completely atomized. Always use the low-
est pressure necessary to get the desired results.
Higher pressure may not improve the spray pattern
and will cause premature tip and pump wear.
2.
If adjusting the pressure does not give a good
spray pattern, try another tip size. Be sure to re-
lieve pressure completely before changing tips.
3.
Use a full open, full close trigger action. Hold the
gun about 14 in. (350 mm) from and at right angles
to the work surface. Don’t swing the gun in an arc.
Practice to find the best length and speed of
stroke.
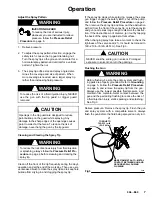
Fig 2
0958
TO ENGAGE SAFETY
LATCH, PULL ON LATCH
AND TURN TO RIGHT
ANGLE WITH BODY
TO DISENGAGE SAFETY
LATCH, TURN LATCH
PARALLEL TO BODY