background image

Installation

311737B

7

Installation

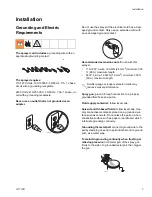
Grounding and Electric 
Requirements

The sprayer cord includes 

a grounding wire with an 

appropriate grounding contact.

The sprayer requires: 

110-120V Units: 100-130VAC, 50/60 Hz, 11A, 1 phase, 
circuit with a grounding receptacle. 

240V Units: 210-255 VAC, 50/60 Hz, 7.5A, 1 phase, cir-
cuit with a grounding receptacle. 

Never use an outlet that is not grounded or an 
adapter.


Do not use the sprayer if the electrical cord has a dam-
aged ground contact. Only use an extension cord with 
an undamaged ground contact. 

Recommended extension cords

 for use with this 

sprayer:

110-120V: 3-wire, 12 AWG (2.5 mm

2

) minimum, 300 

ft. (90 m) maximum length.

240V: 3-wire, 16 AWG (1.0 mm

2

) minimum, 300 ft 

(90 m) maximum length.

Spray gun:


ground through connection to a properly 

grounded fluid hose and pump.

Fluid supply container:

 follow local code.

Solvent and Oil-based fluids: 

follow local code. Use 

only conductive metal pails placed on a grounded sur-
face such as concrete. Do not place the pail on a non-
conductive surface such as paper or cardboard, which 
interrupts grounding continuity.

Grounding the metal pail: 

connect a ground wire to the 

pail by clamping one end to pail and other end to ground 
such as a water pipe.

To maintain grounding continuity when flushing or 
relieving pressure: 

hold metal part of the spray gun 

firmly to the side of a grounded metal pail, then trigger 
the gun.

ti5573a

Smaller gauge or longer extension cords may 
reduce sprayer performance.

ti4297

TIA

Summary of Contents for 390 253958

Page 1: ...62019 254968 254969 254998 253961 Maximum Working Pressure 3300 psi 227 bar 22 7 MPa IMPORTANT SAFETY INSTRUCTIONS Read all warnings and instructions Save these instructions Contact Graco Customer Ser...

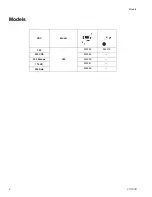
Page 2: ...Models 2 311737B Models VAC Model 120 390 253358 262019 230 CCE 254968 230 Europe 254969 110 UK 253961 230 Asia 254988...

Page 3: ...s on or off when flammable fumes are present Ground equipment and conductive objects in work area Read Grounding instructions If there is static sparking or you feel a shock stop operation immediately...

Page 4: ...containing such solvents in pressurized aluminum equipment Such use can cause serious chemical reaction and equipment rupture and result in death serious injury and property damage BURN HAZARD Equipm...

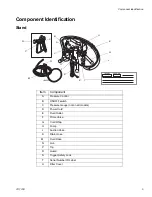
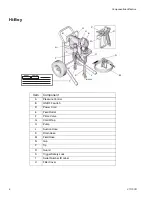
Page 5: ...M N S P R U ti5636c Item Component A Pressure Control B ON OFF switch C Pressure Gauge not on all models D Power Cord E Fluid Outlet F Prime Valve G Cord Wrap H Pump J Suction Hose K Drain Hose M Flui...

Page 6: ...K M N S P R U ti11629a Item Component A Pressure Control B ON OFF switch D Power Cord E Fluid Outlet F Prime Valve G Cord Wrap H Pump J Suction Hose K Drain Hose M Fluid Hose N Gun P Tip R Guard S Tr...

Page 7: ...0 m maximum length 240V 3 wire 16 AWG 1 0 mm2 minimum 300 ft 90 m maximum length Spray gun ground through connection to a properly grounded fluid hose and pump Fluid supply container follow local code...

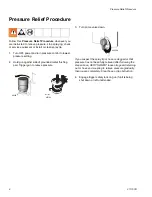
Page 8: ...old gun against side of grounded metal flushing pail Trigger gun to relieve pressure 3 Turn prime valve down If you suspect the spray tip or hose is clogged or that pressure has not been fully relieve...

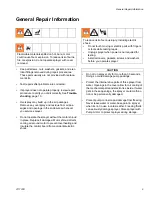
Page 9: ...d on hot bare motor could cause fire or explosion To reduce risk of burns fire or explosion do not operate sprayer with cover removed To reduce risk of serious injury including electric shock Do not t...

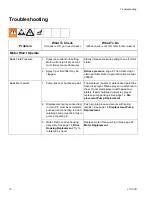
Page 10: ...chanical 1 Pump frozen or hardened paint Thaw sprayer if water or water based paint has frozen in sprayer Place sprayer in warm area to thaw Do not start sprayer until thawed com pletely If paint hard...

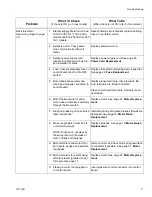
Page 11: ...nals Securely recon nect leads 6 Motor thermal switch Yellow motor leads must have continuity through thermal switch Replace motor See page 27 Motor Replace ment 7 Brush cap missing or loose brush lea...

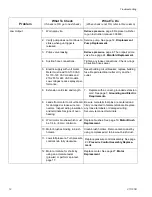
Page 12: ...sion cord See page 7 Grounding and Electric Requirements 8 Leads from motor to circuit board for damaged or loose wire con nectors Inspect wiring insulation and terminals for signs of over heating Be...

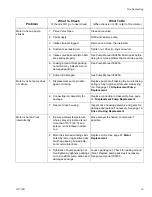
Page 13: ...acement 2 Connecting rod assembly for damage Replace connecting rod assembly See page 14 Displacement Pump Replacement 3 Gears or drive housing Inspect drive housing assembly and gears for damage and...

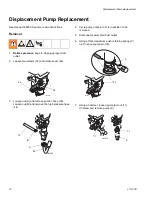
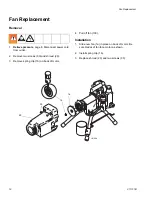
Page 14: ...0 and rotate cover 44 3 Loosen nut A and remove suction hose 35 Loosen nut B and remove the high pressure hose 14 4 Cycle pump until pin 32 is in position to be removed 5 Disconnect power cord from ou...

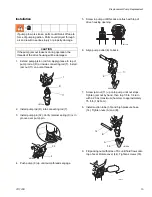
Page 15: ...t 11 up onto pump until nut stops Tighten jam nut by hand then tap 1 8 to 1 4 turn with a 20 oz maximum hammer to approximately 75 ft lb 102 N m 8 Install suction tube 35 and high pressure hose 14 Tig...

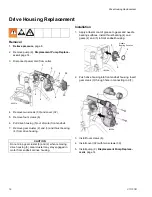
Page 16: ...n 1 Apply a liberal coat of grease to gears and needle bearing surfaces Install thrust bearing 4 and gears 2 and 3 in front endbell housing 2 Push drive housing into front endbell housing Insert gear...

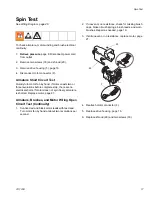
Page 17: ...omplete stop there are no electrical shorts If motor does not spin freely armature is shorted Replace motor page 27 Armature Brushes and Motor Wiring Open Circuit Test Continuity 1 Connect red and bla...

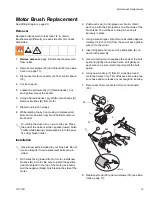
Page 18: ...rd from outlet 2 Remove two screws 30 and shroud 29 3 Remove spring clip 1b on back of motor 4 Pull off fan 100 Installation 1 Slide new fan 1a in place on back of motor Be sure blades of fan face mot...

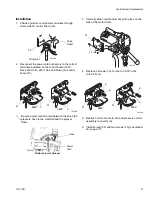
Page 19: ...e motor 2 Push each cap A into place over brush Orient each cap with the 2 projections on either side of the brush lead You will hear a snap when cap is securely in place 3 Using a wire stripper strip...

Page 20: ...3 5 Remove 3 screws 30 securing control board to housing 2 are located on the front and one on the back next to the power cord 6 Pull control board out slightly and then slide it back and off of frame...

Page 21: ...ntrol board back into place on the side of the motor frame 4 Replace 3 screws 30 Torque to 30 35 in lbs 3 4 3 9 N m 5 Reattach motor connector B and pressure control assembly connector A 6 Install shr...

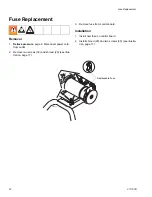
Page 22: ...page 8 Disconnect power cord from outlet 2 Remove two screws 30 and shroud 29 see illus tration page 17 3 Remove fuse from control board Installation 1 Install new fuse on control board 2 Install shro...

Page 23: ...collar 17 on fluid manifold so open ing faces toward motor 2 Apply Loctite to pressure control assembly threads 16 3 Screw pressure control assembly 16 into manifold and torque to 150 in lbs 17 0 N m...

Page 24: ...ain valve 23 and remove it from manifold 15 Installation 1 Thread drain valve 23 into manifold 15 opening 2 Hand tighten securely Using a wrench torque to 120 to 130 in lbs 3 Push base 24 over drain v...

Page 25: ...manifold 2 Push drain line 40 onto barbed fitting 20 If you are only replacing the manifold and will be reusing the existing barbed fitting 20 and drain line 40 you will need to use a sharp knife to...

Page 26: ...oosening grounding screw 31 Installation 1 Follow Control Board Replacement installation instructions steps 1 4 page 20 2 Reconnect green ground wire G to green ground ing screw 31 on frame Be sure te...

Page 27: ...ation 1 Install new motor 1 on frame 45 with four screws 6 2 Install manifold 15 with two screws 6 Manifold Replacement page 24 3 Install control board 33 with three screws 30 Connect all leads to boa...

Page 28: ...y Power Plug White Green Black from Motor 2 x Yellow ON OFF Switch ti5643a Capacitor Replaceable Fuse Black Power Plug Blue Green Brown ON OFF Switch Pressure Control Assembly Red from Motor 2 x Yello...

Page 29: ...pm 0 47 1 8 Maximum tip size 0 021 Fluid outlet npsm 1 4 in Dimensions Stand Length 15 75 in 40 0 cm Width 14 0 in 36 0 cm Height 17 in 43 cm Weight 30 lbs 13 6 kg Weight with gauge 31 lbs 14 0 kg Dim...

Page 30: ...Notes 30 311737B Notes...
Page 31: ...by Graco such as electric motors switches hose etc are subject to the warranty if any of their manufacturer Graco will provide purchaser with reasonable assistance in making any claim for breach of th...

Page 32: ...ained in this document reflects the latest product information available at the time of publication Graco reserves the right to make changes at any time without notice mm 311737 This manual contains E...

Reviews: