background image

vii

Ports and Plugins

Power On/Off Switch

Turns machine on and off.

Upper Encoder Port 

(page 54)

Connects encoders to machine.

Lower Encoder Port 

(page 52)

Connects encoders to machine.

Quilt Motion Tablet Port 

For optional automation accessory.

USB Connector Port 

(page 71)

For updating only.

Power Port with Retainer

 (page 16)

Connects and holds power cord to the 

machine.

Accessory Ports

For laser accessory.

Back Handle Ports

For back handle accessory.

1

3

4

5

6

7

8

2

1

Machine Rear (Underside View)

2

3

4

5

6

8

7

Summary of Contents for Q'nique 19 X

Page 1: ...Service Manual Copyright June 16 2022 V 1 2 The Grace Company ...

Page 2: ...nded for indoor use only Do not use outdoors Do not operate where aerosol spray products are being used or where oxygen is being administered Connect this appliance to a properly grounded outlet only See grounding instructions on next page To disconnect turn all controls to the off position then remove the plug from the outlet by grasping the plug Do not pull on cord Always switch off or unplug th...

Page 3: ...nstructions are not completely understood or if in doubt as to whether the product is properly grounded Do not modify the plug provided with the product if it will not fit the outlet have a proper outlet installed by a qualified electrician Grounding Methods Figure 61 1 B Cover of Grounded Outlet Box Metal Screw A Grounding Pin Surge Protector To Sewing Machine C Adapter Grounding Means D Groundin...

Page 4: ...the Motor Driver Board 26 Replacing the Main Board 28 Replacing the Small Thread Tensioner 30 Replacing the Large Thread Tensioner 32 Replacing the Thread Cutter 36 Checking the Thread Guides 37 Replacing the Needle Bar Thread Guide 40 Replacing the Bobbin Springs 42 Replacing the Encoder Spring 46 Replacing the Upper Encoder 49 Replacing the Lower Encoder 51 Replacing a Machine Wheel 53 Replacing...

Page 5: ...Rated Current 14 5 A Output Rated Power 350 W Accessory Ports 12 V DC 0 5 A Features Ergonomic handles and handlebars for efficient extended use page 17 2 4 touch display page 12 Built in bobbin winder Dual thread mast and stands for quilting and winding bobbin at the same time Dual wheels for added stability page 56 Edge warning system Range of 90 to 2000 stitches per minute Regulated stitching 1...

Page 6: ...p bobbin winding 1 Bobbin Wind Thread Stand page 11 Holds a cone of thread for winding bobbin 2 Thread Mast page 10 Guides thread when quilting 1 Top Thread Stand page 11 Holds a thread cone for threading machine 2 Thread Guide Rod page 37 Positions thread when quilting Small Thread Tensioner page 30 Tensions thread when quilting Take Up Lever Tensions thread when quilting 3 2 4 Touch Display page...

Page 7: ...chine Wheels page 56 Shuttles the machine up and down the bottom carriage 13 14 15 16 17 18 Hook Assembly Front View Thread Cutter page 36 Cuts excess thread from threading machine Needle Bar page 6 Holds the needle when quilting Hopping Foot page 8 Presses fabric down when quilting Needle Plate page 59 Covers top of hook assembly Timing Cut Out page 61 Accesses hook assembly set screws Hook Assem...

Page 8: ...2 Connects encoders to machine Quilt Motion Tablet Port For optional automation accessory USB Connector Port page 71 For updating only Power Port with Retainer page 16 Connects and holds power cord to the machine Accessory Ports For laser accessory Back Handle Ports For back handle accessory 1 3 4 5 6 7 8 2 1 MachineRear UndersideView 2 3 4 5 6 8 7 ...

Page 9: ... 11 Display Cable Port page 12 Connects display cable to machine Accessory Ports For laser accessory Left Handlebar Port page 17 Plug the left handlebar cable into the machine Right Handlebar Port page 17 Plug the right handlebar cable into the machine 10 11 12 12 9 ...

Page 10: ... a new project After 20 hours of use After sitting without use for more than 30 days Hook Assembly Every other bobbin change 4 321 Large Thread Tensioner 1 Power off the machine 2 Set the large thread tensioner to 1 to expose the tensioner discs Use the lint brush or a can of compressed air to clear away lint and thread remnants Note Lint build up between the tensioner discs can prevent proper thr...

Page 11: ... the hook assembly clear away any lint cloth and thread remnants 8 Rotate the hand wheel until the needle is halfway down This will put the hook in the best position for oiling 2 Pull the release lever shown in blue on the bobbin case to remove it from the hook assembly If the case won t release raise the needle with the hand wheel at the rear of the machine 1 Clear debris from the spring and disc...

Page 12: ...e it from the machine 1 Reload the bobbin case and return it to the machine for detailed instructions on tensioning the bobbin case see page 42 Close the hook assembly cover 9 10 Unplug the display cable from the port on the machine 3 Place 1 2 drops of oil on the needle bar Then replace the display board cover and plug the display back into the port 12 11 13 1 Wipe down the needle bar regularly t...

Page 13: ...your needle based upon the thread you re using Thicker thread requires a thicker needle Remember the thicker the thread the lower the thread weight wt number Using the wrong type of needle or using a needle that is bent broken or blunt can damage the fabric the machine and needle For best results Use the recommended needle style for your machine see below Use the needle size appropriate for the we...

Page 14: ...bric more easily and without getting damaged Eye Hole near needle point where the needle is threaded Scarf A cut away on the back of the needle that allows the needle to fit smoothly within the hook assembly when quilting Point The sharp end of the needle Choose the type of needle point to fit your project and always replace your needle once the point is dull Needle Diagram Needle Front View Needl...

Page 15: ...ght hours of use Straight Needle Bent Needle To avoid damage to the machine please choose an approved needle style from the list below DPx5 MR 134 MR 1955 MR To change the needle take the following steps 1 Power off the machine For information on selecting a needle see page 4 2 With the hand wheel raise the needle so it clears the hoop part of the hopping foot 3 Loosen the needle thumb screw and p...

Page 16: ...arf a cut out on the back of the needle should face the throat of the machine Place the needle magnet on the opposite side of the scarf 7 Use the needle magnet as a visual guide Twist the needle until the magnet points as straight out from the machine as possible Note Do not attempt to adjust the needle by moving the magnet directly 8 Hand tighten the thumb screw Do not over tighten if using the f...

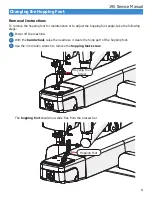
Page 17: ...just the hopping foot angle take the following steps 1 Power off the machine 2 With the hand wheel raise the needle so it clears the hoop part of the hopping foot 3 Use the 3 mm Allen wrench to remove the hopping foot screw Hopping Foot Screw The hopping foot should now slide free from the presser bar Hopping Foot 1 2 3 ...

Page 18: ...ch and hopping foot screw to hold the hopping foot in place but do not tighten 1 2 Changing the Hopping Foot continued 2 Lower the hopping foot until it rests on the height tool Tighten the hopping foot screw with the 3 mm Allen wrench 1 Slide the hopping foot height tool shown in blue underneath the hopping foot with the needle inside the slot 3 4 Hopping Foot Screw Hopping Foot Hopping Foot Coll...

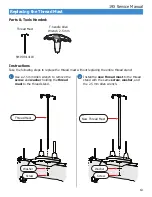
Page 19: ...ng the entire thread stand Use a 2 5 mm Allen wrench to remove the screw and washer holding the thread mast to the thread stand 1 Thread Mast Screw Install the new thread mast to the thread stand with the same screw washer and the 2 5 mm Allen wrench 2 T handle Allen Wrench 2 5 mm 2 5 mm Thread Mast SMP 09 14103 Washer New Thread Mast Screw Washer ...

Page 20: ...and Assembly Parts Tools Needed Instructions Take the following steps to replace the thread stand assembly Use the 2 5 mm Allen wrench to remove the two M4 x 8 mm SBHCS screws and remove the old thread stand assembly from the right side of the machine You may need to push aside the piece of foam to access the screws 1 SMP 09 13183 T handle Allen Wrench 2 5 mm 2 5 mm Old Thread Stand Assembly SBHCS...

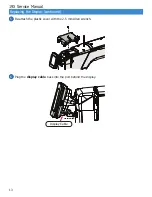
Page 21: ...Turn off the machine and unplug the display cable Display Cable 3 1 Replacing the Display SMP 09 15716 SMP 02 15727 1 Use the 2 5 mm Allen wrench to remove the cover behind the display T handle Allen Wrench 2 5 mm 2 5 mm 1 Attach the new 2 4 inch touch display with two M5 x 16 mm SBHCS and the 3 mm Allen wrench 2 4 2 4 Inch Touch Display Display Cable SBHCS M5 x 16 mm x2 Old 2 4 Inch Touch Display...

Page 22: ...13 19X Service Manual Replacing the Display continued 1 Re attach the plastic cover with the 2 5 mm Allen wrench 2 Plug the display cable back into the port behind the display 5 6 Display Cable ...

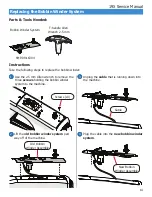
Page 23: ...e the 2 5 mm Allen wrench to remove the three screws holding the bobbin winder system to the machine 1 Screws x3 1 Lift the old bobbin winder system part way off of the machine 2 Old Bobbin Winder Assembly 1 Unplug the cable that is running down into the machine 3 1 Plug the cable into the new bobbin winder system 4 Cable New Bobbin Winder Assembly Bobbin Winder System SMP 09 16394 ...

Page 24: ...new bobbin winder system onto the back of the machine so that the cable goes through the groove behind the motor 5 Groove New Bobbin Winder System 1 Use the 2 5 mm Allen wrench to secure the bobbin winder system in place with the three screws that were removed earlier 6 Screws x3 ...

Page 25: ...eps to replace the power cord retainer 1 Remove the retainer by squeezing it on the sides near the retainer screws and pulling the ends out of the screws 1 Install the new retainer by squeezing the sides and inserting the ends into the retainer screws Retainer Screws 3 1 2 1 Lift the power cable retainer blue and plug the power cord into the machine 4 Power Cord Retainer SMP 08 14475 Power Cord Po...

Page 26: ...bars Turn off the machine and unplug the handlebar cables 1 Use the 4 mm Allen wrench to remove the handlebar clamp screw 2 T handle Allen Wrench 4 mm 4 mm Remove the handlebars from machine 3 1 Slide the new handlebars into the slot so the handlebar cables are on the bottom 4 Handlebar Assembly SMP 08 14066 Handlebar Cables ...

Page 27: ...l they are comfortable to hold and operate 1 Hold the handlebars at the desired angle and tighten the clamp screw 3 Open the handlebar levers shown in blue 1 If desired extend the handles outward to improve the reach of the machine 5 6 7 8 9 1 Close the handlebar levers shown in blue If needed loosen the clamp screw and repeat step 4 10 ...

Page 28: ...19 19X Service Manual Replacing the Handlebars continued 2 Plug the handlebar cables into the ports with the matching color 11 Handlebar Cables ...

Page 29: ...ew Needle T handle Allen Wrench 3 mm 3 mm LED Lamp Assembly To avoid damaging the LED Lamp Assembly keep it in the packaging until you are ready to install it SMP 09 14863 Handlebar Cables Use the 3 mm Allen wrench to remove the hopping foot screw and hopping foot Hopping Foot Screw Hopping Foot 3 Use the 3 mm Allen wrench to loosen the screw in the hopping foot collar and remove the collar Hoppin...

Page 30: ...emove the screw holding the thread guide to LED lamp Keep the thread guide screw and spacer together Thread Guide Screw 6 Use the 2 5 mm Allen wrench to remove the four screws around the needle bar 7 Use the 2 mm Allen wrench to remove the two smaller screws on the back of the LED lamp 8 Pull the old LED lamp assembly down around the needle bar Unplug the two cables and remove the old LED lamp ass...

Page 31: ...e 2 5 mm Allen wrench to reattach the thread guide assembly to the LED lamp Thread Guide Assembly 13 Reattach the thread cutter to side of the machine using the same screw and the 2 5 mm Allen wrench Thread Cutter Screw 15 Plug the cables into the new LED lamp assembly 11 16 New LED Lamp Assembly Assemble the thread guide with the spacer next to the wire that points up and then place the screw thr...

Page 32: ...matching color sticker Handlebar Cables Hopping Foot Height Tool Hopping Foot 1 Replace the hopping foot adjust the hopping foot height see Changing the Hopping Foot on page 8 for instructions 18 1 Replace the needle see Changing the Needle on page 6 for installation instructions 19 Return the hopping foot collar to the press bar with the mounting bar in the back Press Bar Mounting Bar 17 20 21 ...

Page 33: ...over for the front display board by pressing up on the tab on the bottom and then pulling it out Tilt the display back and unplug the bottom of the display cable from the machine Cover Tab Front Display Board SMP 02 16027 To avoid damaging the front display board circuitry keep it in the packaging until you are ready to install it Phillip s Head Screwdriver Front Display Board Screws x4 Unplug the...

Page 34: ...he top of the cover in the slot above the front display board and pressing the cover in place 6 Use the Phillip s head screwdriver and the four screws to secure the front display board to the machine 1 Plug the display back into the machine and adjust the display to a comfortable angle 8 Display Cable Cover Tab Front Display Board Screws x4 New Front Display Board Cable ...

Page 35: ...To avoid damaging the motor driver board circuitry keep it in the packaging until you are ready to install it T handle Allen Wrench 2 mm 2 mm T handle Allen Wrench 2 5 mm 2 5 mm Middle Plastic Cover Use the 2 5 mm Allen wrench to remove the motor driver board cover Motor Driver Board Cover 2 3 Unplug the cables from the motor driver board Cables 4 Use the 2 mm Allen wrench to remove the three scre...

Page 36: ...er Use the 2 5 mm Allen wrench to reattach the motor driver board cover Motor Driver Board Cover Plug the cables into the motor driver board Cables Use the 2 mm Allen wrench to secure the new motor driver board with the three screws New Motor Driver Board Replacing the Motor Driver Board continued 1 2 3 5 ...

Page 37: ...ging the main board circuitry keep it in the packaging until you are ready to install it T handle Allen Wrench 2 5 mm 2 5 mm Note If you have QuiltMotion installed unplug the 6P 6C QuiltMotion cable from the back of the machine 6P 6C QuiltMotion Cable 2 Use the 2 5 mm Allen wrench to remove the two screws holding the main board cover in place Main Board Cover 3 Remove the old main board assembly f...

Page 38: ...ved earlier and the the 2 5 mm Allen wrench 4 1 Plug the encoders back into the encoder ports with the matching sticker color 5 New Main Board Assembly Note If you have QuiltMotion installed plug the 6P 6C QuiltMotion cable back in as well 6P 6C QuiltMotion Cable Replacing the Main Board continued ...

Page 39: ...the front display cover from the top of the machine 1 Small Tensioner 1 Use the 2 mm Allen wrench to remove the clamp holding the small thread tensioner in place 2 1 Remove the old small thread tensioner from the front display cover 3 SMP 08 10015 T handle Allen Wrench 2 5 mm 2 5 mm Front Display Cover 2 mm T handle Allen Wrench 2 mm Clamp Small Thread Tensioner Front Display Cover Bottom View ...

Page 40: ...ont display cover with one thread guide pointing down and the other pointing up and to the right 4 New Small Tensioner 1 Tighten the clamp over the small thread tensioner using the 2 mm Allen wrench 5 1 Replace the front display cover on the to of the machine using the 2 5 mm Allen wrench 6 Front Display Cover ...

Page 41: ...large thread tensioner from the machine Use a 3 mm Allen wrench to loosen the set screw holding the large thread tensioner in place Remove the tensioner from the machine 1 Parts Tools Needed Small Flat Head Screwdriver Large Thread Tensioner 1 2 3 4 Large Tensioner SMP 09 13180 Set Screw T handle Allen Wrench 3 mm 3 mm ...

Page 42: ...the meter key onto the tensioner post with the hub facing up 2 Metered Key Hub Place the tensioner meter on the tensioner post with the numbers near the check spring 3 Tensioner Meter Check Spring Place the tensioner spring on the tensioner post with the top end of the spring fitting in the slot in the post 4 Tensioner Spring Top End of the Spring Place the keyed washer on the tensioner post so th...

Page 43: ...machine with the check spring coming out of the tensioner at a 45 degree angle to the ground Check Spring Secure the tensioner in place with by tightening the set screw with the 3 mm Allen wrench Set Screw Set the check spring tension by inserting a small screwdriver into the slot on the inside of the tensioner knob and turning counter clockwise until the check spring starts to turn down 1 2 3 Slo...

Page 44: ...the screwdriver clockwise until the check spring stops moving and then continue turning another 90 degrees The check spring should still be at about a 45 degree angle to the ground 4 Replacing the Large Thread Tensioner continued ...

Page 45: ...T handle Allen Wrench 2 5 mm 2 5 mm Thread Cutter SMP 04 12082 Use the 2 5 mm Allen wrench to remove the screw holding the old thread cutter to side of the machine Keep the screw and thread cutter together Old Thread Cutter Screw Attach the new thread cutter to side of the machine using the same screw and the 2 5 mm Allen wrench 1 2 New Thread Cutter Screw ...

Page 46: ...des and to replace them if needed 1 Locate the thread guides along the thread path 2 Use a piece of thread like floss to feel around the inside of the thread guides indicated in the previous step Feel for any snagging or rough sections 3 Some of the thread guides must be replaced by a certified technician If you feel damage to one of these thread guides contact The Grace Company or your local deal...

Page 47: ...hat are part of the tensioner assemblies you will need to replace the damaged part See instructions for Replacing the Large Thread Tensioner on page 32 and Replacing the Small Thread Tensioner on page 30 Small Tensioner Assembly Large Tensioner Assembly If you feel damage to the needle bar thread guide you will need to replace it See instructions for Replacing the Needle Bar Thread Guide on page 4...

Page 48: ...rew holding the thread guide and spacer to the LED lamp Thread Guide Screw Use the 2 5 mm Allen wrench to reattach holding the thread guide assembly to LED lamp Thread Guide Assembly Spacer Assemble the thread guide with the spacer next to the wire that points up and then place the screw through the spacer Thread Guide Screw Spacer 7 8 9 ...

Page 49: ... needle Thumb Screw Needle Flat head Screwdriver 1 Power off the machine Raise the needle to the highest position using the hand wheel 1 2 Use the 3 mm Allen wrench to remove the hopping foot screw and hopping foot Hopping Foot Screw Hopping Foot 3 If the thread guide is still on the needle bar pull it down to remove it Note You may need to use a flat head screwdriver to tap the thread guide down ...

Page 50: ...r of a large screwdriver underneath the thread guide to help push it onto the needle bar 6 See Changing the Hopping Foot on page 8 for instructions on reinstalling the hopping foot 7 See Changing the Needle on page 6 for instructions on reinstalling the needle 8 Replacing the Needle Bar Thread Guide continued Thumb Screw Needle Hopping Foot Screw Hopping Foot ...

Page 51: ...n case Parts Tools Needed Small Flat Head Screwdriver Thread Tension Spring SMP 03 13101 Screws x2 Tension Spring Use the small flat head screwdriver to remove the two screws holding the thread tension spring to the outside of the bobbin case 1 Anti Backlash Spring SMP 03 13104 Small Bobbin Case Screw SMP 03 13102 Large Bobbin Case Screw SMP 03 13103 ...

Page 52: ...ole and tighten loosely in place See Loading the Bobbin Case in the user manual for instructions on adjusting the spring tension 4 Use the small flat head screwdriver to attach the spring to the bobbin case with the small bobbin case screw in the screw hole at the end of the spring 3 Tabs Small Bobbin Case Screw Large Bobbin Case Screw Replacing the Bobbin Case Springs continued New Tension Spring...

Page 53: ...case face down so that the opening is facing up 2 Position the anti backlash spring so that the center section is raised above the outside of the spring 3 Place the spring inside the bobbin at an angle and press the tabs that are closer together into their slot on the side Replacing the Bobbin Case Springs continued Tabs Slot Anti Backlash Spring Center ...

Page 54: ...e other side Use the small flat head screwdriver to make sure all four tabs are fully secured 4 Place the bobbin in the bobbin case The anti backlash spring should hold the bobbin so that it barely pokes out of the opening of the bobbin case 5 Bobbin Replacing the Bobbin Case Springs continued ...

Page 55: ...ilting mode is unregulated and does not use the encoders If the issue does continue the issue is likely caused by poor tension If the issue does not continue in manual mode but still happens in precise mode continue to the next step 2 Use precise mode to stitch a square in order to test each direction If you get long stitches or no stitches going left to right or right to left check the lower enco...

Page 56: ...er the machine or the encoder the cable will need to be replaced If the cable does not click into either the machine or the encoder both times then the encoder or machine main board will need to be replaced 3 Press the button on the display to start stitching in precise mode Lift the encoder wheel off the tracks and spin it by hand and observe the needle If the needle moves normally check the enco...

Page 57: ...f it does continue try swapping the upper and lower encoder cables and try stitching again If the issue switches directions for example it was making long stitches going front to back but now makes long stitches going left to right the cable will need to be replaced If the issue stays in the same direction the encoder will have to be replaced 7 ...

Page 58: ...oder and wheel 4 3 Loosen the lock collar screw with the 2 5 mm Allen Wrench until the lock collar shown in blue can twist freely Lock Collar Screw 3 1 Determine the correct spring to use in the repair Upper Encoder Attached to the wheel on the machine Use the silver spring Lower Encoder Attached to the wheel on the bottom carriage Use the black spring 1 2 Unplug the encoder cable from the machine...

Page 59: ...rew 6 Lock Collar 3 Place the replacement spring over the encoder screw and insert the short arm of the spring all the way through the hole on the encoder base 7 Short Spring Arm 4 Place the long arm of the encoder spring arm into the hole on the encoder lock collar 8 Long Spring Arm Lock Collar 5 Without allowing the arm to slip out of the lock collar rotate the collar until it wraps around the e...

Page 60: ... spring installation instructions see page 52 For the lower encoder black spring installation instructions see page 54 13 1 Adjust the screw and lock collar so the head of the screw slides in between the lock collar 10 2 Slide the shoulder spacer onto the screw with the thinner side toward the head of the bolt 11 Shoulder Spacer Plastic Stop Wheel Spacer Washer Replacing the Encoder Spring continu...

Page 61: ...r port T handle Allen Wrench 4 mm 4 mm Use the 4 mm Allen wrench to remove the upper encoder and left rear wheel Remove the wheel from the old encoder Place the wheel onto the encoder screw for the new encoder with the wheel hub facing away from the encoder 2 3 2 5 mm T handle Allen Wrench 2 5 mm Upper Encoder silver spring SMP 09 10668 Wheel Hub Encoder Screw Purple Encoder Port ...

Page 62: ...ten the lock collar screw with the 2 5 mm Allen wrench Lock Collar Screw 1 Place the encoder screw into the left rear wheel hole so the dark encoder wheel is between the two left machine wheels 2 Tighten the encoder screw with the 4 mm Allen wrench Encoder Screw 4 5 6 7 Note Make sure the encoder is functioning correctly by following the instructions for the Encoder Test on page 79 Purple Encoder ...

Page 63: ...ench to remove the upper encoder and left rear wheel 2 T handle Allen Wrench 4 mm 4 mm 2 5 mm T handle Allen Wrench 2 5 mm Lower Encoder black spring SMP 09 13427 Unplug the encoder from the green encoder port Wheel Hub Encoder Screw Remove the wheel from the old encoder Place the wheel onto the encoder screw for the new encoder with the wheel hub facing away from the encoder 3 ...

Page 64: ...oint up Then tighten the lock collar screw with the 2 5 mm Allen wrench Lock Collar Screw Encoder Wheel 4 5 6 To plug in the lower encoder take the free end of encoder cable shown in blue and pull it through the open slot in the bottom carriage behind the wheels Open Slot 1 Plug the lower encoder cable into the green encoder port on the left rear of the machine 7 8 Note Make sure the encoder is fu...

Page 65: ...e wheel screw Wheel Bearing Wheel Screw Allen Wrench 4 mm HDW 03 10126 Old Wheel Note If you are replacing a wheel with the machine channel lock or the upper encoder remove them along with the wheel using the 4 mm Allen wrench Note If you are replacing an inside wheel and have QuiltMotion installed on your machine you may need to remove the machine from the frame to access the inside wheel ...

Page 66: ...wheel with the machine channel lock or the upper encoder see your user manual for installation instructions 3 If you are replacing a wheel without the machine channel lock or upper encoder use the 4 mm Allen wrench and the wheel screw to install the new wheel 2 Wheel Screw New Wheel ...

Page 67: ...e old hand wheel and the connector bolt connecting the hand wheel to the machine Hand Wheel Old Hand Wheel Connector Bolt 2 Place the new hand wheel on the end of the main shaft on the back of the machine New Hand Wheel Main Shaft 3 Secure the hand wheel in place with the connector bolt and the 4 mm Allen wrench Connector Bolt T handle Allen Wrench 4 mm 4 mm SMP 05 10026 ...

Page 68: ...t head Screwdriver Removal Instructions To remove the needle plate from the quilting machine take the following steps 1 Power off the machine and raise the needle to the highest position using the hand wheel Needle Plate Needle Plate Screw x2 2 Use the flat head screwdriver to remove the two needle plate screws 1 2 3 ...

Page 69: ...eedle should slide into the center hole of the needle plate without contacting the plate Installation Instructions To install the needle plate onto the quilting machine take the following steps 1 Power off the machine Raise the needle to the highest position using the hand wheel Needle Plate 2 Align the screw holes on the needle plate with those on the machine 1 4 2 3 1 Reset the hopping foot heig...

Page 70: ...possible Please consult with a Grace Company support technician before attempting to adjust the timing on your machine Timing Spacer Tool 2 mm T handle Allen Wrench 2 mm 4 Look into the machine s timing cut out and turn the hand wheel The hook assembly will rotate 1 Turn off the machine 2 Check that your needle is not bent or damaged and that it is inserted all the way into the needle bar see page...

Page 71: ...ing the hand wheel the same direction The needle should begin to raise up 8 Stop raising the needle once the eye is about level with the hook shown in blue Do not continue to raise the needle If the needle goes too high start over at step 8 9 Slip the timing spacer tool shown in blue into the hook assembly with the flat side facing up Then turn the timing tool until the flat side faces down 9 Turn...

Page 72: ... close to the needle as possible without touching 1 Position the tip of the hook shown in blue with the center of the Needle Scarf shown in gray This is easier to see from the back of the machine 13 2 Use the 2 mm Allen wrench to tighten one of the three set screws through the timing cut out window on the left Set Screw 14 12 ...

Page 73: ...oes not bend or hit the hook 17 Replace and align the needle plate see page 59 Replace the bobbin case Test the machine and listen for any unusual noises If there are any skipped stitches the hook is too far away from the needle If the thread breaks the hook is too close to the needle 1 Turn the timing spacer tool until the flat side is facing up and then remove it from the machine 16 Set Screw x2...

Page 74: ...se call 800 264 0644 before attempting this procedure 1 Turn off the machine Parts Tools Needed Flat head Screwdriver T handle Allen Wrench 3 mm Hook Holder Screw 2 Rotate the hand wheel to raise the needle to the highest point Hook Holder 3 Press in on the hook assembly cover and down to open it 4 With the 3 mm Allen wrench remove the hook holder screw shown in gray that attaches the hook holder ...

Page 75: ...at head screwdriver see page 59 4 Remove the bobbin case from the hook assembly 5 Turn the inside part of the hook assembly shown in blue so that the positioning guide is at the highest point 6 Slide the finger of the hook holder into the middle of the hook assembly s positioning guide Attach loosely with the hook holder screw Do not tighten Hook Assembly Positioning Guide Hook Holder 1 4 2 3 5 6 ...

Page 76: ...der blue with the inside edge of the positioning guide gray as shown below Tighten the hook holder screw to fasten the hook holder in place The inside part of the hook assembly should no longer rotate freely by hand 8 9 Re install the needle plate See page 59 for instructions 10 ...

Page 77: ...o your email Desktop or Laptop Computer Note If you have already installed the DfuSe Demo app for a previous update you do not need to download it again Download the update and continue to step 10 to install the update through the app 2 Open the zip file and select the file named DfuSe_Demo_V3 0 6_Setup Then select Extract all DfuSe Demo App Zip File Update Mini USB cable ...

Page 78: ...elect the file named DfuSe_Demo_V3 0 6_Setup again Select Next 4 Select Next again You do not need to fill out User Name or Organization 5 Select Install 6 Select Finish 7 8 Plug a mini USB cable into your computer and then plug the other end into the USB connector port on the side of the display USB Connector Port ...

Page 79: ...the upgrade file you downloaded earlier 11 Check the box labeled Verify after download 12 Select Upgrade 13 Select Yes Note If the machine is not properly connected to your computer this section will be blank After the update is complete close the app on your computer and unplug the mini USB from the USB connector port in back of the machine USB Connector Port ...

Page 80: ... Demo app zip file that were sent to your email Desktop or Laptop Computer Note If you have already installed the DfuSe Demo app for a previous update you do not need to download it again Download the update and continue to step 10 to install the update through the app 2 Open the zip file and select the file named DfuSe_Demo_V3 0 6_Setup Then select Extract all DfuSe Demo App Zip File Update Mini ...

Page 81: ...ith the now opened zip file Select the file named DfuSe_Demo_V3 0 6_Setup again Select Next 4 Select Next again You do not need to fill out User Name or Organization 5 Select Install 6 Select Finish 7 Use the power switch on the back of the machine to turn the machine off 8 Power Switch ...

Page 82: ...onnector Port 9 10 Open the DfuSe Demo program Select Choose in the Upgrade or Verify Action section and then select the upgrade file you downloaded earlier 11 Check the box labeled Verify after download 12 Select Upgrade 13 Select Yes 14 Updating Machine Firmware continued Note If the machine is not properly connected to your computer this section will be blank Display Cable ...

Page 83: ... connector port in back of the machine 15 Plug in the display cable 16 Turn the machine on with the power switch The machine is now updated 17 Updating Machine Firmware continued After updating the machine firmware continue to the next page to calibrate the machine speed 18 USB Connector Port Power Switch Display Cable ...

Page 84: ...tion if you have recently updated your software and are having issues with your stitch regulation baste or your machine is running slow Take the following steps to access the testing menu and calibrate the machine speed 1 Open the settings menu and press the info button to access the System Info screen 2 1 If your machine hasn t been used for at least 10 min move your machine away from any fabric ...

Page 85: ... Calibration screen 3 1 After this screen is open press the start stop quilting button on the handlebars to start the calibration The machine will run for up to two minutes 4 5 1 The display will show the diagnostic results of the calibration 6 Calibrating the Machine Speed continued X XX XX XX X XX XX XX Tap here three times XXXX XXXX XXX XXX XX XX XXXX XXXX XXX XXX XX XX ...

Page 86: ...amaging your fabric You can address this issue by adjusting the window offset which changes the position of the needle stop Only do this if a Grace Company technician advises you to do so Take the following steps to access the testing menu and adjust the window offset 1 Open the settings menu and press the info button to access the System Info screen Info Button 1 1 Tap three times on the blank sp...

Page 87: ...the window offset 4 1 Select Calibration to open the Self Calibration screen XXXX XXXX XXX XXX XX XX 3 Up Down Buttons Needle Button XXXX XXXX XXX XXX XX XX 1 Test the machine by using the needle button and by stitching in baste mode to see if the thread is correctly released from the hook assembly without snagging Repeat step 4 as needed until the thread no longer snags on the hook assembly 5 ...

Page 88: ...e connected and correctly sending signals to your machine Take the following steps to test your encoders First make sure your encoders are installed correctly and are plugged into the correct ports Also make sure the tracks on your frame and bottom carriage are wiped down and clear of any debris 1 1 Open the settings menu and press the info button to access the System Info screen 2 Info Button ...

Page 89: ...enu 1 Select Encoder Test to open the Encoder Test screen 3 4 X XX XX XX X XX XX XX Tap here three times 1 Move your machine side to side on your frame The lower encoder should register movement along the frame s tracks also called the X axis of your frame If the encoder is correctly signaling this movement to your machine the X on your display will turn green 5 ...

Page 90: ... machine forward and backward on your bottom carriage The upper encoder should register movement along the carriage s tracks also called the Y axis of your frame If the encoder is correctly signaling this movement to your machine the Y on your display will turn green 6 ...

Page 91: ...est to make sure your handlebar buttons are functioning correctly 1 Open the settings menu and press the info button to access the System Info screen Info Button 1 1 Tap three times on the blank space underneath the back arrow on the System Info screen to open the testing menu X XX XX XX X XX XX XX Tap here three times 2 ...

Page 92: ...t continued 1 Select Button Test and the button test screen will appear 3 1 Press the buttons on your handlebars one at a time The corresponding buttons on the button test screen will turn green if the buttons are working correctly 4 ...

Page 93: ...ng at the correct speed Take the following steps to access the testing menu and perform a test to make sure this sensor is working properly 1 Open the settings menu and press the info button to access the System Info screen Info Button 1 1 Tap three times on the blank space underneath the back arrow on the System Info screen to open the testing menu X XX XX XX X XX XX XX Tap here three times 2 ...

Page 94: ...hine 4 The motion light should turn green as you turn the hand wheel The Needle Up and Needle Down lights should alternate so that the Needle Up light turns green when the needle is about halfway up to its highest position and the Needle Down light turns green when the needle is about halfway back down to its lowest position 5 Hand Wheel Needle Up Needle Down Motion ...

Page 95: ...her 33 Index L lamp vi 20 large bobbin case screw 43 large tensioner 32 layout v lint brush 1 lower encoder 51 M machine dimensions iv machine layout v machine specifications iv measure test 76 metered key 33 N needle 4 needle bar thread guide 38 40 needle diagram 5 needle groove 5 needle magnet 6 needle scarf 5 needle sensor test 82 needle size 4 O optical sensor 82 P parts of machine v ports vii...

Page 96: ...33 test encoders 76 testing menu 72 74 80 82 thread guides 37 thread mast 10 thread mast loops 38 thread stand 11 thread tensioner nut 33 thread tension spring 42 timing spacer 58 U update 65 68 upper encoder 49 USB connector port vii V voltage iv W wheel 53 wheel bearing 53 window offset 74 ...

Page 97: ...oducts to designated collection points where they will be accepted on a free of charge basis In some countries you may be able to return your products to your local retailer upon the purchase of a new product Disposing of this product correctly will help you save valuable resources and prevent any possible effects on human health and the environment which could otherwise arise from inappropriate w...

Page 98: ...The Grace Company Phone 1 800 264 0644 www graceframe com ...

Reviews: