68
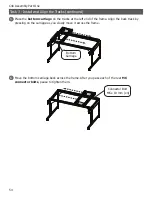
Adjust the height of the rail holder bracket
until there is a
finger width
of space
between the bottom of the take-up rail and
the machine.
4
Task 8 - Adjust the Rails (continued)
With the machine on the left side of the
frame, loosen the
plastic knob
on the left
rail holder bracket for the take-up rail.
3
Crib Assembly Part Three
Tighten the
plastic knob
to hold the rail in
place.
5
Move the machine to the right side of the
frame and repeat steps 3-5 for the right rear
rail holder bracket.
6
Roll the machine forward to the front of the
right side of the frame.
7
Plastic Knob
Finger Width
Plastic Knob
Plastic Knob
Summary of Contents for Q-Zone Queen
Page 1: ...Assembly Instructions Copyright December 3 2021 V2 0 Grace Company ...
Page 2: ......
Page 13: ...13 Queen Assembly ...
Page 44: ...44 Crib Assembly ...
Page 72: ...72 Repeat the process with machine on the right side of the frame 4 Crib Assembly Part Three ...
Page 84: ...The Grace Company Phone 1 800 264 0644 www graceframe com ...


