background image

Mounting

HG G-98780-A

Englisch, Revision 14, Date: 07.02.2017

11

2.3

Interface HG 06150ZA/XA (optional)

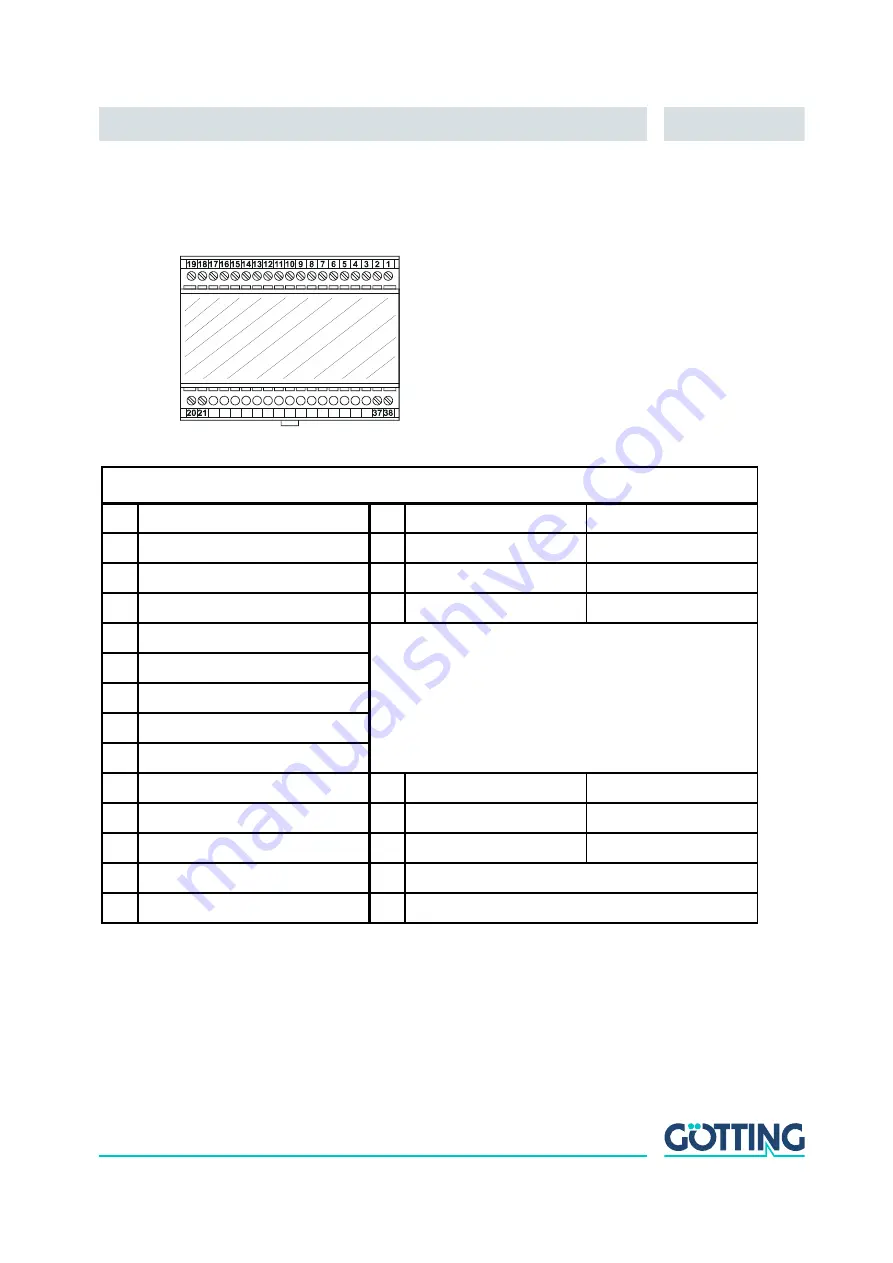
The optional interface has to be mounted in a climated enclosure on a mounting bar 
with the following connections:

Figure 5

Outline of the interface mounting bar case

Interface connection plan

1

Code Bit 1 (lowest Bit)

15

Code Bit 15

2

Code Bit 2

16

Code Bit 16 (highest Bit)

3

Code Bit 3

17

Data Ready

4

Code Bit 4

18

Data Valid

5

Code Bit 5

6

Code Bit 6

7

Code Bit 7

8

Code Bit 8

9

Code Bit 9

10

Code Bit 10

Version ZA

Version XA

11

Code Bit 11

20

Rx+ (RS 422 input)

RxD (RS232 Input)

12

Code Bit 12

21

Rx- (RS 422 input)

not connected

13

Code Bit 13

37

+24 V operating voltage

14

Code Bit 14

38

GND ground

Table 2

Interface connection plan

Summary of Contents for HG 06150XA

Page 1: ...ntenna 13 56 MHz one dimensional HG G 98780 A Englisch Revision 14 Developed by WW Date 07 02 2017 Author s RAD MN Götting KG Celler Str 5 D 31275 Lehrte Röddensen Germany Tel 49 0 51 36 80 96 0 Fax 49 0 51 36 80 96 80 eMail info goetting de Internet www goetting de ...

Page 2: ...us and RS232 RS422 15 4 2 2 1 Dimensions 15 4 2 2 2 Pin Allocations X1 X2 X3 16 4 2 3 HG 98780UA with Profibus RS422 and Cable Tails 17 4 2 3 1 Dimensions 17 4 2 3 2 Pin Allocations X1 X2 X3 18 4 2 4 Positioning Pulse 18 4 2 5 Switch on Characteristics 19 4 2 6 Interfaces 19 4 2 6 1 Serial RS 422 RS 232 19 4 2 6 1 1 List of system data to be output 19 4 2 6 1 2 List of commands 22 4 2 6 2 System M...

Page 3: ...Code 33 5 2 2 3 S erial Output 34 5 2 2 4 C A N Parameters 36 5 2 2 5 P r ofibus Parameters 37 5 2 2 6 CS V 38 5 2 2 7 B oot Load 38 5 3 Software Update Antenna Software 39 5 3 1 Installation of the Program for Software Update 39 5 3 2 Software Update 40 6 Maintenance 43 7 Troubleshooting 44 8 Technical Data 45 8 1 Antenna 45 8 2 Parallel converter optional 47 9 Appendix 48 A Effective Antenna Are...

Page 4: ...tion PLC antenna 57 H GSD File Antenna HG 98780XA YA with Profibus 57 10 Handbook Conventions 58 11 List of Figures 59 12 List of Tables 61 13 Index 62 14 Copyright and Terms of Liability 63 14 1 Copyright 63 14 2 Exclusion of Liability 63 14 3 Trade Marks and Company Names 63 ...

Page 5: ... a similarly structured output format in which additional system in formation can be configured by the user This information can for example be saved in a visualization system and enables statements about the condition and availability accessibility of the transponders and antennas This system description applies to de vices with the firmware 98780B2 version 1 06 and higher 1 1 Accessories The fol...

Page 6: ... 98780ZA As an option the serial signal can be converted into a 16 bit parallel output signal 24 Volts switched for the code within an external interface device This interface de vice is suited for mounting rail top hat rail installation and should be installed in a place protected from any environmental influences see section 4 3 on page 27 1 3 Positioning Pulse For the generation of the position...

Page 7: ...sitioning pulse was generated and then changes its direction of travel no renewed positioning pulse is generated during the center crossing Positioning Accuracy As the field compensation for the corresponding measuring coil is not infinitely sharp and is also depending on the reading height refer to Appendix Section A on page 48 the positioning pulse is generated at different but reproducible loca...

Page 8: ...hind the transponder has to be at least of the same range as the reading distance between transponder and an tenna The reception of the transponder signal will be largely unattenuated also refer to Table 26 on page 53 It is essential that the transponder does not dip into the meshs loops of steel reinforcement grids Single metal rods on the other hand hardly have any influence on the performance 2...

Page 9: ...xagon socket screws The length of the screws de pends on where the antenna is to be mounted Please make sure that in the direction of travel there is enough free space for the connections Depending on the variant up to 140 mm are needed the picture above shows the ZA WA variants Figure 4 Position of the mounting holes Moving directions 4 Screws not in the scope of supply Mounting side Reading side...

Page 10: ...consumption of the output stage would increase considerably Perfect transponder readings are only guaranteed if the transponders are placed within max 4 cm tolerance from the center line of the antenna Outside these limits the transponder readings become less reliable due to decreasing signal levels NOTE Whenever the antenna is operated at temperatures below 0o C it is necessary to use the integra...

Page 11: ...e Interface connection plan 1 Code Bit 1 lowest Bit 15 Code Bit 15 2 Code Bit 2 16 Code Bit 16 highest Bit 3 Code Bit 3 17 Data Ready 4 Code Bit 4 18 Data Valid 5 Code Bit 5 6 Code Bit 6 7 Code Bit 7 8 Code Bit 8 9 Code Bit 9 10 Code Bit 10 Version ZA Version XA 11 Code Bit 11 20 Rx RS 422 input RxD RS232 Input 12 Code Bit 12 21 Rx RS 422 input not connected 13 Code Bit 13 37 24 V operating voltag...

Page 12: ...as to be continuously counted up to 65535 When moving the transponder in driving direction over the center axis of the antenna a positioning pulse should be generated 2 For setting the decoding thresholds refer to section 5 2 2 2 T ime Code on page 33 it is useful to record a complete test run along the transponder track Antennas HG 98780ZA and HG 98780WA offer for this function the use of the ser...

Page 13: ...nmental conditions have no effect on the system Oil tar earth dirt etc Massive metal structures on one side of the Transponder or antenna e g rails Refer to section E on page 55 in the appendix 4 2 Positioning Antenna on the Vehicle Crane 4 2 1 HG 98780ZA WA with CAN Bus and RS422 RS232 inter faces Figure 6 Positioning antenna HG 98780ZA WA The antenna and the interpreter electronics are housed in...

Page 14: ... allocation of contacts is as follows Contact Description HG 98780ZA HG 98780WA 1 24 V antenna 2 GND antenna 3 24 V heating 4 GND heating 5 RX RS 422 Rx RS232 6 RX RS 422 n c 7 TX RS 422 Tx RS232 8 TX RS 422 n c 9 Posi Pulse see section 4 2 4 on page 18 10 Posi Pulse see section 4 2 4 on page 18 11 CAN 12 CAN PE signal ground Table 3 Variant ZA WA Connection plan of the 12 pin antenna socket CAN b...

Page 15: ...suitable line termination resistance is included in the scope of supply Inside the casing are the completely sealed antenna electronics and the heater For connecting the antenna the sockets X1 and X2 Profibus or the connecter X3 Posi Puls RS232 power supply are being used The integrated LED is lit for the Profibus status Data exchange For each antenna of this variant a connection set HW CONSET0000...

Page 16: ...antenna 8 GND antenna 9 shield 10 n c 11 n c 12 RTS housing shield Table 4 Variant XA YA Pin allocation of the 12 pin Profibus connectors X1 X2 Contact Allocation HG 98780YA HG 98780XA 1 24 V DC antenna 2 GND antenna 3 24 V DC 2 A heater 4 GND heater 5 Rx RS232 RX RS 422 6 n c RX RS 422 7 Tx RS232 TX RS 422 8 n c TX RS 422 9 Posi Pulse see section 4 2 4 on page 18 10 Posi Pulse see section 4 2 4 o...

Page 17: ...sistor Antenna and interpreting electronics are housed in a 360 x 160 x 91 mm casing The reading side of the antenna is the top of the casing with the casing cover Up to three connections X1 X2 Profibus and X3 power serial are facing in the direction of travel If a terminating resistor is included connection X2 is replaced with a dummy plug Inside the casing are the completely sealed antenna elect...

Page 18: ...internally connected to 24 V or GND as a strict voltaic separation is essential for some of the systems For safety rea sons a 20 mA current limitation has been implemented in the antenna for these out puts In case a 24 V output is required contact No 9 may be connected to 24 V and contact No 10 may be connected to GND via a 1 KOhm resistor Color Allocation Shield Signal Ground Green Line A Red Lin...

Page 19: ...al commands are used for activating a system monitor The crossing of the anten na s center axis in direction of travel is shown by the digital positioning output Its transmission time is adjustable in blocks of milliseconds In addition it may be re duced to one impulse per crossing 4 2 6 1 1 List of system data to be output A telegram consists of max 15 bytes The minimum update rate at 9600 Baud i...

Page 20: ...Type Description 1 1 Byte 0x01 Unsigned char Start character ASCII 061 2 3 4 5 4 Byte 0x02 Unsigned long 32 Bit of the Transponder code 6 7 2 Byte 0x04 Unsigned int Voltage induced by the Transponder within the frame antenna in Samples 8 1 Byte 0x08 Unsigned char Supply voltage for the antenna x 100 mV 9 1 Byte 0x10 Unsigned char Power consumption x 10 mA 10 1 Byte 0x20 Signed char Temperature wit...

Page 21: ...checking whether transmission of the corresponding switch off command has been forgotten in this case it is no longer possible to read runway transponders correctly Priority Name Description 0x0001 HW_ERROR Hardware error 0x0002 CODE_CRC_ERR Reception of transponder code with CRC error 0x0004 0x0008 0x0010 0x0020 PARAM_CRC_ER Parameter block no longer save 0x0040 0x0080 F_ERROR Transmission oscill...

Page 22: ... 4E164916 ASCII MO NI trans parent HEX 3D16 4D164F16 4E164916 3816 ASCII MO NI 8 2 Switch off refer ence transponder 3964R HEX 52165416 30163016 ASCII RT 00 trans parent HEX 3D16 52165416 30163016 3B16 ASCII RT 00 3 Switch on refer ence transponder 3964R HEX 52165416 31163116 ASCII RT 11 trans parent HEX 3D16 52165416 31163116 3B16 ASCII RT 11 4 Supply of the 16 programmable lower bits of the tran...

Page 23: ...avel x direction Its duration is adjustable within a millisecond pattern 4 2 6 4 CAN Bus 4 2 6 4 1 Description Either Basic or Full CAN mode are configurable The system monitor is used for set ting the CAN parameters also refer to section 5 2 2 4 on page 36 The internal CAN module is based on the CAN specifications V2 0 part B It is possible to transmit either standard or extended frames adjustabl...

Page 24: ...gth of 5 bytes The reference transponder may be de activated via byte 5 The programming of a transponder is initiated by setting byte 5 to the value 02 This byte should be reset after 8 to 100 ms The programming of a transponder takes 100 to max 200 ms Afterwards the new code is read and may be checked via Message Object 1 In case the programming wasn t successful repeat the procedure Byte Length ...

Page 25: ...N 02 Program Transponder Table 14 Structure of the CAN Message Object 4 Number Input Bytes Byte Length Type ByteSequence Description 6 1 2 Byte Unsigned int HiByte LoByte System status in binary coding 2 LoByte HiByte 3 4 byte Unsigned long HiByte LoByte Transponder code 4 5 6 LoByte HiByte 7 7 1 Byte Unsigned char Supply voltage connected to the antenna x 100 mV 8 8 1 Byte Unsigned char Current c...

Page 26: ...be transferred subsequently the same transponder code wit PROG 2 Thus the released programming process lasts approx 100 ms Afterwards the new code will be read directly and is available for the input bytes 4 2 7 Software download If necessary the antennas may be updated via the serial interface Please refer to chapter 5 3 Software Update Antenna Software on page 39 Number Input Bytes Byte Length T...

Page 27: ...utput The code then contacts the outlets until the next code is received In addition 10 ms after the code bits are applied a data ready pulse of 100 ms is generated as the antenna pass es over a transponder i e the same transponder generates a new data ready pulse as it enters the field again e g when switching tracks The validity of the voltage i e if a transponder is actually within reception ra...

Page 28: ...art of the scope of supply of Microsoft Windows We usually use this program because many of our customers are already familiar with it and due to the configuration files supplied by us it is very easy to use Nevertheless any other terminal program that is capable of VT52 emulation may be used If you should use a different program please read its manual and adjust it to the values described in sect...

Page 29: ...fferent ly refer to section 5 2 2 3 on page 34 5 2 1 1 Procedure Monitor only If the antenna is set to the procedure Monitor only the monitor mode is started 10 s after switch on In this case not files have to be transmitted and section 5 2 1 2 may be ignored 5 2 1 2 Procedures 3964R transparent The command to switch to monitor mode should be entered directly via a PC To do so start your terminal ...

Page 30: ...otation the following characters 0x3D 0x4F 0x4D 0x49 0x4E 0x38 Transferring a file with HyperTerminal is done as follows 1 Choose Send Text File from the menu Transfer The following window will opened up partly German version 2 Switch to disk drive in our example the files are located on the hard disk and select the respective txt file 3 Click open The file will be transferred and if the correct f...

Page 31: ...onder crossing This value is pre served until another transponder is detected It is also deleted through Noise U mV Supply voltage of the processor circuit board measured exactly to 100 mV Due to various protective measures it is always slightly lower than the applied supply voltage I mA Current consumed by the positioning unit measured to 10 mA accurately T Grd C Approximate temperature inside th...

Page 32: ... ofibus Parameters section 5 2 2 5 on page 37 CS section 5 2 2 6 on page 38 oot Load section 5 2 2 7 on page 38 uit Monitor With the monitor program is left whenever the serial proce dures 3964R or transparent are active In procedure Monitor only it is impossible to leave the monitor program E System status expression in hexadecimal notation The single bits are explained in Table 9 Possible system...

Page 33: ...ng outputs With the voltage threshold S for the start of the code decoding is set in order to pre vent decoding tries during a weak signal period With it is possible to switch on the reference transponder for testing The duration of the positioning pulses can be set in a millisecond pattern by pressing S 0544 X 0000 Code 00000000 Read 0 U mV 24000 I mA 150 T Grd C 28 E 0200 N 0 Ftx Hz 105970 Prog_...

Page 34: ...whether the highest byte is to be output first or last When connecting this equipment with a Siemens PLC this parameter has to be 0 High Byte first influences the composition of the output telegram Based on the values given in Table 8 Data words in a telegram of 15 14 byte length on page 20 you can define the desired elements of your telegram by hexadecimal addition The sequence of the parameters ...

Page 35: ...procedure refer to appendix sec tion G Procedure transparent on page 57 either activates the permanent output according to the Clock for Sampling set in Time Code 1 refer to 5 2 2 2 on page 33 or generates the output solely when a transponder is decoded within the reading range of the antenna 0 With the repetition rate of the serial output is set S 0547 X 0000 Code 00000000 Read 0 U mV 24200 I mA ...

Page 36: ...ers to Message Object 2 Table 12 on page 24 accordingly refers to Message Ob jects 3 Table 13 on page 24 Entering 0 deactivates the corresponding Message Ob ject enables alteration of the so called Bit Timing Register for different baud rates and sample points It is possible to directly fill it with a 4 digit HEX value in the range between 0 to 7fff according to the Siemens Processor Manual S 23 1...

Page 37: ...ained in above mentioned Processor Manual on page 23 7 5 2 2 5 P r ofibus Parameters This menu enables setting the Profibus parameters ATTENTION In case the Profibus is not connected and if the antenna in ques tion is a version HG 98780ZA WA in contrast to versions YA XA the Profibus must be deactivated If the Profibus is not deacti vated transmission errors will lead to an antenna reset Figure 18...

Page 38: ...ert an appropriate file name should bear the file ending csv in or der to ensure that the spreadsheet calculation program will automatically recognize this file Once the file is recorded stored and closed under HyperTerminal it may be uploaded into a spreadsheet calculation program e g Microsoft Excel Sun StarCalc When opening the file various options will be prompted by the spreadsheet calculatio...

Page 39: ...a download is to be carried out In case a download is not generated the unit will return to the normal operating program Data received during this period of 10 seconds are examined for their validity NOTE Only the update program described below may be used for the software update 5 3 1 Installation of the Program for Software Update The program for the antenna software update is a 32 bit applicati...

Page 40: ... Update While the software update is carried out no other programs may occupy the used se rial interface COM Port Thus terminate any such connections in your Terminal pro gram e g Hyperterm Connect the antenna with your PC For antenna variants with RS422 interface HG 98780ZA XA it is essential to use an appropriate interface converter not includ ed in the antenna scope of supply refer to the note ...

Page 41: ...enna and then click Program within a period of 10 seconds afterwards A device reset follows and after a short pe riod of time the file is being transmitted 2 Selection of the serial interface 1 Selection of the Hex file to be 5 Status messages 4 Start the programming procedure 6 Exit the program transmitted 3 This option must always be activated and baud rate ...

Page 42: ...completed the program can be closed close From now on the interpreter uses the new program Should an error occur during the transmission red coloured status messages are output As long as green coloured messages are out put the software update is cor rect The last 2 messages of a normal update procedure are Program Flash Ok and CloseCom Ok ...

Page 43: ...ews cables and plugs are cor rectly fastened cleaning the ventilation openings if necessary Document regularly the power consumption and power supply of each antenna These values can be obtained from any menu in the monitor program If necessary update of the system software as described above section 5 3 on page 39 Date and version of the current antenna software can be obtained from the main menu...

Page 44: ...sent 1 RS 422 T R exchanged with RS 422 T R by mistake 2 Signal ground not connected a too high potential difference between antenna and receiver 3 Incorrect setting of transfer parameters 4 Incorrect transfer procedure selected 1 Check the connections 2 Connect signal ground 3 Select only 9600 or 19200 baud 8 bit even parity 4 Select the correct procedure etc with the PC and the system monitor In...

Page 45: ...itch on as soon as the tem peratures are below 5 o C Mechanical stability 5 g 11 ms 2 g 10 to 55 Hz Weight Approx 6 kg Installation regulations refer to Figure 3 on page 9 Protection IP 67 Connectors HG G 98780ZA WA 12 pin M3 screw in plug HG G 98780YA XA 3 12 pin M23 built in sockets HG G 98780UA Up to 3 cable tails 4 m With Transponder HG 70661 Reading distance distance transponder underside rea...

Page 46: ...5 kBd 500 kBd 1 5 MBd 3 MBd 6 MBd 12 MBd LED for Profibus status data exchange Output positioning pulse 20 mA current source potentially separated Electromagnetic Compatibility EMC of Antenna HG 98780 A Checking of Test Standards Interference transmission Radiated interference EN 55 022 Class A Interference immunity Casing Electromagnetical HF field amplitude modulated EN 61000 4 3 Static electric...

Page 47: ...g 28 pin mounting bar 75 x 75 x 47 5 mm L x W x H Supply 24 V 10 approx 50 mA Operating temperature 0 to 50o C Mechanical stability 5 g 11 ms 2g 10 to 55 Hz Protection IP 55 Connector screw terminal Data input RS 422 ZA RS232 XA Data output 16 2 24 V 20 mA not potentially separated Table 25 Technical Data Parallel converter HG 06150ZA XA optional ...

Page 48: ...side for different reading distances The scaling of this voltage corresponds to the sum voltage S output by the antenna refer to Table 20 on page 31 As long as this voltage is 200 transponder codes are correctly received Figure 21 Diagram 1 Reception voltage S within the antenna area at a reading dis tance of 40 mm Figure 22 Diagram 2 Reception voltage S within the antenna area at reading distance...

Page 49: ...A Englisch Revision 14 Date 07 02 2017 49 Figure 23 Diagram 3 Reception voltage S within the antenna area at reading distance 80 mm Figure 24 Diagram 4 Reception voltage S within the antenna area at reading distance 100 mm ...

Page 50: ...il voltage within the antenna area for different reading distances The voltage scaling corresponds the an tenna voltage X refer to Table 20 on page 31 Figure 25 Diagram 5 Reception voltage X within the antenna area at reading distance 40 mm Figure 26 Diagram 6 Reception voltage X within the antenna area at reading distance 100 mm ...

Page 51: ...s within the antenna area at different reading distances and approach from left and right Figure 27 Diagram 1 Location of the generation of the Posipulse at reading distance 40 mm Figure 28 Diagram 2 Location of the generation of the Posipulse at reading distance 60 mm Figure 29 Diagram 3 Location of the generation of the Posipulse at reading distance 80 mm ...

Page 52: ...gure 30 Diagram 4 Location of the generation of the Posipulse at reading distance 100 mm Figure 31 Diagram 5 Location of the generation of the Posipulse on the center axis at different reading distances Location of Positioning Pulse Height mm Direction of Travel mm ...

Page 53: ...aused by Metal Figure 32 Attenuation of the reception level caused by metal Height h cm Signal 0 34 1 56 2 70 3 78 4 83 5 88 6 94 7 93 8 96 9 97 10 99 100 Table 26 Dependency of the signal strength on the distance between transponder and metal Metal Sheet Antenna Transponder HG 70661 Reading Distance ...

Page 54: ...emulating natural seawater For comparison seawater has a conductivity of about 42 to 55 mS cm Through evaporation a salt crust can form on the transponder top which then leads to punctual higher conductivity Figure 33 Attenuation of the sum voltage as a function of the conductivity of the water 30 mm water level Figure 34 Attenuation of the sum voltage as a function of the conductivity of the wate...

Page 55: ...as lower priority Data transfer is set to 1 start bit 8 data bit even parity 1 stop bit baud rate 9600 baud default or 19200 baud F 1 Data direction antenna PLC In this direction the antenna data is transmitted cyclically A set of data always starts with an character hex 0x3d The cycle time is parameterizeable and should be an integer part or a multiple thereof of the transponder code s transmissi...

Page 56: ...e 3964R Antenna PLC F 2 Data direction PLC Antenna In this direction commands are transmitted only when required e g when the refer ence transponder is activated To overcome the frequent cyclical data output of the antenna the 3964R of the antenna has a lower priority see Figure 36 Figure 37 Status diagram procedure 3964R PLC Antenna Figure 37 ...

Page 57: ...wed by the accord ingly selected parameters from the menu The telegram is terminated with an 8 bit check character incl start character This check character is the result of ex oring all characters The characters are transmitted without delay G 2 Data direction PLC antenna Commands are transmitted in this direction upon request Each command has to start with an character hex 0x3d The format of the...

Page 58: ...dition each documents includes a list of contents showing the page numbers following the front If a document exceeds 10 pages it also has a drawings list and a list of tables on the last few pages If required in case a doc ument is correspondingly long and complex a index is added in the back Each document shows a small table including meta information such as devel oper author revision and date o...

Page 59: ...nu S erial Output 34 Figure 16 Output D isplay Telegram Content 35 Figure 17 Menu C A N Parameter 36 Figure 18 Menu P r ofibus Parameters 37 Figure 19 Update program Operating Elements 41 Figure 20 Update program programing procedure 42 Figure 21 Diagram 1 Reception voltage S within the antenna area at a reading distance of 40 mm 48 Figure 22 Diagram 2 Reception voltage S within the antenna area a...

Page 60: ...reading distances 52 Figure 32 Attenuation of the reception level caused by metal 53 Figure 33 Attenuation of the sum voltage as a function of the conductivity of the water 30 mm water level 54 Figure 34 Attenuation of the sum voltage as a function of the conductivity of the water 75 mm water level 54 Figure 35 Recommended distances to massive metal structures 55 Figure 36 Status diagram procedure...

Page 61: ...ystem status messages 21 Table 10 List of System Commands 22 Table 11 Structure of the CAN Message Object 1 23 Table 12 Structure of the CAN Message Object 2 24 Table 13 Structure of the CAN Message Object 3 24 Table 14 Structure of the CAN Message Object 4 25 Table 15 Profibus Input Bytes 25 Table 16 Profibus Output Bytes 26 Table 17 Significance of the instruction bit 26 Table 18 Output format w...

Page 62: ..._I13933 5 I Installation 12 Interface 27 Mounting 11 Technical data 47 interfaces CAN 23 positioning pulse 23 Profibus 25 L LED 15 17 line terminating resistor 15 M Maintenance 43 Monitor program 29 Parameter presettings 28 Working with 30 O output format 5 P Positioning antenna 13 Positioning Pulse 23 Procedure transparent 57 Procedure 3964R 55 Profibus 25 S Software 28 Software update 39 Softwar...

Page 63: ... are used according to the description This instruction manual has been drawn up to the best of our knowledge Installation setup and operation of the device will be on the customer s own risk Liability for con sequential defects is excluded We reserve the right for changes encouraging techni cal improvements We also reserve the right to change the contents of this manual without having to give not...

Reviews: